FinOps v7.0- Post Deployment Process
An Installation Engineer is required to perform a few steps after SmartOps deployment is completed. The steps related to core-platform are:
Contents
- Generate Offline Token
- Hostnames (Updates) for configurations related to internal service invocation
- Update Workflow shared Variables and reload cache
- Clear Keycloak Cache
- PWF/Product/Component Association and De-association with Organization
- Creating Organizations and adding Users
- Create realm for a new organization
- Defining Web Redirect URI for the Organisation
- Keycloak Mapper Configuration
- Add Users and Assign Roles
- Importing Skills
Generate Offline Token
To generate an offline token for an organization, login to Master Organization and follow the steps below:
-
Click on Manage Tokens corresponding to the organization as shown in FigureFigure.
_files/image1.png)
This displays the token window as shown below
_files/image2.png)
-
Click on the
_files/image3.png) icon to copy the offline token.
icon to copy the offline token.
Note: Ensure that you generate offline token for Ustglobal Organization.
Also ensure to inform the Deployment team about the new offline token, so that it can be updated in the key vault secret and containers will be restarted.
Hostnames (Updates) for configurations related to internal service invocation
In Kubernetes environment, the internal service names have changed when compared to Swarm environment. So, for internal service communications, all the hostnames of the services are now prefixed based on the domain. That is, based on the domain and region, the hostname will differ. This is applicable for areas where service URLS are configurable.
Example Scenarios:
-
Clones Engine can now be accessed in SmartOps DI Platform internally as "http://smartops-dev-clones-engine:9090" (earlier this used to be http://clones-engine:9090). In QA, the prefix will change to smartops-qa. In PaaS ITOps DI, this will become http://itops-dev-clones-engine:9090 and so on.
-
If you need to call any other service through micro action, you can follow this pattern.
-
Another example is the case with elastic search Sense Channel where elastic search URL is configurable through UI. In such cases, Elastic Search URL becomes http://smartops-dev-elasticsearch:9200 for Platform DI environment.
Note: Only the name of the service has been changed as part of Kubernetes implementation, and no further changes in service side. Users can get the full list of applicable service names from Dev-Enablement team.
Update Workflow shared Variables and reload cache
Workflow shared variables are certain variables which can be used in workflows. The default variables are saved in DB. Based on the installed environment, it is required to edit certain variables.
An installation engineer should ensure that the following variables are changed based on the environment. An API is currently available and can be used to edit the variables. After editing the variables, invoke another API to reload the cache. The details are given below:
API to edit variables:
|
|
Note:
-
In Kubernetes based deployment, the variable value changes according to the domain name. So choose the correct domain names accordingly (the correct domain name for each installation can be checked with Dev Enablement team). The following table is an example for K8 SmartOps Dev environment for an Organization with ID, 1:
|
Variable ID |
Org ID |
Variable Name |
Variable Value |
|
1 |
1 |
clones.engine.host |
http://<host-name>:<Port> http://smartops-dev-clones-engine:9090 |
|
10 |
1 |
clones.dialog.host |
http://<host-name>:<Port> http://smartops-dev-clones-dialog:8082 |
|
16 |
1 |
nlp.ice.url |
http://<host-name>:<Port>/api/parse/predict http://smartops-dev-ice-xd-rest:8021/api/parse/predict |
|
21 |
1 |
clones.queue.host |
<rabbitmq-host> Example: smartops-dev-rabbitmq |
-
As another example, In the ITOPs DI environment the variable value for clones.engine.host is: -clones.engine.host -http://itops-dev-clones-engine:9090
-
To link XD project, ensure that you update the service ID of XD project, the details are:
|
Variable ID |
Org ID |
Variable Name |
|
17 |
1 |
nlp.ice.subscriptionId |
-
Similarly, if there are any other workflow shared variable that needs to be edited based on any change in client implementation, it can be done.
-
If for an Organization ID, you are not sure about the Variable ID to be used, you can invoke the fetch API to fetch all the details of shared variables of an organization.
API to fetch all variables:
|
Method: GETURL: https://<hostname>/designer/api/clones/dashboard/orgnworkflows/fetchSharedVariable Headers: offline-token or Authorization, Organization-key |
API to reload cache:
|
Method: POST URL: https://<hostname>/clonesengine/api/clones/engine/core/executions/reloadWorkflowSharedVariables Headers : offline-token or Authorization, Organization-key |
Clear Keycloak Cache
This step needs to be done only if clones-upgrade container was run for the deployment. To clear the Keycloak cache, follow the steps mentioned below:
-
Login to Keycloak Master Admin console.
-
Select any of the Realms and in Realm Settings and go to Cache tab.
-
Click on all the three Clear buttons (Realm Cache, User Cache and Keys Cache) to clear cache in all realms.
_files/image4.png)
Note:
-
This process is required only if the clones-upgrade program was run as part of deployment.
-
In case the person who is doing the post-deployment steps are not aware of the deployment procedures completed, this can be executed.
PWF/Product/Component Association and De-association with Organization
For each environment, the de-association/association of PWFs, products, components in respective environments/instances (namely, core platform, ITOps, Invoice PWF) can be done. This will include the de-association of monitoring/support PWFs after data migration, as well as the association of new ITOps PWF and these steps are done via API.
Postman Collection contains sample request/response samples for the various APIs for association and de-association. It is on need basis that these need to get executed. For actual usage, these should be replaced with appropriate values for host, headers and request body. PFB the details of each of these APIs:
Postman collection available at: (https://ustglobal.sharepoint.com/:u:/r/teams/InnovationEngineering/Shared%20Documents/Knowledge%20Management/SmartOps%20Deployment/7.0.0/7.0_CorePlatform_PostmanCollection.zip?csf=1&web=1&e=UuTsda)
-
Invoke the SmartOps Login API for the applicable Organization.
URL: POST https://<host_name>/pwf/api/smartops/login
Body: {"realm":"<orgname>","userName":"<user_name>","password":"<password>"}
-
Invoke the Get all PWFS, Products and Components (stacks) API with the following parameters to fetch all available PWFS, products and components:
URL: GET https://<host_name>/pwf/api/smartops/pwf/fetch-smartops-capabilities
Headers:
-
Organization-name–Unique identifier for the organization.
-
Authorization –Access token generated after invoking SmartOps login API (offline token can also be used)
-
user –User Id
Note: This API response provides the details of the PWFs, products and components available and it is based on these values the input for the rest of the APIs given below can be derived. -
-
Invoke the Add Product and PWF association API to add or associate applicable PWFs and Products in the required Organization.
-
Component Type: PWF
-
Component ID for Finops: 4
URL: PUT https://<host_name>/pwf/api/smartops/pwf/create-pwf-or-product-association
Headers:
-
Organization-name –Unique identifier for the organisation.
-
Authorization –Access token generated after invoking SmartOps login API (offline token can also be used)
-
user –User Id
Body: {"componentId": <component_id>,"componentType":"<component_type>"}
-
Component ID –Unique identifier of the package workflow or product (copied from previous step)
-
Component Type –pwf / product
-
-
-
Associate/De-Associate components/stack to a Product or a PWF
The details are as follows:-
API details to Associate Stacks with PWF/Product:
URL: PUT
https://<hostname>/pwf/api/smartops/pwf/add-component-associationHeaders: offline-token or Authorization, user and Organization-key
Body: {"componentId":<component_id>,"componentType":"<component_type>","stacks":[<list_of_stacks>]} -
API details to De-associate Stacks from PWF/Product:
URL:DELETE https://<hostname>/pwf/api/smartops/pwf/remove-component-association
Headers: offline-token or Authorization, user and Organization-key
Body: {"componentId":<component_id>,"componentType":"<component_type>","stacks":[<list_of_stacks>]}
-
Note:
-
The stacks should be list of applicable components which needs to be associated for the product/pwf.
-
The values of the componentId and the stack can be obtained from the API which fetches all PWFs, Products and Components (api/smartops/pwf/fetch-smartops-capabilities)
Creating Organizations and adding Users
-
Organizations are the enterprise users for whom the SmartOps capabilities are offered.
-
A Master Administrator has the privilege to manage organizations for SmartOps.
-
Creating an Organization consists of the following sections
-
Create realm for a new organization
-
Defining Web Redirect URI for the Organization
-
Create realm for a new organization
To create a new organization in SmartOps, follow the steps mentioned below:
-
Access the Master User Interface. The Master UI login page is displayed as shown in FigureFigure.
_files/image6.png)
-
Enter the user credentials (Master Admin) in the Username and Password field.
-
Click Sign in. SmartOps Master UI home page is displayed as shown in FigureFigure.
_files/image7.png)
-
Click Organizations tab. By default, Organization is displayed.
-
Click on the
_files/image8.png) icon near Organizations. The window for creating a new organization is displayed as shown in FigureFigure.
icon near Organizations. The window for creating a new organization is displayed as shown in FigureFigure._files/image9.png)
-
Enter the name of the organization in the Organization Name field.
-
Click Add. The SmartOps Master UI home page is refreshed with the new organization as shown in FigureFigure.
_files/image10.png)
Defining Web Redirect URI for the Organisation
To define the web redirect URI for the new organization, follow the steps mentioned below:
-
Click on Edit Organisation corresponding to the organisation in FigureFigure.
_files/image11.png)
This will open the Keycloak Administration UI where you can create an Organization Administrator user and do other configurations. -
Click on Clients tab from the menu options available on the left-hand side of the screen and select smartops-frontend from the Clients as shown in FigureFigure.
_files/image12.png)
-
Enter the URI in Valid Redirect URIs and Web Origins field as shown in FigureFigure.
_files/image13.png)
-
Click Save. The success message is displayed as shown in FigureFigure.
_files/image14.png)
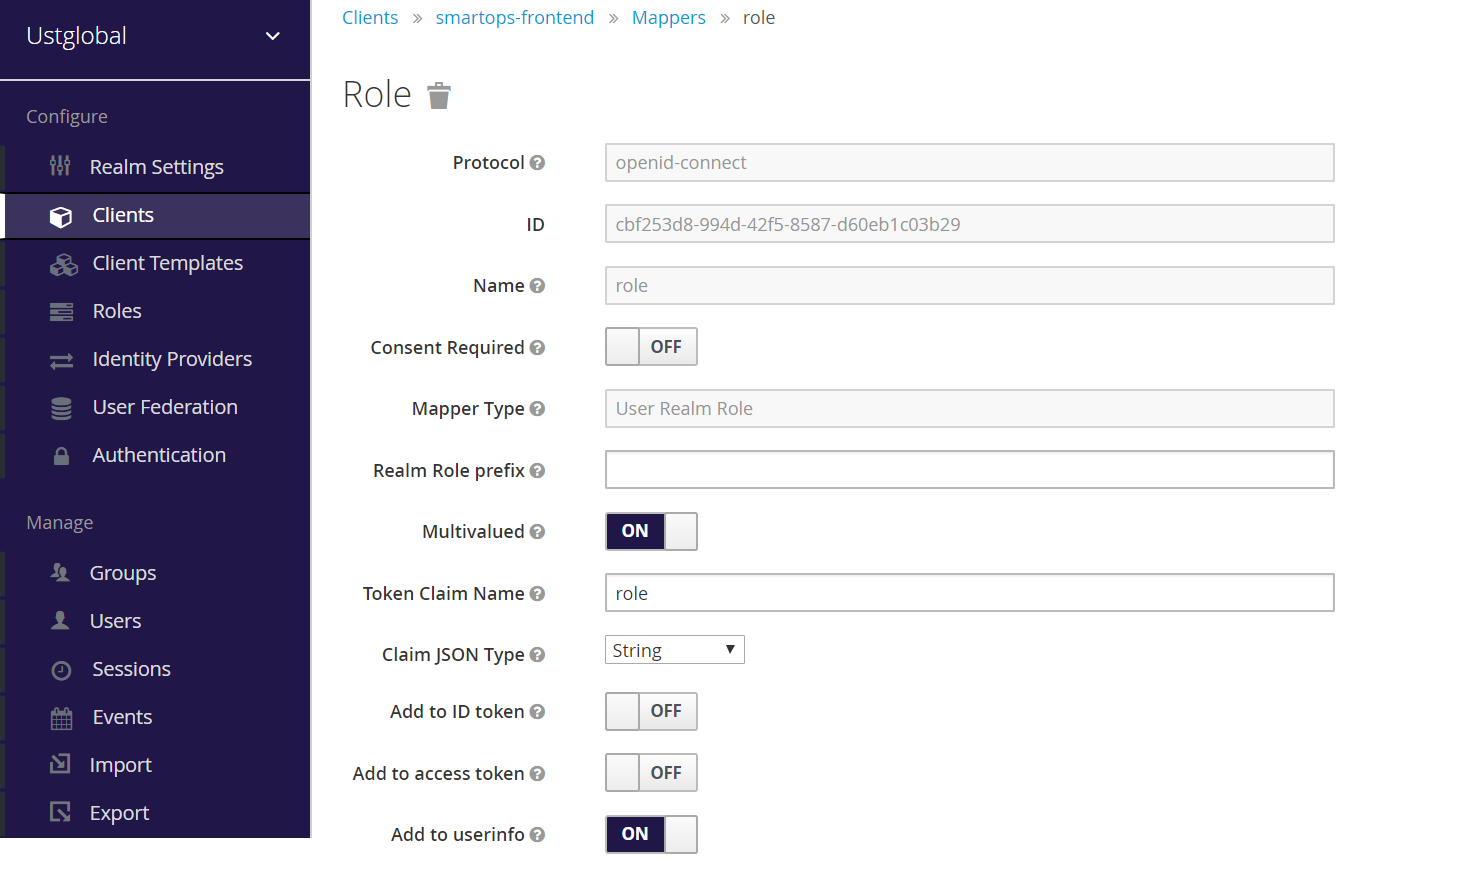
Keycloak Mapper Configuration
Perform Keycloak Mapper configuration to enable role based access.
-
Login to Keycloak admin console
-
Select the realm and click on ‘Clients’ from the left navigation pane
-
Add a new protocol mapper to the client "Smartops-frontend"
-
Set the Mapper Type to User Realm Role
-
Set Token Claim Name as role
-
Set Claim JSON Type as String
-
Enable Add to userinfo & Save
Note: Remove default password from "Realm Role Prefix" if appears.
Add Users and Assign Roles
Master Administrator can add users such as Admin, Installation Engineer, and Skills Designer through Master UI. The Roles and Permissions corresponding to each Package Workflow is detailed in the section Appendix: PWF Roles and Permissions To add users and assign corresponding roles, follow the steps mentioned below:
-
Click on Edit Organisation corresponding to the organisation as shown in FigureFigure.
_files/image15.png)
This will open the Keycloak Administration UI where you can create an Organization Administrator user and do other configurations. -
Click on Users tab from the menu options available on the left-hand side of the screen and click Add User as shown in FigureFigure.
_files/image16.png)
The Add User screen is displayed as shown below.
_files/image17.png)
-
Enter the username in the User Name field. You may also enter all other optional fields. Click Save.
-
Select the user from the list. You may search from the Search field.
-
Navigate to Role Mappings tab and add the required roles from the Available Roles block.
-
To add a role, select the required role from the Available Roles block and click on Add selected icon as shown in FigureFigure.
_files/image18.png)
You may assign roles as per requirement of the Package Workflow required as shown below. For example: Admin, Installation Engineer and Skills Designer Roles.
_files/image19.png)
-
You may also assign password for the user. To assign password:
-
Access Manage Password window through Credentials tab as shown in FigureFigure.
_files/image20.png)
-
Enter the password in Password field.
-
Confirm the password in Password Confirmation field.
-
Mark the password as temporary or not in the Temporary field.
-
Click Reset Password. The password reset successfully message is displayed.
Importing Skills
To import skills, perform the following steps:
-
Access Creator's Studio from SmartOps home page. Dashboard tab of Creator's Studio is displayed by default.
-
Click Skill Migration tab. This displays the Skill Migration page as shown in FigureFigure.
Import Files tab within Skill Migration page is enabled by default.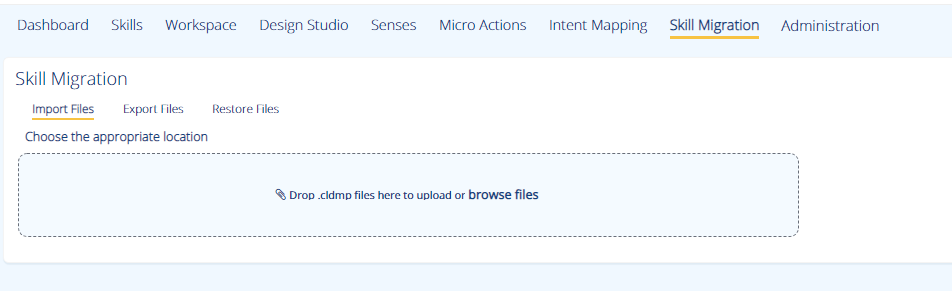
-
You may drag and drop the skill file or click browse files to select the file from a path. Click Upload.