Platform v6.4.3- Deployment Process (Docker Swarm)
Purpose of this document is to provide guideline for deploying SmartOps Platform in a docker swarm environment for azure. The document contains prerequisites for installation and detailed instructions to deploy SmartOps along with FAQs and post deployment validation steps.
Contents
- Setup Docker Swarm Cluster
- Deployment Timings
- Preparation Activities
- Setup Resource Group and Networks
- Creating Docker Swarm Node VMs
- Instructions for Proxy Enabled and Client Environments
- Initialize Swarm Cluster
- Label Swarm Cluster Nodes – (Automated steps- For information of Installation engineers)
- Infra Node fix for Elasticsearch - (Automated steps- For information of Installation engineers)
- Configure Azure Application Gateway – SmartOps
- Pre-Deployment Activity
- Deploy SmartOps
- Post-Deployment Activity
- Additional Config Steps in Deployment
- Check and Update Keycloak Config, add User and Protocol Mapper
- Create Keycloak Protocol Mapper
- Get Offline token and update the stack files
- Update the stacks with new token or NER Service ID and redeploy app stacks
- Setting up Indices for Kibana Logs
- Configure Azure Load Balancer for External access of RabbitMQ in TLS enabled channel
- Post Deployment Checks & Validations
- URLs for accessing application features
- Archive Release artifacts (Production or Client Environments)
- AD Integration
Setup Docker Swarm Cluster
Follow the below instructions to set up docker swarm environment and to complete the prerequisites for deploying SmartOps application.
Deployment Timings
Timings will vary based on the environment and network
|
Activities |
Duration |
|
Preparation Activities |
- |
|
Setup Resource Group and Networks |
15 minutes |
|
Creating Docker Swarm Node VMs |
30 minutes |
|
Instructions for Proxy Enabled and Client Environments |
15 minutes |
|
Initialize Swarm Cluster |
5 minutes |
|
Configure Azure Application Gateway |
30 minutes |
|
Pre-Deployment Activity |
NA |
|
Deploy SmartOps |
75 minutes |
|
Deploy Log Monitoring Stack |
10 minutes |
|
Post-Deployment Activity |
20 minutes |
|
Post Deployment Checks & Validations |
|
|
Validate Deployment |
25 minutes |
|
Perform Post Deployment Configurations |
15 minutes |
|
Archive Release artifact (Production or Client Environments) |
10 minutes |
Preparation Activities
Following are the preparation activities:
Setup Resource Group and Networks
-
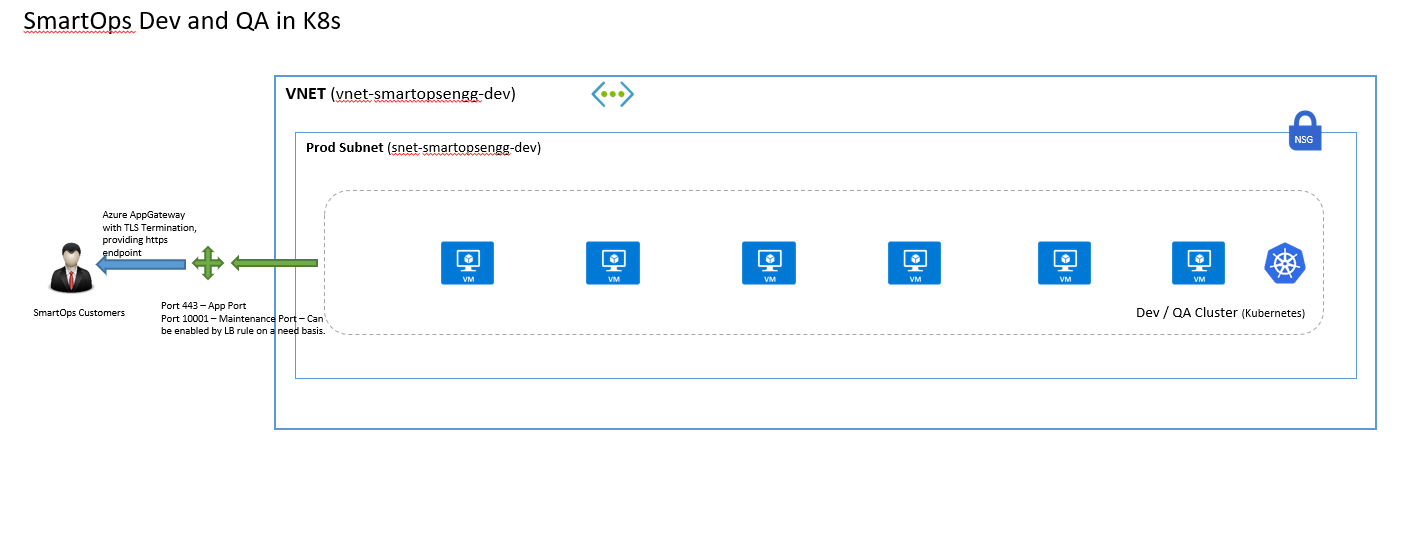
Before beginning the VM setup it is always better to plan the Resource group and network in Azure so that we have better control over security and usage.
-
The above architecture diagram provides guidance on setting up a Virtual Network and a Subnet for the installation. If deviating from above plan, consider applying the effects of that change in subsequent steps of this document.
-
Also, for better cost control and auditing, place all resources in an installation under one resource group.
Creating Docker Swarm Node VMs
-
Create Node VMs with below configurations to create the infrastructure from Deployment VM
-
Number of VMs required for installation is subjective to the stacks that are required for the installation at hand. More details on sizing will amended as required in subsequent releases.
-
Recommended hardware details are mentioned below.
|
VM |
Type |
CPU/Memory |
Disk Size |
Type |
OS / Data |
|
App - 1 |
Standard D16s v3 |
16 vcpus, 64 GB |
256 GB |
Premium SSD |
OS |
|
App - 2 |
Standard D16s v3 |
16 vcpus, 64 GB |
256 GB |
Premium SSD |
OS |
|
Infra - 1 |
Standard D16s v3 |
16 vcpus, 64 GB |
512 GB |
Premium SSD |
OS |
*Accelerated Networking should be enabled in VM NICs for better performance of cluster.
Create the VMs with authentication mechanism as SSH public key
-
Considering the Azure resource group may differ in environments, it is necessary to log on to azure cli and set the default resource group to the one used for this purpose (Steps to Install azure cli is available in FAQ)
-
Place the public key file to create VM from where the script is getting executed. The key is passed as parameter ssh-key-values and the key file name is smartops-dev-env-public-compact in script Eg: --ssh-key-values @smartops-dev-env-public-compact
-
The following values should be updated correctly in the Script. Please not the script is used to create VMs with naming conventions used by SmartOps Engineering Team
|
Description |
|
|
RESOURCE_GROUP |
Azure Resource Group |
|
VNET_NAME |
Azure Virtural Network Name Created within that Resource Group to associate with VM |
|
SUBNET_NAME |
Azure Sub Network Name Created within that Resource Group to associate with VM |
|
NSG_NAME |
Network Security Group Name if already created, or else it will be created as part of this script |
|
ENV_PREFIX |
Environment Prefix - Example: engg, sales, delivery etc |
|
ENV_ID |
Environment ID - Example: dev, qa, stage, prod etc |
|
PURPOSE |
Environment Purpose - Example: smartops, pwf-invoice, pwf-monitoring etc |
|
KEYFILE |
Create the public key and provide the filename. Ensure this file is placed in same location |
|
ENV_TAG |
Tag to be attached to these resources |
|
BUSINESS_UNIT_TAG |
Tag to be attached to these resources |
|
AZ_LOCATION |
Azure Location where resources to be created |
Place install_dependencies.sh and docker-setup.sh scripts and public key file in same location where the vm creation script(smartops-suite-vm-setup.sh) is being executed. install_dependencies.sh and docker-setup.sh files will install all prerequisite softwares required to deploy the application. The failure in execution of this script causes failure in installation of SmartOps.
VM Names are set as vm-ENV_PREFIX-ENV_ID-PURPOSE-<Sequence>
Refer the above script with adequate input parameters to create 3 VMs with the names as below. The names are just for reference. Team can decide the naming convention of VMs to be followed.
vm-smartopsengg-dev-smartops-app-001, vm-smartopsengg-dev-smartops-app-002, vm-smartopsengg-dev-smartops-infra-001
As the model files are installed from jumpbox for previous deployments, please make sure that azcopy is installed in App1 VM before installation.
Instructions for Proxy Enabled and Client Environments
-
Proxy in docker daemon should be added and set up openSSL certificate in Proxy enabled and client environment
-
Follow below steps for adding proxy in docker daemon. Edit proxy server and port number accordingly for the environment
|
mkdir -p /etc/systemd/system/docker.service.d sudo vi /etc/systemd/system/docker.service.d/http-proxy.conf #Add below configuration if not there already by replacing the proxy server and port for the environment. [Service] Environment="HTTP_PROXY=http://172.27.71.42:9401" Environment="HTTPS_PROXY=http://172.27.71.42:9401" sudo systemctl daemon-reload sudo systemctl show --property Environment docker sudo systemctl restart docker |
-
Ensure that Open SSL Certificate (by default it will be /usr/local/share/ca-certificates) is updated.
-
Ensure that Access to below Docker Registry is in place
-
smartopsregistry.azurecr.io
-
smartopdevsregistry.azurecr.io
-
-
Request help from respective Cloud Admin Teams to apply the certificates and add registry access in the environment
Initialize Swarm Cluster
-
Docker Swarm will be initialized as part of install_dependencies.sh script by default.
|
# To initiate swarm cluster, run the following command: docker swarm init |
-
Appropriate connectivity (SSH) needs to be established between Deployment VM and Cluster VMs (docker swarm nodes).
-
Connect to the APP-001 VM through ssh authentication and get swarm join token in App VM
|
ssh <APP-001> docker swarm join-token manager # To add a manager node to this swarm, run the following command: docker swarm join --token SWMTKN-1-2g2y0i29v726ephzrnrvcw0wnbhj0wnnos90adxepoajlfda08-btqj81s4j30xupd8gaf2tzesm 172.27.0.14:2377 |
-
SSH in to other VMs and execute the copied command from previous execution to join as a manager
Note: Find more info about setting up a docker swarm cluster here and other links in the website.
|
ssh <App-002 VM> docker swarm join --token SWMTKN-1-2g2y0i29v726ephzrnrvcw0wnbhj0wnnos90adxepoajlfda08-btqj81s4j30xupd8gaf2tzesm 172.27.0.14:2377 exit ssh <Infra-001 VM> docker swarm join --token SWMTKN-1-2g2y0i29v726ephzrnrvcw0wnbhj0wnnos90adxepoajlfda08-btqj81s4j30xupd8gaf2tzesm 172.27.0.14:2377 exit |
-
Execute below command from manager node to identify the docker nodes
|
docker node ls Result: ID HOSTNAME STATUS AVAILABILITY MANAGER STATUS ENGINE VERSION oout8h6cf8z42pu03xb44xv66 * vm-smartopsengg-dev-app-001 Ready Active Leader 19.03.8 l39k1xair19wfm225bphuslpg vm-smartopsengg-dev-app-002 Ready Active Reachable 19.03.8 z08tkuqp232tb5kjp4c87ce5g vm-smartopsengg-dev-infra-001 Ready Active Reachable 19.03.8 |
-
Download deployment artifacts smartops-platform-R6.4.3.tar.gz from the SharePoint location and copy the deployment artifacts to one of the Docker Swarm Manager Node’s home directory. [ ~ ]. (After creating VM using above steps)
Label Swarm Cluster Nodes – (Automated steps- For information of Installation engineers)
-
Labelling is an important step in setting up the cluster. The node labels ensure that the docker stacks are scheduled in the correct VMs as per the Node planning that we have done above. Also the deployment architecture described in SmartOps in Docker Swarm design document is implemented using node labeling
-
Nodes must be labelled for the following
-
Infrastructure and Log Monitoring Node
-
App and Database Node Label (For Database node): - This is required as we are giving node affinity for databases, so that each database gets scheduled on particular node.
-
Labelling of Nodes are handled by the deployment script for SmartOps based on details provided in config.ini file.
Infra Node fix for Elasticsearch - (Automated steps- For information of Installation engineers)
Apply below command to Infra Node VM if not reflected already. This is required for Elasticsearch
log in to the Infra VM (where the elastic search has installed) and validate if max map count is set
Reference: https://www.elastic.co/guide/en/elasticsearch/reference/current/vm-max-map-count.html
|
sudo sysctl -w vm.max_map_count=262144 #view the content of /etc/sysctl.conf and execute only if below entry is not present. sudo bash -c 'echo "vm.max_map_count=262144" >> /etc/sysctl.conf' |
Configure Azure Application Gateway – SmartOps
Reference:
https://docs.microsoft.com/en-us/azure/application-gateway/overview
https://docs.microsoft.com/en-us/azure/application-gateway/quick-create-portal
-
This document will provide details on how to set up and configure application gateway for SmartOps
Pre-Deployment Activity
Deploy SmartOps
-
smartops-platform-R6.4.3.tar.gz contains the artifacts for SmartOps Platform. Extract the deployment artifacts using following command:
| tar -xvf smartops-platform-R6.4.3.tar.gz |
-
Navigate to installer directory in the package.
| cd <package_name>/installer/ |
-
Execute initialization script
|
sh init.sh |
-
Edit config.ini file and update environment specific values as per table
| vi config.ini |
|
Description |
|
|
PWF_OR_PRODUCT_NAME |
Name of the Packaged Workflow or Product. Here value is smartops-platform |
|
DNS_NAME |
DNS for the environment. |
|
PWF_OR_PRODUCT_DNS_SUFFIX |
Suffix corresponding to deployment requirement. Leave it blank for SmartOps Platform . |
|
INFRA_VM_NAME |
Virtual Machine name(s) for Node Labelling. Provide the VM Name provisioned for SmartOps Infra Setup. |
|
APP_VM_NAMES |
Virtual Machine name(s) for Node Labelling. Provide the VM Name provisioned for SmartOps App Setup. |
|
VESPA_VM_NAMES |
Virtual Machine name(s) for Node Labelling. Provide the VM Name provisioned for DU Vespa Setup. |
|
MON_VM_NAME |
Virtual Machine name(s) for Node Labelling. Provide the VM Name provisioned for Log monitoring Setup. |
|
INFRAVM_IP |
IP address of INFRA_VM |
|
APPVM_IPS |
app VMs' Ip address(es) (comma separated without any space in between) |
|
VESPAVM_IPS |
vespa VMs' Ip address(es) (comma separated without any space in between) |
|
RELATIVE_PATH |
Indicates the location of stack-repo directory containing stack files. By default it will be ../ |
|
HOME_PATH |
Indicates the location where model files are downloaded. By default, it will be smartops |
|
PROXY_SERVER |
Proxy server settings : http://<proxy_host>:<port> if proxy is enabled. Leave it blank if Proxy is not required. |
|
DEPLOY_OR_UPGRADE |
Flag to indicate if deploy from scratch or upgrade from existing release. |
|
OFFLINE_TOKEN |
Offline Token to be used for deployment. |
|
CLONES_STUDIO_UPLOAD_DIALOGUE_STATUS |
Set this value to true for SmartOps Platform |
|
MYSQL_ROOT_PASSWORD |
Root Password for MySQL Database. By default, it is set as 5up3ru53r_sql_Sm. |
|
MONGO_ADMIN_PASSWORD |
Admin Password for MongoDB. By default, it is set as 5up3ru53r_mon_sm |
|
POSTGRESQL_PASSWORD |
Password for PostgreSQL. By default, it is set as postgres |
|
MINIO_SECRET_KEY |
Secret Key for Minio. By default it is set as 5up3ru53r_min_sm |
|
RABBIT_MQ_ADMIN_PASSWORD |
Rabbit MQ Admin Password. By default, it is set as admin |
|
RABBIT_MQ_ADMIN_PWD_HASH_VALUE |
Rabbit MQ Admin Password Hash Value. |
|
NER_SERVICE_ID |
NER Project ID Created in Conversation Designer to integrate with Smart Sense. You can leave this blank if not used. |
-
If it is proxy enabled environment, execute below command to replace the proxy variables
Eg: sed -i "s,gateway.zscaler.net,http://172.67.17.50,g" config/*/*.env
sed -i "s,PROXY_PORT=9400,PROXY_PORT=8500,g" config/*/*.env
|
cd ~/<package_name>/stack-repo/ sed -i "s,PROXY_ENABLED=false,PROXY_ENABLED=true,g" config/*/*.env sed -i "s,gateway.zscaler.net,<PROXY_SERVER>,g" config/*/*.env sed -i "s,PROXY_PORT=9400,PROXY_PORT=<PROXY_PORT >,g" config/*/*.env |
Execute the following command to start deployment. The deployment takes 60+ minutes to complete
|
cd ~/<package_name>/installer/ ./deploy.sh |
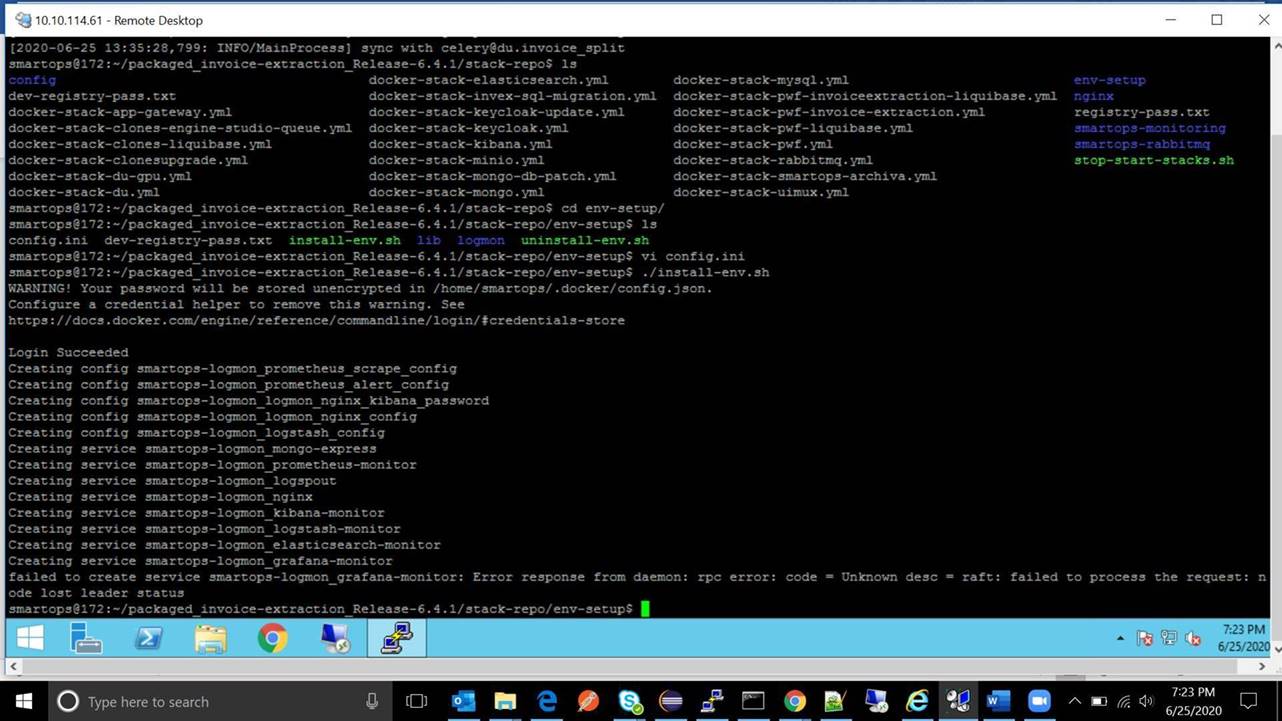
Note: When deploying the services for first time, all the images are getting downloaded from image registry. So, there could be failures/delay in startup. If you see certain services failing after waiting for a period, you can try to redeploy using stop-start-stacks.sh for those specific stacks present in <package_name>/ stack-repo, or force update specific services. E.g is shown below.
|
./stop-start-stacks.sh <stack-name> docker service update <stack-name>_<service-name> --force |
Refer Post Deployment Checks & Validations for more validation steps on deployment
Deploy Log Monitoring Stack
-
Navigate to ‘<package_name>/stack-repo/env-setup’
-
Edit config.ini file with the values as below.
|
Variable |
Description |
|
logmon_dns_suffix |
Empty for Smartops platform |
|
mysql_root_password |
5up3ru53r_sql_Sm |
|
grafana_email_user |
Email id for Grafana SMTP user |
|
grafana_email_password |
Email user password for Grafana SMTP user |
-
execute the script install-env.sh to set up the monitoring stack
| ./install-env.sh |
-
Verify the deployment using following commands
|
docker stack ps smartops-logmon docker service ls | grep smartops-logmon *** To know the service is up and running, use below command docker service ps <service_name>. service name is available from above command ***** docker service ps smartops-logmon_alertmanager-monitor |
-
Wait for 10 minutes after deployment for Kibana to create indexes
-
To access the logs from kibana use the following URL
Post-Deployment Activity
Additional Config Steps in Deployment
It is necessary to add the domain and Active Directory (if enabled) in proxy to allow the access via Application
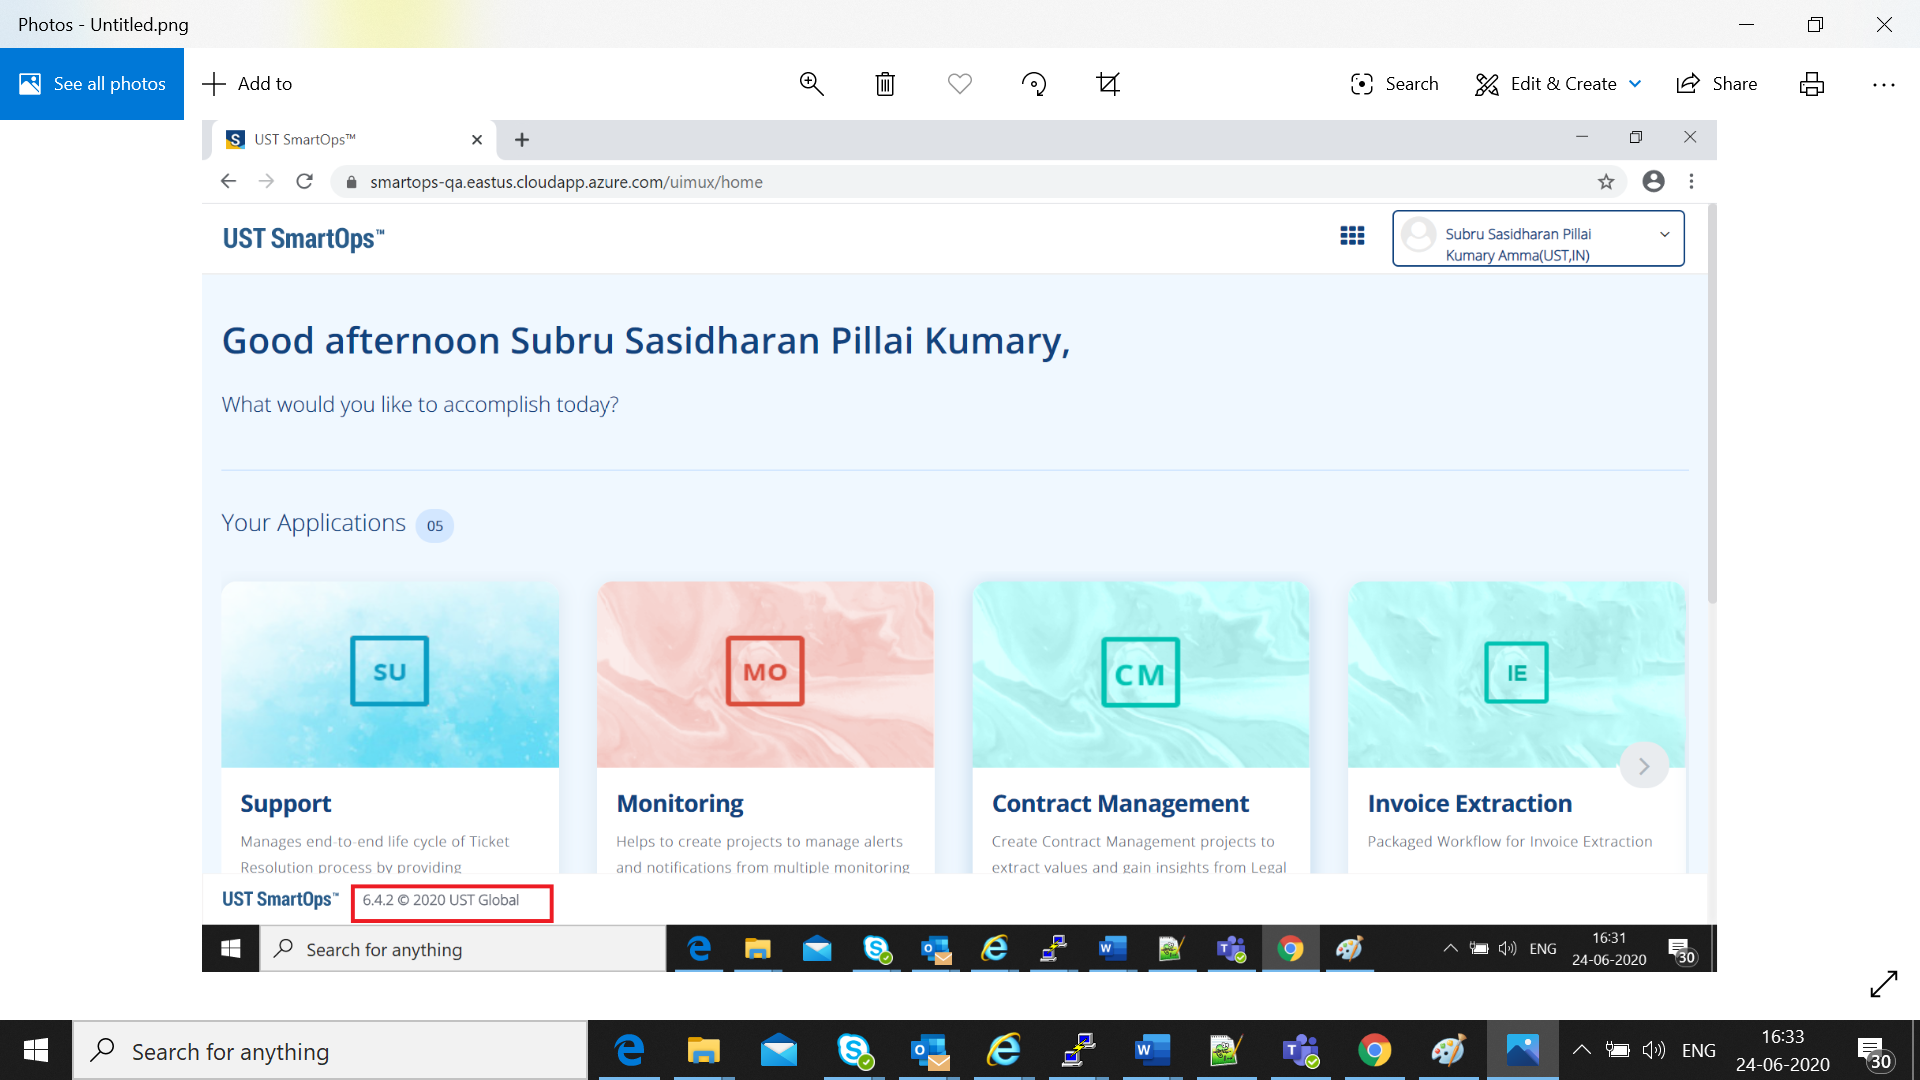
Once app-gateway is up and running you can access the application in browser with the url >/
Before starting to use the application, certain config steps are to be performed, which includes application restarts. Following config steps are to be done.
-
Check keycloak configuration pages and add a new user.
-
Generate New Offline token
Check and Update Keycloak Config, add User and Protocol Mapper
-
Access keycloak URL with following link in a browserExample: https://smartops-prod.eastus.cloudapp.azure.com/keycloak/auth/
-
Login to Administration Console using userid/password as admin/admin
-
Go to “Clients” menu item on left pane and select smartops-frontend
-
In Validate Redirect Uri you should see (if not enter it manually).
-
In Web Origins add the following uri
-
Click Save
-
Go to “Users” menu item on left pane.
-
Click Add User button
-
Enter username as “smartops” and click save.
-
Go to “Credentials” tab for the user and enter a password for login
-
Go to “Role Mappings” tab for the user.
-
For the time being assign all the roles to the user by selecting all from left list and putting it to right.
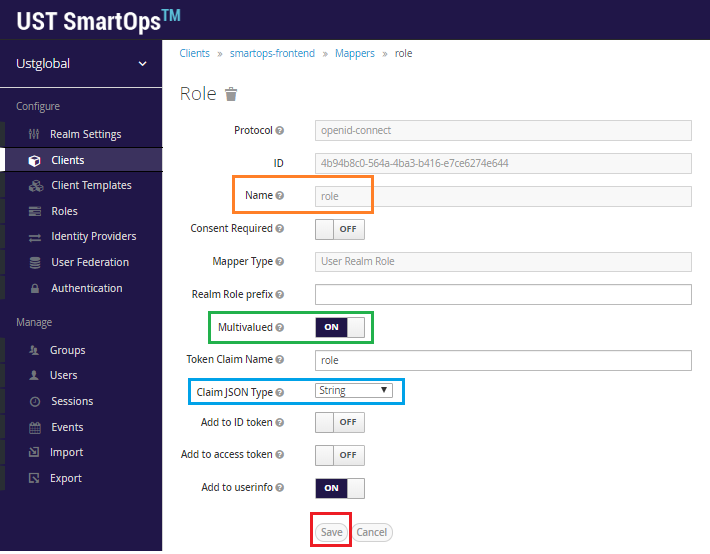
Create Keycloak Protocol Mapper
To create a protocol mapper named “role”, select the realm in dropdown, Clients in Configure, click on Smartops-frontend and click on Create in Mappers tab.

Provide the values mentioned in below screenshot and click on Save
Get Offline token and update the stack files
-
Go to in a browser.
-
You will get the login page.
-
Enter admin/admin as credentials
-
Once logged in select multi menu from right top of the screen and click on “Creator’s Studio”
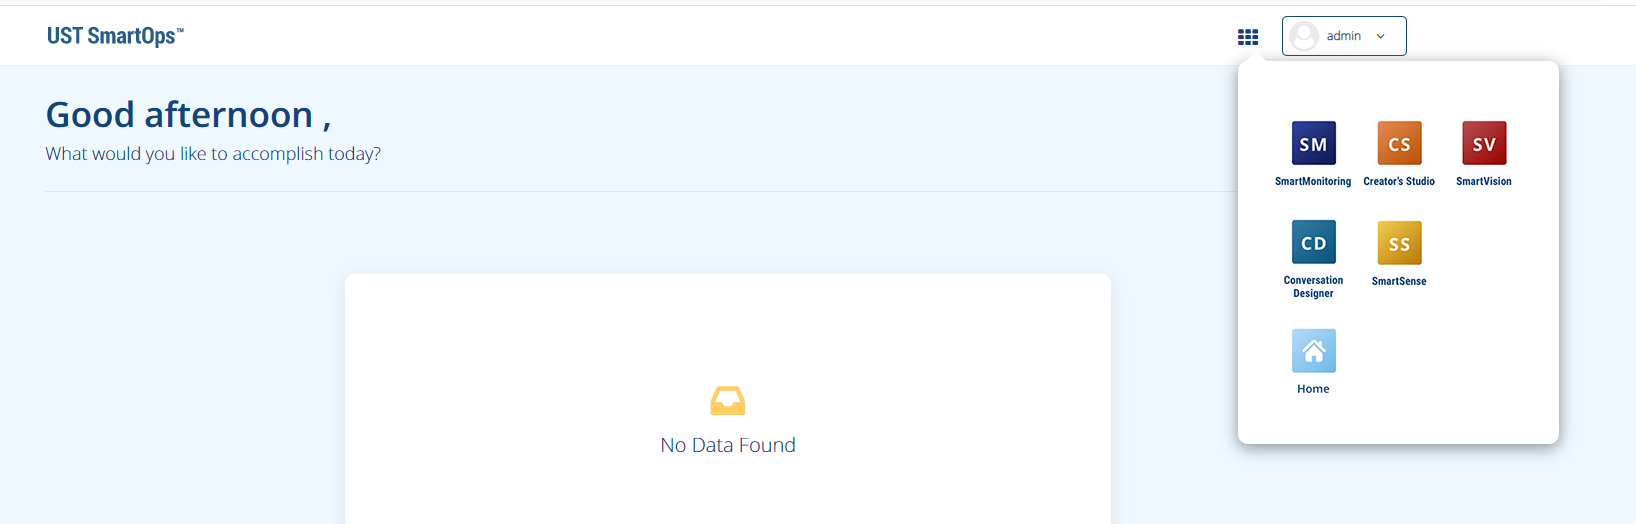
-
You should see the Organizations tab on screen now.

-
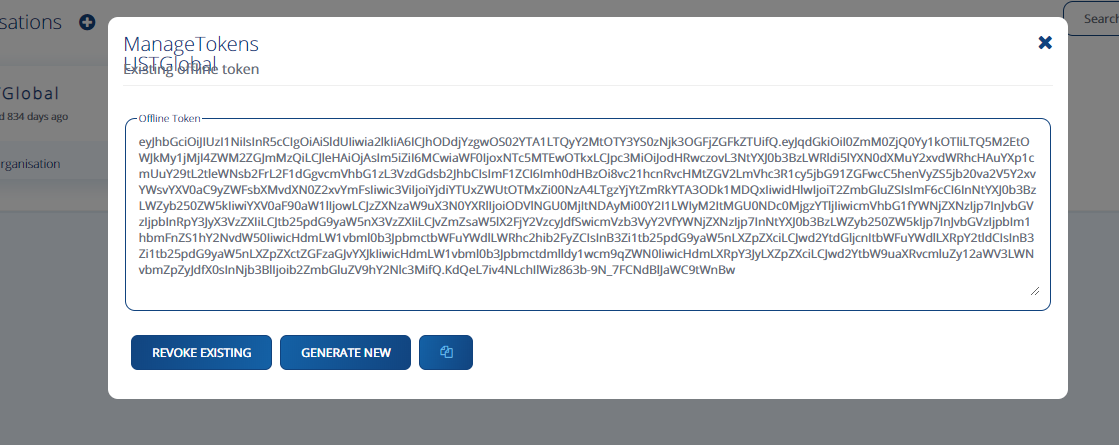
Click on “Manage Tokens” in UST Global Organization. Copy the existing token. Keep the token in a file so that it can be referred later.
Update the stacks with new token or NER Service ID and redeploy app stacks
-
SSH into a manager node.
-
Navigate to ‘<package_name>/installer’ directory.
-
Update OFFLINE_TOKEN in config.ini file and save it. (You can also update NER Service ID in same way)
-
Execute the script to replace the stack files with updated token.
-
Navigate to ‘<package_name>/stack-repo’ directory.
-
Re-deploy Smart Sense, DU and Monitoring Stacks.
|
vi config.ini # Update value for OFFLINE_TOKEN variable and save the file. ./update_additional_values.sh cd ../stack-repo/ ./stop-start-stacks.sh smartsense smartops-du monitoring |
Setting up Indices for Kibana Logs
After opening Kibana, choose the Logs card on the home page. Move to the Settings tab and go to the Log Indices section to set the value as shown below.
To review the container logs via kibana, we have to set up the log indices pattern to “logstash-*”.

Configure Azure Load Balancer for External access of RabbitMQ in TLS enabled channel
-
Create an Azure Load Balancer for external access of RabbitMQ .Please follow the attached document and configure an Azure Load balancer
-
Configure appropriate Rule in Load Balancer to point it to back end pool VM.(Add Infra VM -001 as the back-end pool for Smartops application)
Post Deployment Checks & Validations
Validate Deployment
-
On successful installation , services in attached list will be deployed in cluster. The installed service can be found out using following command
| docker service ls |
-
Once Deployment is completed verify the services to check whether all required services are up and running. Please not that below services with name suffix as ‘patch_update’ and ‘liquibase’ will be down as they are one-time containers.
|
docker service ls | grep 0/1 |
-
When manager node is running with high Network Usage and to deploy a stack with high performance services at same time causes the following issue of ‘Error respose from Deamon: RPC error’. Deployment Scripts deploys stack one after another with 30 second interval, there is a possibility of request gets queued and throttle network during that time. Execute “docker service ls | grep 0/1” which will list out the containers which are either stopped or being prepared to start.
Restart respective stack using stop-start-stack.sh script which had rpc error.
Example: contract-mgmnt_cms_doclink_process is down. Then execute following steps to restart it .
The stack name will be ‘contract-mgmnt’ for above service.
|
cd ../stack-repo ./stop-start-stacks.sh contract-mgmnt |
-
Validate the status of stack by executing “docker stack ps <stack_name>” which will then provide the list of services of that stack with its current status
| docker stack ps <stack_name> |
Perform Post Deployment Configurations
Before starting to use the application, certain config steps are to be performed. Refer Post Deployment-Configuration Guide for executing the post deployment activity steps for configuring PWF roles and permission. If it is already executed, please ignore the steps.
Note: This step is mandatory to view the components available in the Home Page of application and in menu (nine dots)
Validate Application Access
Validate Application access by accessing following URL and login using the user id/password
https://<app-dns-name> /
URLs for accessing application features
Replace <app-dns-name> with the dns name configured in application gateway.
Eg: smartops.eastus.cloudapp.azure.com
For broker oidc endpoint:
https://<app-dns-name>/keycloak/auth/realms/ustglobal/broker/oidc/endpoint
For accessing SmartOps Application:
https://<app-dns-name> /
For accessing Master Realm for monitoring Application:
https://<app-dns-name>/uimux/smartops/master
For Logout URL:
https://<app-dns-name>/keycloak/auth/realms/ustglobal/protocol/openid-connect/logout
For Accessing logs:
Archive Release artifacts (Production or Client Environments)
The deployment artifacts contain sensitive information such as passwords . Hence the deployment folder should be archived to a protected location and removed from the VM after Successful Deployment.
|
# acrhive the deployment folder cd ~ sudo tar -pcvzf <package_name>_archive.tar <package_name> # Move created archive to a secured location # Remove deployment folder sudo rm -R <package_name> |
AD Integration
Please follow attached document below to integrate keycloak with an Enterprise AD.