Platform v6.4.3-Upgrade Process (Docker Swarm)
Purpose of this document is to provide guideline for upgrading the SmartOps Platform in a docker swarm environment for azure to 6.4.3 version. The document contains prerequisites for installation and detailed instructions to upgrade SmartOps Platform along with FAQs.
Contents
- Supported releases for Upgrade
- Deployment Timings
- Preparation Activities
- Upgrading SmartOps from 6.4.2 to version 6.4.3
- Upgrading SmartOps Platform from 6.4.3 to version 6.4.3-Hotfix 9
- Upgrading SmartOps from 6.4.0 to version 6.4.3
- Post Deployment Checks & Validations
- Archive Release artifacts (Production or Client Environments)
- Rollback to Release Version 6.4.2 on Failed upgrade
- URLs for accessing application features
- Get Offline token and update
Supported releases for Upgrade
|
6.4.0 |
|
6.4.2 |
Deployment Timings
Timings will vary based on the environment and network.
|
Activities |
Duration |
|
Preparation Activities |
10 mins |
|
Pre-Deployment Activity |
45 minutes |
|
Deploy SmartOps |
60 minutes |
|
Post-Deployment Activity |
20 minutes |
|
Post Deployment Checks & Validations |
15 minutes |
|
Validate Deployment |
15 minutes |
|
Perform Post Deployment Configurations |
15 minutes |
|
Archive Release artifact (Production or Client Environments) |
10 minutes |
Preparation Activities
-
Confirm SSH connectivity between Application VM and Infra VM
-
SSH into manger node.
|
ssh <App-001 VM> |
-
Please make sure following tools are installed in manager node from which 6.4.3 installation is taking place (Refer FAQ for installation steps).
-
azcopy
-
dos2unix
-
python-pip
-
PyYAML==5.1
-
-
Validate Disk usage and make sure that enough disk space is available to go for upgrade in Each VM by executing below commands.
|
~ df -h udev 32G 0 32G 0% /dev tmpfs 6.3G 2.9M 6.3G 1% /run /dev/sda1 497G 310G 187G 63% / tmpfs 32G 0 32G 0% /dev/shm tmpfs 5.0M 0 5.0M 0% /run/lock tmpfs 32G 0 32G 0% /sys/fs/cgroup /dev/sda15 105M 3.6M 101M 4% /boot/efi /dev/sdb1 126G 61M 120G 1% /mnt tmpfs 6.3G 0 6.3G 0% /run/user/1000 ~ exit |
Refer following metrics for minimum disk space requirement. Please ensure that enough space is available to do Upgrade in all VMs
|
Content |
Total Size (GB) |
Requirement for Node |
|
Docker Images |
50 |
50 GB on each node VM |
|
Database Volume |
50 |
Specific to Infra node |
|
Model Files |
20 |
/data/smartops for each node |
-
The Deployment artifact folder of previous release which contains sensitive information such as password should be archived in a secured location for production and client environments. And when deployment or changes needed with same artifacts, download the archived artifacts to the APP VM and execute deployment steps
-
Take a backup of current deployment artifact folder (Release 6.4.2) for DEV environments
|
mkdir backup_6.4.2 cd backup_6.4.2 cp -r <6.4.2_deployment_artifacts_directory_name> . |
-
Download smartops-platform-R6.4.3.tar.gz from the shared SharePoint location in manager node
Upgrading SmartOps from 6.4.2 to version 6.4.3
Pre-Deployment Activity
-
SSH into Infra node VM
|
ssh <Infra-001 VM> |
Back up existing data by following below steps in Infra VM
|
# Move to directory to keep the database backup files: cd backup_6.4.2 # Copy the Data Volume Mount for Database sudo cp -pr /var/lib/docker/volumes/mysql_mysql-data . sudo cp -pr /var/lib/docker/volumes/mongo_mongo-data . sudo cp -pr /var/lib/docker/volumes/postgres_postgres-data . sudo cp -pr /var/lib/docker/volumes/elasticsearch_monitoringelasticsearch-data . # Create the compressed file using below commands sudo tar -pcvzf mongo_mongo-data.tar.gz mongo_mongo-data sudo tar -pcvzf mysql_mysql-data.tar.gz mysql_mysql-data sudo tar -pcvzf postgres_postgres-data.tar.gz postgres_postgres-data sudo tar -pcvzf elasticsearch_monitoringelasticsearch-data.tar.gz # Remove the uncompressed files after compressing the data successfully. sudo rm -rf *-data exit |
-
smartops-platform-R6.4.3.tar.gz contains the artifacts for SmartOps Platform. The package can be extracted using following command in Manager Node(APP-001 VM):
|
tar -xvf smartops-product-composer-R6.4.3.tar.gz |
If it is proxy enabled environment, execute below command to replace the proxy variables
Eg: sed -i "s,gateway.zscaler.net,http://172.67.17.50,g" config/*/*.env
sed -i "s,PROXY_PORT=9400,PROXY_PORT=8500,g" config/*/*.env
|
cd ~/<package_name>/stack-repo/ sed -i "s,PROXY_ENABLED=false,PROXY_ENABLED=true,g" config/*/*.env sed -i "s,gateway.zscaler.net,<PROXY_SERVER>,g" config/*/*.env sed -i "s,PROXY_PORT=9400,PROXY_PORT=<PROXY_PORT>,g" config/*/*.env |
Note: Do not execute this step if it is a non-proxy environment.
-
Navigate to installer directory.
|
cd ../installer/ |
-
Execute initialization script
|
sh init.sh |
-
Edit config.ini file with the environment details as below.
|
vi config.ini |
|
Variable |
Description |
|
PWF_OR_PRODUCT_NAME |
Name of the Packaged Workflow or Product. |
|
DNS_NAME |
DNS for the environment. |
|
PWF_OR_PRODUCT_DNS_SUFFIX |
Suffix corresponding to deployment requirement. Leave it blank for SmartOps Platform. |
|
INFRA_VM_NAME |
Virtual Machine name(s) for Node Labelling. Provide the VM Name provisioned for SmartOps Infra Setup. |
|
APP_VM_NAMES |
Virtual Machine name(s) for Node Labelling. Provide the VM Name provisioned for SmartOps App Setup. |
|
VESPA_VM_NAMES |
Virtual Machine name(s) for Node Labelling. Provide the VM Name provisioned for DU Vespa Setup. |
|
MON_VM_NAME |
Virtual Machine name(s) for Node Labelling. Provide the VM Name provisioned for Log monitoring Setup. |
|
INFRAVM_IP |
IP address of Infra VM |
|
APPVM_IPS |
app VMs' Ip address(es) (comma separated without any space in between) |
|
VESPAVM_IPS |
vespa VMs' Ip address(es) (comma separated without any space in between) |
|
RELATIVE_PATH |
Indicates the location of stack-repo directory containing stack files. By default it will be ../ |
|
HOME_PATH |
Indicates the location where model files are downloaded. By default, it will be smartops |
|
PROXY_SERVER |
Proxy server settings : http://<proxy_host>:<port> if proxy is enabled. Leave it blank if Proxy is not required. |
|
DEPLOY_OR_UPGRADE |
Flag to indicate if deploy from scratch or upgrade from existing release. |
|
OFFLINE_TOKEN |
Existing Offline Token for the environment. Refer the next instruction point to get current offline token |
|
CLONES_STUDIO_UPLOAD_ |
Set this value to true for SmartOps Platform |
|
MYSQL_ROOT_PASSWORD |
Root Password for MySQL Database. By default, it is set as 5up3ru53r_sql_Sm. |
|
MONGO_ADMIN_PASSWORD |
Admin Password for MongoDB. By default, it is set as 5up3ru53r_mon_sm |
|
POSTGRESQL_PASSWORD |
Password for PostgreSQL. By default, it is set as postgres |
|
MINIO_SECRET_KEY |
Secret Key for Minio. By default it is set as 5up3ru53r_min_sm |
|
RABBIT_MQ_ADMIN_PASSWORD |
Rabbit MQ Admin Password. By default, it is set as admin |
|
RABBIT_MQ_ADMIN_PWD_ |
Rabbit MQ Admin Password Hash Value. |
|
NER_SERVICE_ID |
NER Project ID Created in Conversation Designer to integrate with Smart Sense. You can leave this blank if not used. |
-
Update existing offline token in config.ini for current release package referring below steps
Deployment Activity (approximately 60 minutes)
-
Execute the following command to start deployment.
|
./deploy.sh |
Upgrading SmartOps Platform from 6.4.3 to version 6.4.3-Hotfix 9
-
Please extract the archive file - smartops-platform-R6.4.3.tar.gz
-
Open the file in edit mode - <Package>\stack-repo\config\clones\clones-sense.env
-
Update the variable CLONES_OUTLOOK_HOST to the IMAP host name of the specific outlook server that is to be used (eg: outlook.office365.com for @ust-global.com domain)
-
In order to disable SSL connection to the exchange-server, update the env variables for mail-port, CLONES_MAIL_PORT=143 and mail-protocol CLONES_MAIL_IMAP_PROTOCOL=imap
|
cd ../installer ./replace_anchors.sh config.ini cd ../stack-repo docker stack rm kafka logstash monitoring ./stop-start-stacks.sh clones smartops-du |
Post-Deployment Activity
NA
Upgrading SmartOps from 6.4.0 to version 6.4.3
TBD
Post Deployment Checks & Validations
Validate Deployment
-
Once Deployment is completed verify the images using below command to make sure that the images name is updated to 6.4.3.
|
~ docker stack ps uimux ID NAME IMAGE NODE DESIRED STATE CURRENT STATE ERROR PORTS c9ebdhm7zcgm uimux_pw_ui.1 smartopsregistry.azurecr.io/smartops/packaged_workflow_ui:6.4.3.286 vm-smartopsengg-qa-app-007 Running Running about an hour ago pfpzshcrw9wt uimux_smartops_ui_mux.1 smartopsregistry.azurecr.io/smartops-ui-mux:6.4.3.300 vm-smartopsengg-qa-app-006 Running Running about an hour ago |
-
On successful installation attached list of services will be updated with tag version in image as 6.4.3.x The installed service can be found out using following command
|
~ docker service ls |
-
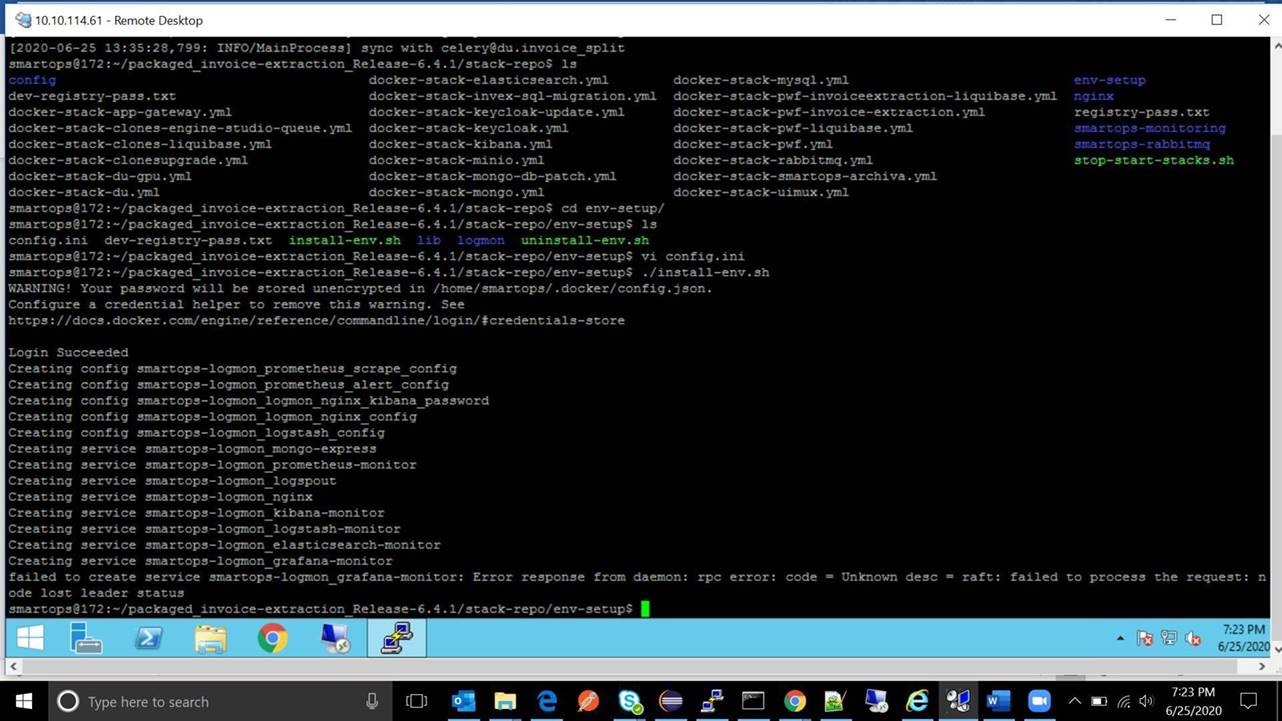
Once Deployment is completed verify the services to check whether all required services are up and running. Please note that below services with name suffix having ‘patch_update’,’migration’ or ‘liquibase’ will be down as they are one-time containers.
|
~ docker service ls | grep 0/1 |
-
When manager node is running with high network usage and to deploy a stack with high performance services at same time causes the following issue of ‘Error respose from Deamon: RPC error’. Deployment Scripts deploys stack one after another with 30 second interval, there is a possibility of request gets queued and consumes the CPU during that time. Execute “docker service ls | grep 0/1” which will list out the containers which are either stopped or being prepared to start.
-
Restart respective stack using stop-start-stack.sh script which had rpc error.
Example: contract-mgmnt_cms_doclink_process is down. Then execute following steps to restart it .
The stack name will be ‘contract-mgmnt’ for above service.
|
~ cd ../stack-repo ~ ./stop-start-stacks.sh contract-mgmnt |
-
Validate the status of stack by executing “docker stack ps <Stack_Name>” which will then provide the list of services of that stack with its current status
|
docker stack ps <Stack_Name> |
Perform Post Deployment Configurations
-
It is necessary to add the domain and Active Directory (if enabled) in proxy to allow the access via Application
-
Before starting to use the application, certain config steps are to be performed. Refer Post Deployment-Configuration Guide for executing the post deployment activity steps for configuring PWF roles and permission. If it is already executed, please ignore the steps.
Note: This step is mandatory to view the components available in the Home Page of application and in menu (nine dots)
Validate Application Access
-
Validate Application access by accessing following URL and login using the user id/password
https://<app-dns-name>/
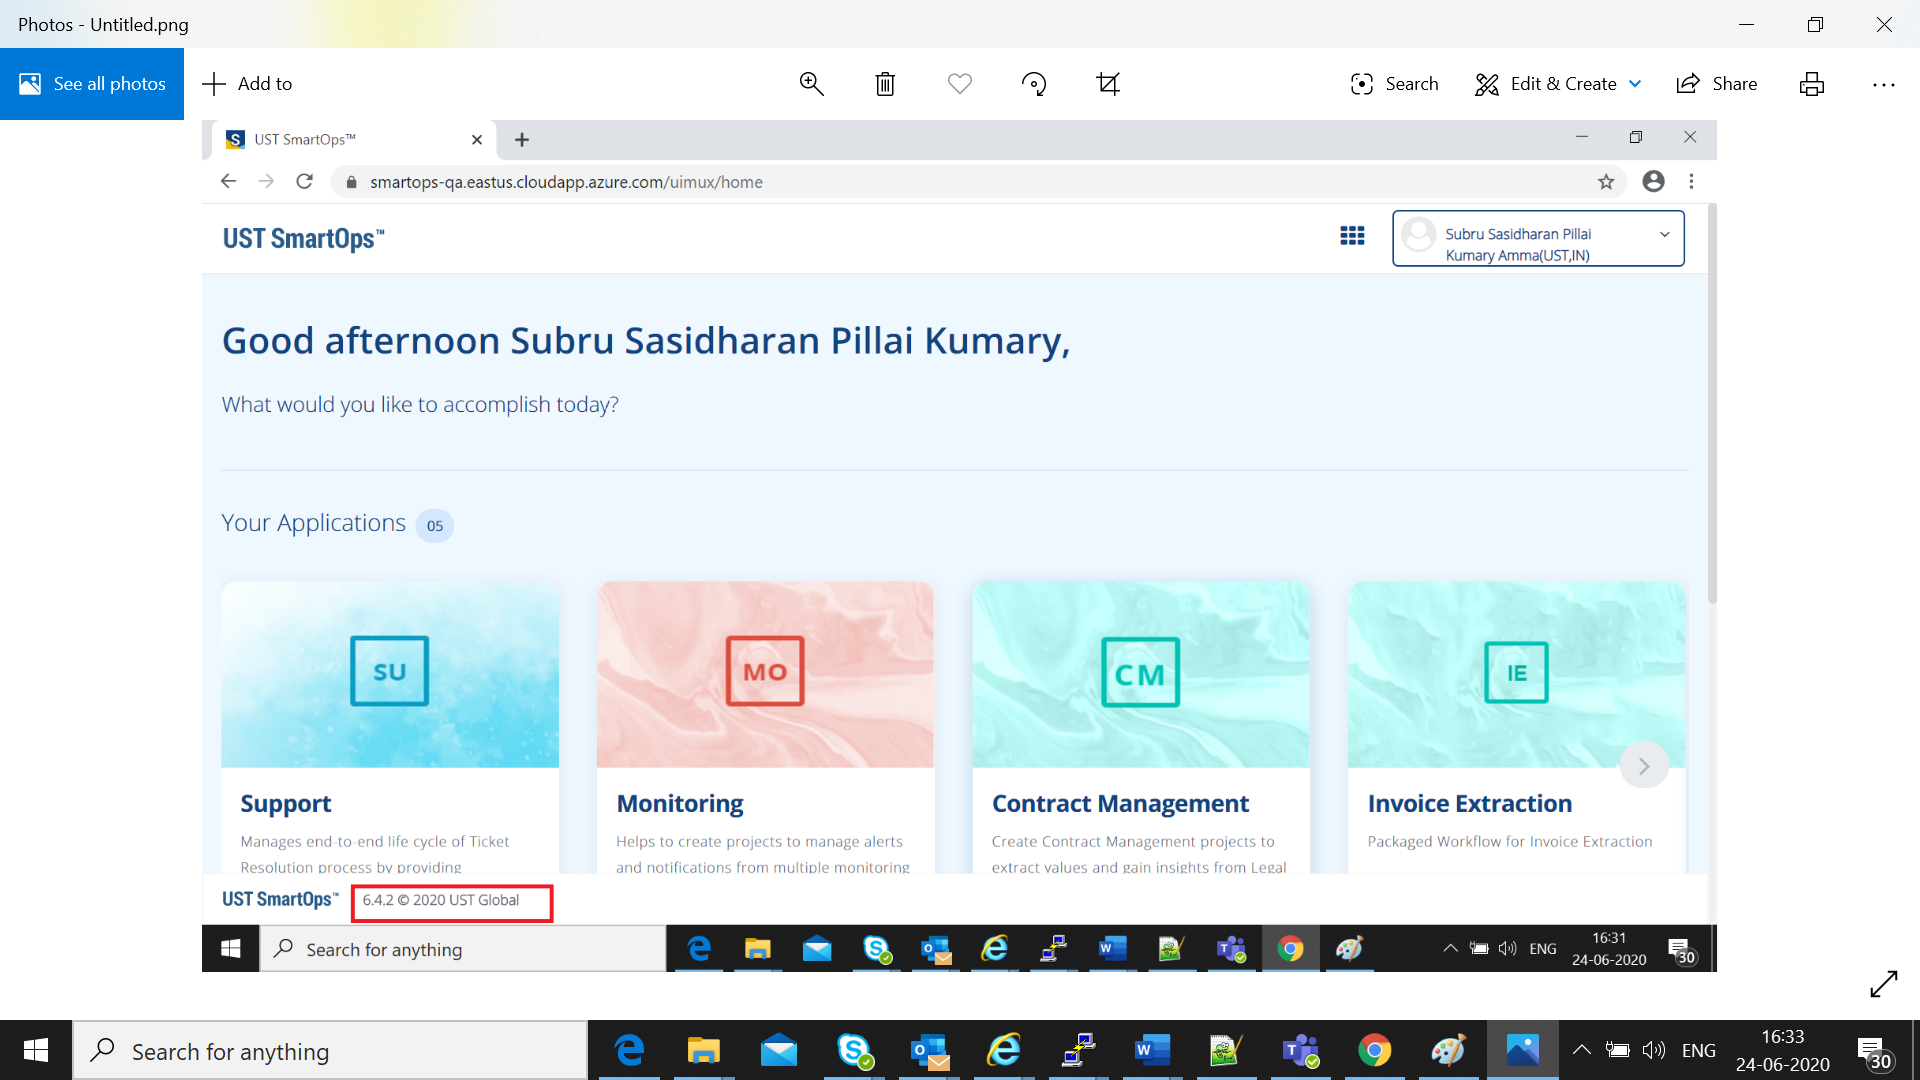
Please note that the version is updated as 6.4.3 as in Screenshot
Archive Release artifacts (Production or Client Environments)
The deployment artifacts contain sensitive information such as passwords . Hence the deployment folder should be archived to a protected location and removed from the VM after Successful Deployment.
|
# acrhive the deployment folder cd ~ sudo tar -pcvzf <package_name>_archive.tar <package_name> # Move created archive to a secured location # Remove deployment folder sudo rm -R <package_name> |
>
Rollback to Release Version 6.4.2 on Failed upgrade
Steps to restore Release 6.4.2 Database from Back up
-
Stop all running stacks <Infra
|
# get the stack list by executing below command docker stack ls # Use command below to remove stacks docker stack rm <stack_name> |
>
-
SSH into Infra node VM
|
ssh <Infra-001 VM> |
-
Restore back up data by following below steps in Infra VM
|
cd backup_6.4.2 # Delete all the Data Volume Mount which got corrupted sudo rm -R /var/lib/docker/volumes/mysql_mysql-data sudo rm -R /var/lib/docker/volumes/mongo_mongo-data sudo rm -R /var/lib/docker/volumes/postgres_postgres-data sudo rm -R /var/lib/docker/volumes/elasticsearch_monitoringelasticsearch-data . # Extract the compressed file using below commands sudo tar -xvf mongo_mongo-data.tar.gz /var/lib/docker/volumes/ sudo tar -xvf mysql_mysql-data.tar.gz /var/lib/docker/volumes/ sudo tar -xvf postgres_postgres-data.tar.gz /var/lib/docker/volumes/ sudo tar -xvf elasticsearch_monitoringelasticsearch-data.tar.gz /var/lib/docker/volumes/ exit |
-
Redeploy database stacks and application stacks from the backup folder from where 6.4.2 version is deployed
-
Edit config.ini in the ~ backup_6.4.2/<6.4.2_deployment_artifacts_directory_name>/installer/ directory and update the value DEPLOY_OR_UPGRADE = upgrade
|
cd ~backup_6.4.2/<6.4.2_deployment_artifacts_directory_name>/installer/ vi config.ini #Edit value ‘DEPLOY_OR_UPGRADE = upgrade’ ./deploy.sh
|
For production and client environments
-
Download archived artifacts of 6.4.2 release into APP VM for Production and client environments
-
Redeploy database stacks and application stacks from <APP VM-001> from extracted folder of archived artifacts by executing following steps
-
Edit config.ini in the ~ <extracted_folder>/installer/ directory and update the value DEPLOY_OR_UPGRADE = upgrade
|
~ cd ~ extracted_folder>/installer/ ~ vi config.ini #Edit value ‘DEPLOY_OR_UPGRADE = upgrade’ ~ ./deploy.sh
|
URLs for accessing application features
Replace <app-dns-name> with the dns name configured in application gateway.
Eg: smartops.eastus.cloudapp.azure.com
For broker oidc endpoint:
https://<app-dns-name>/keycloak/auth/realms/ustglobal/broker/oidc/endpoint
For accessing SmartOps Application:
https://<app-dns-name> /
For accessing Master Realm for monitoring Apllication:
https://<app-dns-name>/uimux/smartops/master
For Logout URL:
https://<app-dns-name>/keycloak/auth/realms/ustglobal/protocol/openid-connect/logout
For Accessing logs:
Get Offline token and update
-
Go to in a browser.
-
You will get the login page.
-
Enter admin/admin as credentials
-
Once logged in select multi menu from right top of the screen and click on “Creator’s Studio”
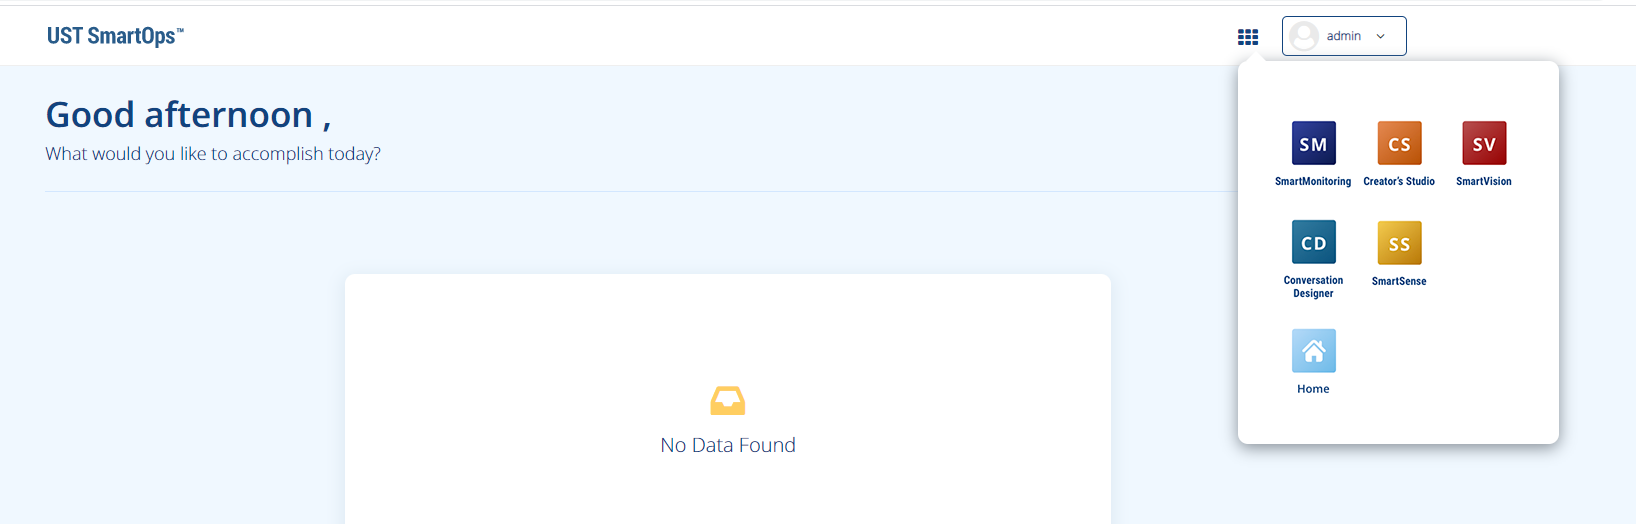
-
You should see the Organizations tab on screen now.
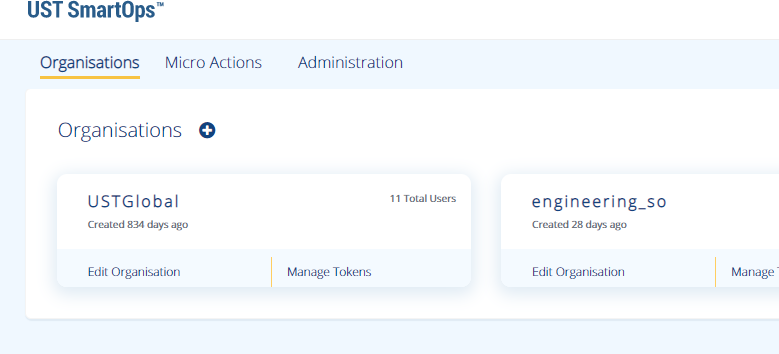
-
Click on “Manage Tokens” in UST Global Organization. Copy the existing token. Keep the token in a file so that it can be referred later.