An Installation Engineer is required to perform a few steps after SmartOps deployment is completed.
The steps and related to core-platform are:
Contents
If you have done fresh installation, make sure that you generate offline token for Ustglobal Organization.
If you have migrated data from Swarm to Kubernetes environment, make sure that you generate new offline token for all applicable organizations.
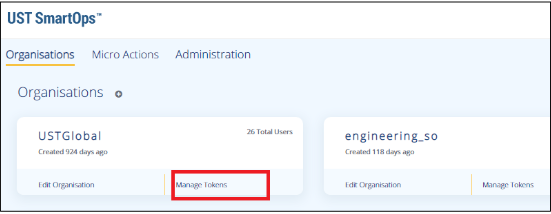
To generate an offline token for an organization, login to Master Organization and follow the steps below:
Click on Manage Tokens corresponding to the organization as shown below:
This displays the token window as shown below

2. Click on the  icon to copy the offline token.
In Kubernetes environment, the internal service names have changed when compared to Swarm environment. So, for internal service communications, all the hostnames of the services are now prefixed based on the domain. That is, based on the domain and region, the hostname will differ. This is applicable for areas where service URLS and configurable.
Example Scenarios:
Clones Engine can now be accessed in SmartOps DI Platform internally as "http://smartops-dev-clones-engine:9090" (earlier this used to http://clones-engine:9090). In QA, the prefix will change to smartops-qa. In PaaS ITOps DI, this will become http://itops-dev-clones-engine:9090 and so on.
In micro actions, if you need to call any other service through micro action, you can follow this pattern.
Another example is the case with elastic search Sense Channel where elastic search URL is configurable through UI. There, Elastic Search URL becomes http://smartops-dev-elasticsearch:9200 for Platform DI environment
Note:
It is to be noted that nothing has changed in the service side. Only the name of the service has been changed as part of Kubernetes implementation. Users can get the full list of applicable service names from Dev- Enablement team.
Workflow shared variables are certain variables which can be used in workflows. The default variables are saved in DB. Based on the installed environment, it is required to edit certain variables.
An installation engineer should make sure that the following variables are changed based on the environment. There is an API currently available and can be used to edit the variables. After editing the variables, invoke another API to reload the cache. The details are given below:
Method: PUT
URL: https://<hostname>/designer/api/clones/dashboard/orgnworkflows/updateSharedVariable/{variableId}
Headers: offline-token or Authorization, user and Organization-key
RequestBody :
|
{ "sensitiveFlag": 0, "variableName": "string", "variableValue": "string" } |
PathVariable: variableId
Note:
It is to be noted that, in Kubernetes based deployment, the variable value changes according to the domain name. So accordingly choose the correct domain names (the correct domain name for each installation can be checked with Dev Enablement team). The following table is an example for K8 SmartOps Dev environment for an Organization with ID, 1:
|
Variable ID |
Org ID |
Variable Name |
Variable Value |
|
1 |
|
clones.engine.host |
|
|
10 |
1 |
clones.dialog.host |
|
|
16 |
1 |
nlp.ice.url |
|
|
21 |
1 |
clones.queue.host |
smartops-dev-rabbitmq |
As another example, In the ITOPs DI environment the variable value for clones.engine.host is: clones.engine.host -http://itops-dev-clones-engine:9090
If you want to link XD project, please make sure that you update the service ID of XD project, the details being:
|
Variable ID |
Org ID |
Variable Name |
|
17 |
1 |
nlp.ice.subscriptionId |
Similarly, if there are any other workflow shared variable that needs to be edited based on any change in client implementation, it can be done.
If for an Organization ID, you are not sure about the Variable ID to be used, you can invoke the fetch API to fetch all the details of shared variables of an organization.
Method: GET
URL: https://<hostname>/designer/api/clones/dashboard/orgnworkflows/fetchSharedVariable
Headers: offline-token or Authorization, Organization-key
API to reload cache for workflow shared variables:
Method: POST
URL: https://<hostname>/clonesengine/api/clones/engine/core/executions/reloadWorkflowSharedVariables
Headers : offline-token or Authorization, Organization-key
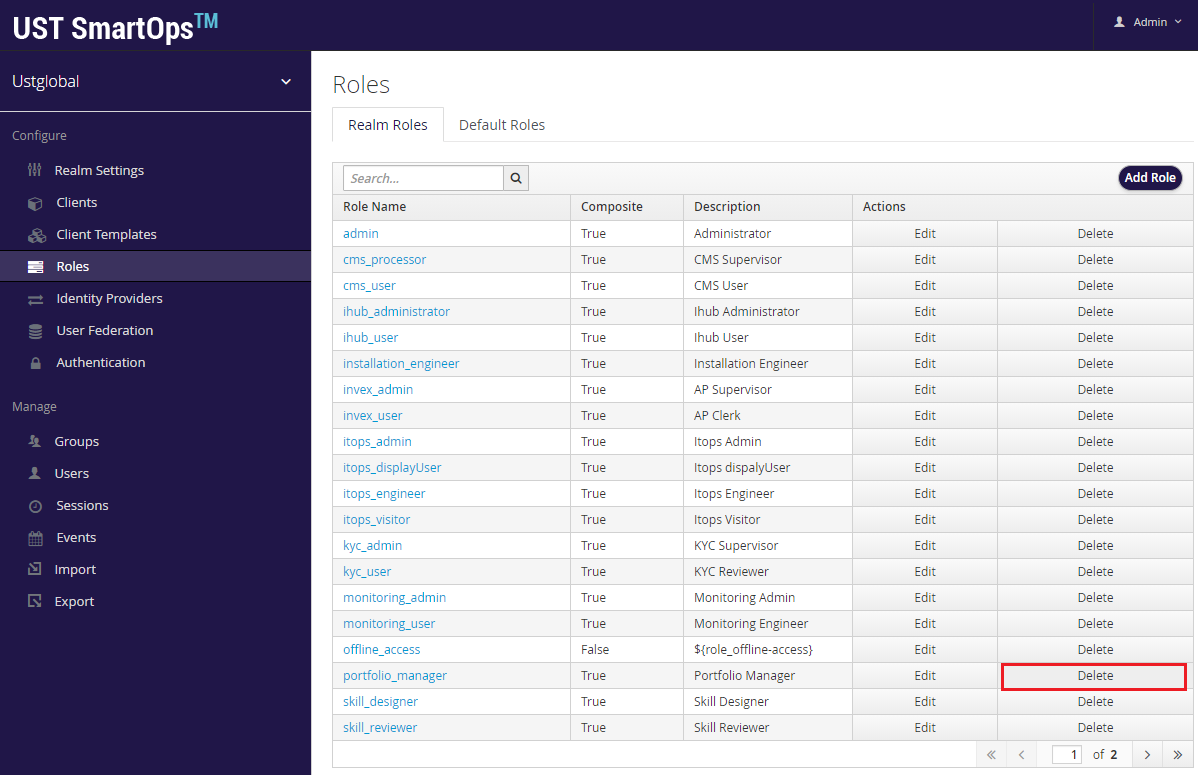
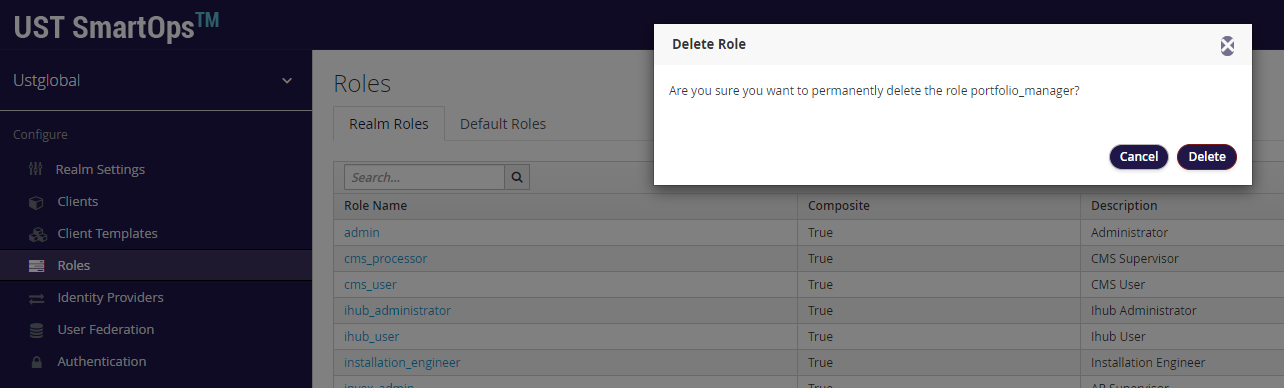
Portfolio manager persona is no longer required as the corresponding widgets have been removed from dashboard. To remove portfolio manager role, follow the steps mentioned below:
1. Login to Keycloak Master Admin console.
2. Select each Realms and click on Roles tab
3. Click on Delete button against portfolio_manager role and confirm to delete the role from the realm.
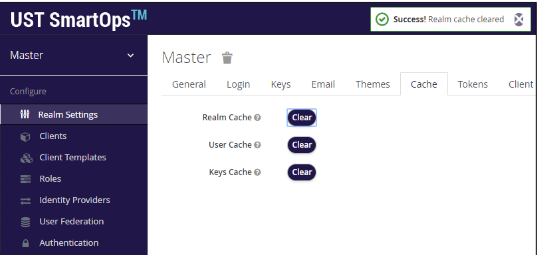
This step needs to be done only if clones-upgrade container was run for the deployment. To clear the Keycloak cache, follow the steps mentioned below:
1. Login to Keycloak Master Admin console.
2. Select any of the Realms and in Realm Settings and go to Cache tab.
3. Click on all the three Clear buttons (Realm Cache, User Cache and Keys Cache) to clear cache in all realms.
Note:
This process is required only if the clones-upgrade program was run as part of deployment.
In case the person who is doing the post-deployment steps are not aware of the deployment procedures completed, this can be executed.
During upgrade, please upload required micro actions to applicable Organizations and Master Org.
Microactions are available at Microactions
Following are the new/updated Micro Actions for Core-Platform: -
|
MA Name |
Display Name |
Category |
Release |
|
outboundmq_publish |
outboundmq_publish |
Others |
7.1 |
|
queue_publish_vhost |
Queue.Publish.Vhost |
Service |
7.1 |
Release-7.2
|
MA Name |
Display Name
|
Category
|
Release
|
|
mongodb_deletemany_documents_java |
Mongodb.Deletemany.Documents.Java |
Storage |
7.2 |
|
mongodb_deleteone_document_java |
Mongodb.Deleteone.Document.Java |
Storage |
7.2 |
|
mongodb_findmany_java |
Mongodb.Findmany.Java |
Storage
|
7.2
|
|
mongodb_findone_java |
Mongodb.FindOne.Java |
Storage
|
7.2
|
|
mongodb_insertmany_java |
Mongodb.Insertmany.Java |
Storage
|
7.2
|
|
mongodb_insertone_java |
Mongodb.Insertone.Java
|
Storage
|
7.2
|
|
mongodb_updatemany_java |
Mongodb.Updatemany.Java |
Storage
|
7.2
|
|
mongodb_updateone_java |
Mongodb.Updateone.Java
|
Storage
|
7.2
|
Microactions for v7.2 is available at Microactions
Note:
During fresh installation, these MAs will already be part of the dump and so these steps can be ignored.
There might be other MAs specific to individual PWFs, these can be uploaded based on need. For details regarding MAs specific to PWFs, respective teams need to be checked with.
There might be skills also which needs to be imported for specific PWF and details can be checked with respective teams.
For each environment, the de-association/association of PWFs, products, components in respective environments/instances (namely, core platform, ITOps, Invoice PWF) can be done. This will include the de-association of monitoring/support PWFs after data migration, as well as the association of new ITOps PWF and these steps are done via API.
Postman Collection contains sample request/response samples for the various APIs for association and de-association. It is on need basis that these need to get executed. For actual usage, these should be replaced with appropriate values for host, headers and request body. PFB the details of each of these APIs:
Invoke the SmartOps Login API for the applicable Organization.
URL: POST https://<host_name>/pwf/api/smartops/login Body: {"realm":"<orgname>","userName":"<user_name>","password":"<password>"}
Invoke the Get all PWFS, Products and Components (stacks) API with the following parameters to fetch all available PWFS, products and components:
URL: GET https://<host_name>/pwf/api/smartops/pwf/fetch-smartops-capabilities
Headers:
Organization-name–Unique identifier for the organization.
Authorization –Access token generated after invoking SmartOps login API (offline token can also be used)
user –User Id
Note: This API response provides the details of the PWFs, products and components available and it is based on these values the input for the rest of the APIs given below can be derived.
Invoke the Add Product and PWF association API to add or associate applicable PWFs and Products in the required Organization.
URL: PUT https://<host_name>/pwf/api/smartops/pwf/create-pwf-or-product-association
Headers:
Organization-name – Unique identifier for the organisation.
Authorization – Access token generated after invoking SmartOps login API (offline token can also be used)
user – User Id Body: {"componentId": <component_id>,"componentType":"<component_type>"}
Component ID –Unique identifier of the package workflow or product (copied from previous step)
Component Type –pwf / product
Note: Repeat this step for every PWF / product to be associated to the organization.
Invoke Disable PWF Association API if you need to de-associate any PWF from an organization. URL: PUT https://<host_name>/pwf/api/smartops/pwf/disable-pwf-association?pwfId=<pwf_id >
Headers: Authorization, user and Organization-key
Param: <pwf_id>
Note: Disabling PWF association will only disable the association of PWF with that organization. If there are any active projects associated wit that PWF, these projects should be de-activated or deleted to avoid further executions of these projects.
Invoke Remove Product Association API if you need to de-associate any Product from an organization.
URL: DELETE https://<host_name>/pwf/api/smartops/pwf/remove-product-association/<product_id>
Headers: Authorization, user and Organization-key
Param: <product_id>
Associate/De-Associate components/stack to a Product or a PWF
The details are as follows:
API details to Associate Stacks with PWF/Product:
URL: PUT https://<hostname>/pwf/api/smartops/pwf/add-component-association
Headers: Authorization, user and Organization-key.
Body: {"componentId":<component_id>,"componentType":"<component_type>","stacks":[<list_of_stacks>]}
API details to De-associate Stacks from PWF/Product:
URL: DELETE https://<hostname>/pwf/api/smartops/pwf/remove-component-association
Headers: Authorization, user and Organization-key
Body: {"componentId":<component_id>,"componentType":"<component_type>","stacks":[<list_of_stacks>]}
Note:
Please replace request body with corresponding values of componentId, componentType, stack.
The componentType can be either product/pwf.
The componentId is the corresponding id of the product or pwf
The stacks should be list of applicable components which needs to be associated for the product/pwf.
The values of the componentId and the stack can be obtained from the API which fetches all PWFs, Products and Components (api/smartops/ pwf/fetch-smartops-capabilities)
For details on iHub, refer
Use below configurations to setup Archiva for proxy environments where network accessibility is not there:
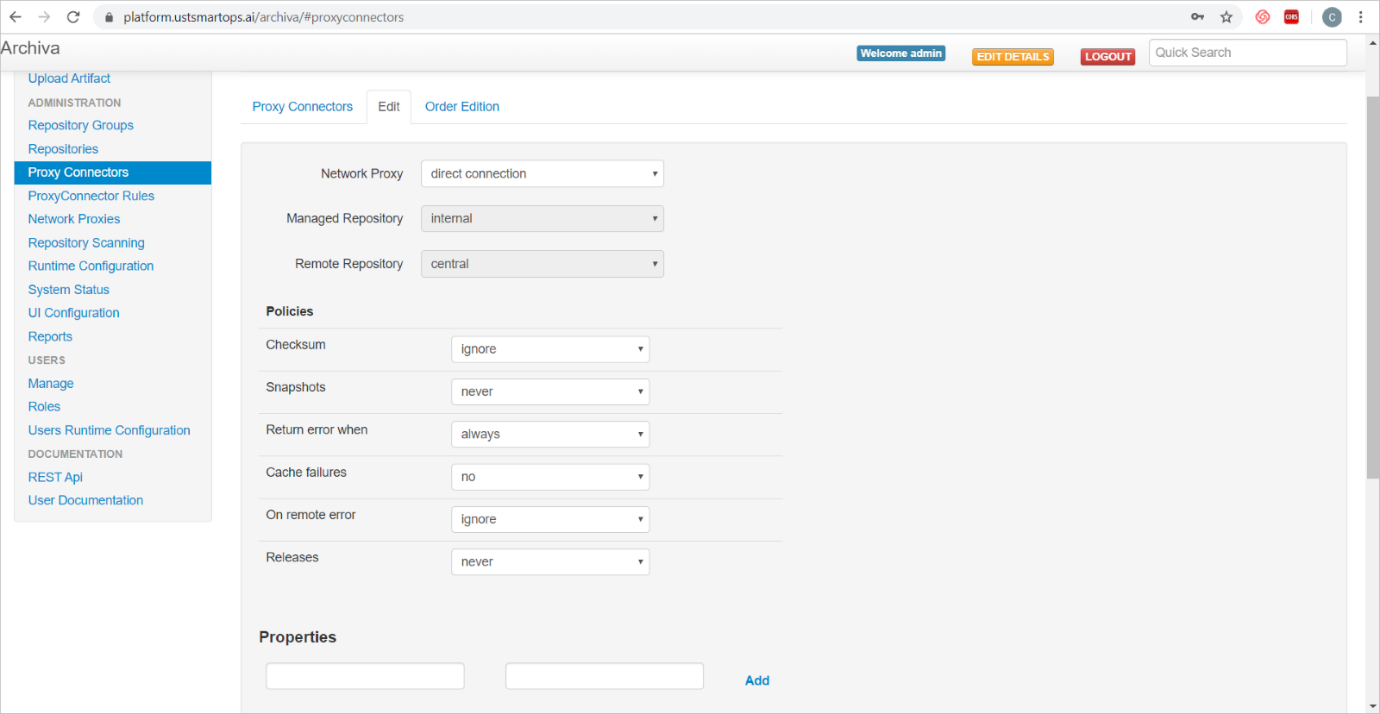
For more on Archiva please refer here :
http://clones-dev.southindia.cloudapp.azure.com:8080/smartops-dev-guide/archiva/
Organizations are the enterprise users for whom the SmartOps capabilities are offered.
A Master Administrator has the privilege to manage organizations for SmartOps.
Creating an Organization consists of the following sections
Create realm for a new organization
Defining Web Redirect URI for the Organization
To create a new organization in SmartOps, follow the steps mentioned below:
Access the Master User Interface. The Master UI login page is displayed as shown in FigureFigure.
_files/image6.png)
Enter the user credentials (Master Admin) in the Username and Password field.
Click Sign in. SmartOps Master UI home page is displayed as shown in FigureFigure.
_files/image7.png)
Click Organizations tab. By default, Organization is displayed.
Click on the _files/image8.png) icon near Organizations. The window for creating a new organization is
displayed as shown in FigureFigure.
icon near Organizations. The window for creating a new organization is
displayed as shown in FigureFigure.
_files/image9.png)
Enter the name of the organization in the Organization Name field.
Click Add. The SmartOps Master UI home page is refreshed with the new organization as shown in FigureFigure.
_files/image10.png)
To define the web redirect URI for the new organization, follow the steps mentioned below:
Click on Edit Organisation corresponding to the organisation in FigureFigure.
_files/image11.png)
This will open the Keycloak Administration UI where you can create an Organization Administrator user and do other configurations.
Click on Clients tab from the menu options available on the left-hand side of the screen and select smartops-frontend from the Clients as shown in FigureFigure.
_files/image12.png)
Enter the URI in Valid Redirect URIs and Web Origins field as shown in FigureFigure.
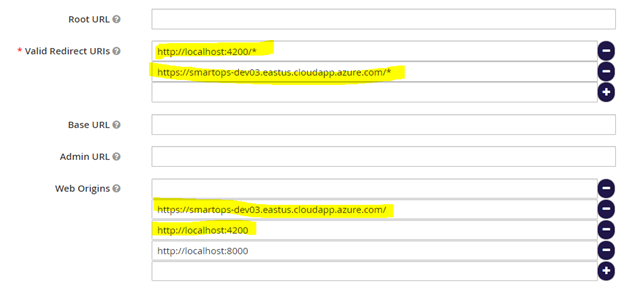
Click Save. The success message is displayed as shown in FigureFigure.
_files/image14.png)
Master Administrator can add users such as Admin, Installation Engineer, and Skills Designer through Master UI. The Roles and Permissions corresponding to each Package Workflow is detailed in the section Appendix: PWF Roles and Permissions To add users and assign corresponding roles, follow the steps mentioned below:
Click on Edit Organisation corresponding to the organisation as shown in FigureFigure.
_files/image15.png)
This will open the Keycloak Administration UI where you can create an Organization Administrator user and do other configurations.
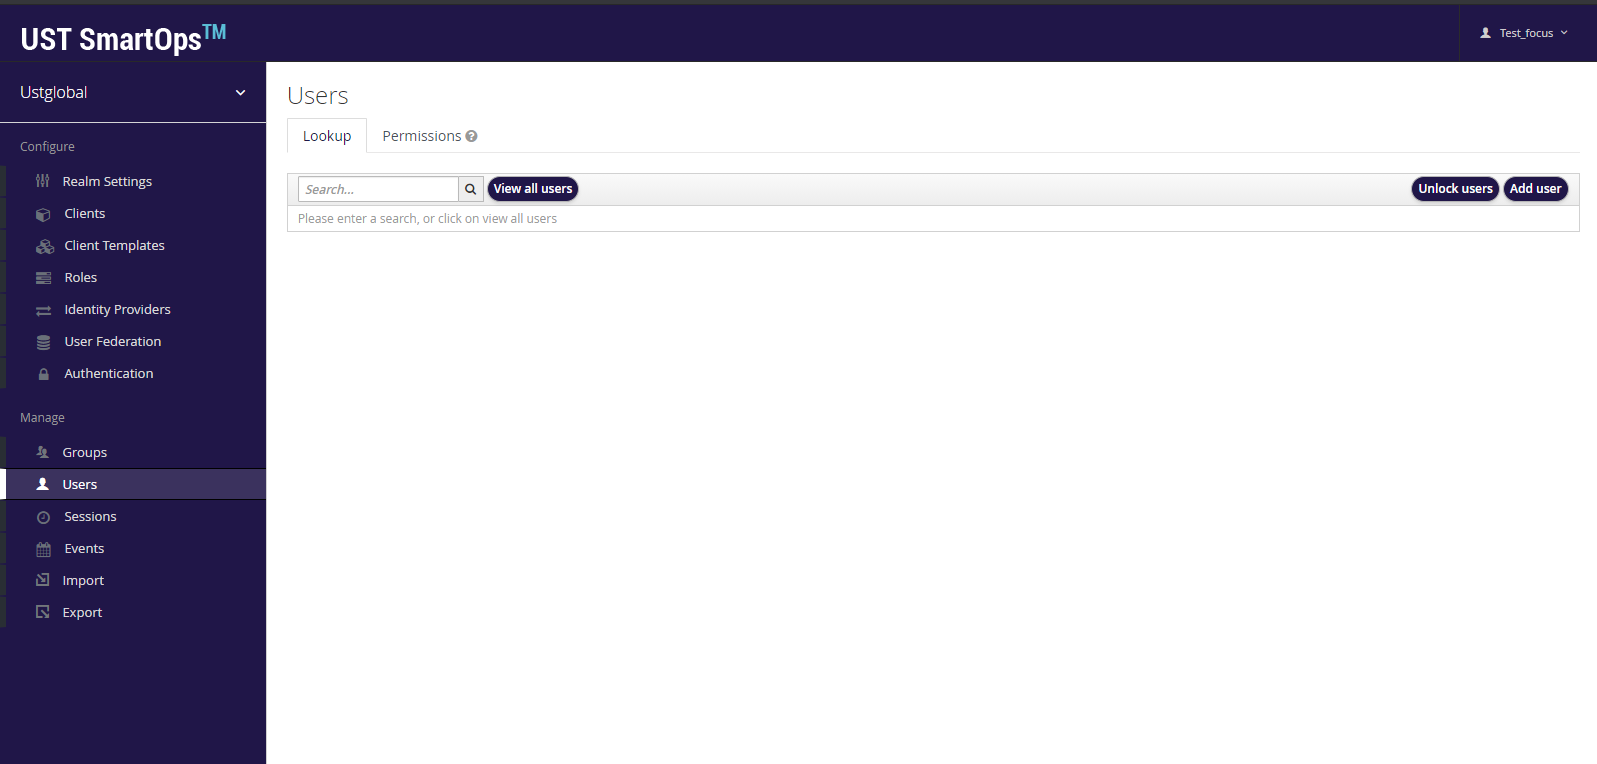
Click on Users tab from the menu options available on the left-hand side of the screen and click Add User as shown in FigureFigure.
_files/image16.png)
The Add User screen is displayed as shown below.
_files/image17.png)
Enter the username in the User Name field. You may also enter all other optional fields. Click Save.
Select the user from the list. You may search from the Search field.
Navigate to Role Mappings tab and add the required roles from the Available Roles block.
To add a role, select the required role from the Available Roles block and click on Add selected icon as shown in FigureFigure.
_files/image18.png)
You may assign roles as per requirement of the Package Workflow required as shown below. For example: Admin, Installation Engineer and Skills Designer Roles.
_files/image19.png)
You may also assign password for the user. To assign password:
Access Manage Password window through Credentials tab as shown in FigureFigure.
_files/image20.png)
Enter the password in Password field.
Confirm the password in Password Confirmation field.
Mark the password as temporary or not in the Temporary field.
Click Reset Password. The password reset successfully message is displayed.
New roles have been added for iHub and these can be added to applicable users based on the requirement:
ihub_administrator – admin user for iHub
ihub_user – normal user for iHub
Following permissions have been newly introduced (this is just for understanding purpose and there is no action required as part of post deployment):
|
Permissions |
Description |
Associated Roles |
|
ihub_channel_listing |
List iHub channels |
Ihub Administrator, Ihub User |
|
ihub_channel_edit_conf |
Edit iHub channel configuration |
Ihub Administrator |
|
ihub_channel_enable_disable |
Enable or disable iHub channels |
Ihub Administrator |
|
ihub_channel_view_conf |
View iHub channel configuration |
Ihub Administrator, Ihub User |
|
smartops-component-access |
Access SmartOps Components |
Skill Designer, Portfolio Manager, Installation Engineer, Ihub Administrator, Ihub User |
Refer this Link for details.
Generic Notes:
While adding roles to a user in Keycloak, it is enough to add roles needed for that specific user. For example, an Invex user may not need roles corresponding to ITOps. Adding all available roles to a user may result in header size issue and the application may not be accessible for that specific user.
To get contents in the Clones dead letter queue (clones.dlx.queue), the following API can be saved in Service.Connect MA:
|
URL: http://<hostname>:15672/api/queues/clones/clones.dlx.queue/get Method: POST body: {"vhost":"clones","name":"clones.dlx.queue","truncate":"50000","ackmode":"ack_requeue_true","encoding":"auto","count":"3"} //count can be updated based on the number of records to be fetched username:admin password:***** |
While installing and updating a PWF project, the status of the project will become ‘Installing’ and ‘Updating’ respectively. During this time, workflow execution of only the Installation and Update workflows will be allowed. All other workflows will be prevented from getting executed.
For archival process, certain PWF APIs are used for fetching archival configurations and logging the archival status. These APIs are authorized with the Organization ID and Offline Token of a valid Organization. By default, the Organization ID used is 1 based on the assumption that this organization will have a valid offline token generated. But in case, Organization with ID 1 is not an active organization, the environment variable 'ARCHIVAL_ACCESS_ORG_ID' can be used to provide the ID of an active organization.
Considering the need for performance optimization, archival process can be run on daily basis as well as hourly basis. This can be decided based on the volume of data expected in an environment. This can be configured based on the minimum, maximum days and run size based on days or hours
In an environment where SmartOps application has previously been running (that is, an upgraded environment and not a new one), data should already be available in the transaction tables. So, in such environments, it is advisable to run archival on an hourly basis during the first run. Afterwards, it can be decided to keep it on hourly/daily basis. Run size can also be decided based on the volume of data.
Following are the environment variables available which can be used to configure the archival process with their default values:
Configurations to set timeout/limit:
Configuration to set the timeout for queries being run
ARCHIVAL_MYSQL_QUERY_TIMEOUT: "300"
Configuration to set the limit of number of records which get inserted/deleted at a time
ARCHIVAL_HOT_QUERY_LIMIT: "1000"
Configurations for Step Run
Configurations required for step by step run (based on step size provided), this needs to be set when volume of data is more, especially during first run. If step by step run is required, step_run_required should be set as true. If not, this needs to be set as false
ARCHIVAL_STEP_RUN_REQUIRED: "true"
When step run is enabled, archival process will start with step_run_max_day (that is, records created prior to the value of this field will be archived first). Once this is completed, archival process will run in intervals based on step size till it reaches step_run_min_days (minimum value will also be decided based on the minimum value configured per DB in archival db configurations with preference for DB configuration)
ARCHIVAL_STEP_RUN_MAX_DAY: "30"
ARCHIVAL_STEP_RUN_SIZE: "1"
ARCHIVAL_STEP_RUN_MIN_DAY: "10"
Note: For the very first run, ARCHIVAL_STEP_RUN_MAX_DAY can be increased to a value based on the date of first run of SmartOps application in that environment. For example, if the application was first run 3 months back, this value can be set as 90. From the next run onwards, it can be brought back to 30 (30 is chosen here because that is the maximum value of hot archival period configured in DB for the currently available databases)
when hour-based run is enabled, archival will run in intervals given in hour run size and not based on step_run_size
ARCHIVAL_STEP_HOUR_RUN_REQUIRED: "true"
ARCHIVAL_STEP_HOUR_RUN_SIZE: "1"
When enable_all_databases is set to true, step_run configurations will be applicable to all databases and the field step_run_enabled_databases will not be considered. When set to false, databases for which step run needs to be set can be selected; those database names need to be entered as comma separated values for the field, step_run_enabled_databases
ARCHIVAL_STEP_RUN_ENABLE_ALL_DATABASES: "true"
ARCHIVAL_STEP_RUN_ENABLED_DATABASES: "null"
Note: Currently available database names are clones_core, clones_engine and smartops.
Note:
Based on testing done in DI, it is identified that FinOps mostly has lesser data when compared to Platform and ITOps. So, it is assumed that FinOps can be run based on daily run. ITOps and Platform would mostly require hourly run because of the huge volume of data expected. However, for the very first run, it is advisable to run all environments based on hourly run.
APIs are be available to save/update values and will be used by end users for adding organization specific data to the archival_duration table.
|
Method: POST URL: Headers: Authorization, user and Organization-key RequestBody : { "dbConfigId" : Integer, "dbName" : "String", "hotArchivalPriorTo" : Integer, "coldArchivalPriorTo" : Integer, "permanantDeletePriorTo" : Integer } |
|
1.Method: DELETE 2.URL: 3.Headers: Authorization, user and Organization-key 4.RequestParam: durationId (required = true) |
|
1.Method: GET 2.URL: 3.Headers: Authorization, user and Organization-key 4.RequestParam: dbConfigId (required = false) |
APIs for managing master configurations are now accessible only for master admin user. These APIs are authorized with the Organization, ‘master’ and a valid Bearer token of master admin.
Master Configuration API Details
APIs are available for save/update, fetch and delete master configurations. Organization-key value should be ‘master’ for all the below APIs.
1). API to save/update
|
Method: POST URL: Headers: Authorization, user, Organization-key RequestBody Sample: { "componentType": "string", "defaultValue": "string", "description": "string", "displayName": "string", "displayOrder": 0, "dynamic": true, "groupName": "string", "installationProperty": true, "key": "string", "mandatory": true, "options": [ { "key": "string", "value": "string" } ], "pwfName": "string", "readOnly": true, "sensitive": true, "serviceType": "string", "unique": true } |
2). API to Delete
|
Method: DELETE URL: } Headers: Authorization, user, Organization-key Path variable: mcId (Required = true) |
3). API to fetch by PWF Id
|
Method: GET URL: } Headers: Authorization, user, Organization-key Path variable: pwfId (Required = true) RequestParam: pageNumber (required = false) RequestParam: pageSize(required = false) |
4). API to fetch by McId
|
Method: GET URL: } Headers: Authorization, user, Organization-key Path variable: mcId (Required = true) |
Project code base setup
Clone from smartops-ui-mux repo
Move to smartops-ui-mux folder
Install dependecies
npm install
run the platform application
npm run base
Browser address
http://localhost:4200/smartops/ustglobal
We have added a new permission realm-admin to installation_engineer role in Keyclaok. Users assigned with installation_engineer role will get access to more features in Keycloak Admin console for the corresponding realm/organization. This change was introduced as a part of staggered release support. The additional features for admin console are shown as below:
Release 7.3.1
With respect to the retry mechanism followed for reprocessing requests which have remained in Queued status in Clones Engine, there are a few ENV variables which can be configured based on user requirements. Following are the environment variables, which, if needed, should be changed in Clones Engine ENV file. Default values given are specified here:
Requeue schedule frequency (time in milliseconds) based on which queued up requests will be processed again:
CLONES_REQUEUE_INTERVAL=1800000
With the above value (1800000 milliseconds), scheduler will run every 30 minutes to take up requests which have not been processed by engine and thus remained in ‘Queued’ state.
Time variables for Requeue flow. Requests created before CLONES_REQUEUE_START_TIME_IN_MINUTES but not before CLONES_REQUEUE_END_TIME_IN_MINUTES from scheduler run time will be taken up for reprocessing.
CLONES_REQUEUE_START_TIME_IN_MINUTES=5
CLONES_REQUEUE_END_TIME_IN_MINUTES=120