Purpose of this document is to provide guideline for deploying iHub Lite in a docker swarm environment for azure. The document contains prerequisites for installing iHub Lite application and detailed instructions to deploy iHub Lite application.
Contents
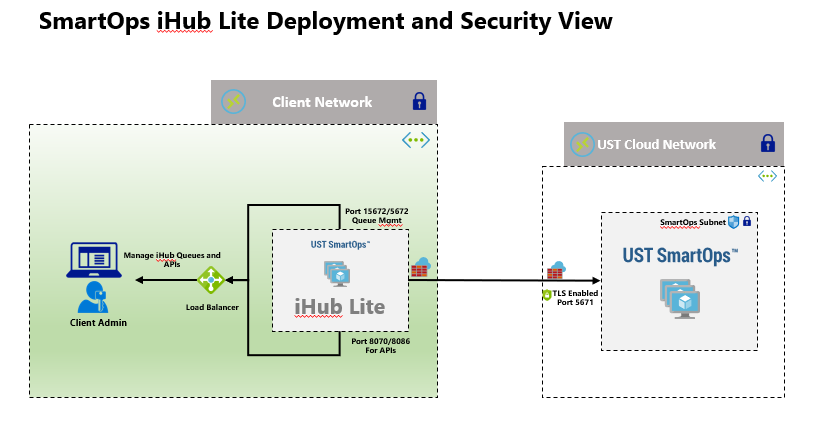
IHub Lite Architecture diagram is as follows
Access to azure container registry is required.To download ihublite docker images outbound call to be made to azure container registry(https://smartopsregistry.azurecr.io/v2/).
Procure an Azure container registry access key from SmartOps Support Team .
Key will be valid for a fixed time period for deployment
Access to docker hub is required to download RabbitMQ and Mongo (https://docs.docker.com/docker-hub/)
IHubLite is installed in client network and It will connect to SmartOps through TLS enabled channel on RabbitMQ (Refer Azure Load Balancer creation document)
The above architecture diagram provides guidance on setting up network for the installation. If deviating from above plan, consider applying the effects of that change in subsequent steps of this document.
Create a Docker Node VMs with below configurations to create the infrastructure from Deployment VM
Ihublite requires one node Vm of Below specification
|
VM |
Type |
CPU/Memory |
Disk Size |
Type |
OS / Data |
|
App |
Standard B2ms (in Azure) |
2 vcpus, 8 GiB |
128 GiB |
Premium SSD |
Ubuntu 18.04 |
If the infrastructure is not Azure, create same size of VM in any other infrastructure
Create the VMs with authentication mechanism as SSH public key
Considering the Azure resource group may differ in environments, it is necessary to log on to azure cli and set the default resource group to the one used for this purpose(Steps to Install azure cli is available in FAQ)
Place the public key file to create VM from where the script is getting executed. The key is passed as parameter ssh-key-values and the key file name is smartops-stage-env-public-compact in script
A public Ip and DNS name is associated with this VM (DNS Name as smartops-ihublite.eastus.cloudapp.azure.com). So, make sure that you are creating a public ip with desired DNS name and using it in VM creation script
Eg: --ssh-key-values @smartops-dev-env-public-compact
The following values should be updated correctly in the Script. Please not the script is used to create VMs with naming conventions used by Smartops Engineering Team
|
Description |
|
|
RESOURCE_GROUP |
Azure Resource Group |
|
VNET_NAME |
Azure Virtural Network Name Created within that Resource Group to associate with VM |
|
SUBNET_NAME |
Azure Sub Network Name Created within that Resource Group to associate with VM |
|
NSG_NAME |
Network Security Group Name if already created, or else it will be created as part of this script |
|
ENV_PREFIX |
Environment Prefix - Example: engg, sales, delivery etc |
|
ENV_ID |
Environment ID - Example: dev, qa, stage, prod etc |
|
PURPOSE |
Environment Purpose - Example: smartops, pwf-invoice, pwf-monitoring etc |
|
KEYFILE |
Create the public key and provide the filename. Ensure this file is placed in same location |
|
ENV_TAG |
Tag to be attached to these resources |
|
BUSINESS_UNIT_TAG |
Tag to be attached to these resources |
|
ADMIN_USERNAME |
User name : usually smartops |
Place install_dependencies.sh script and public key file in same location where the vm creation script(setup-vm-ihub-lite-stage.sh) is being executed. install_dependencies.sh file will install all prerequisite softwares required to deploy IhubLite application. The failure in execution of this script causes failure in installation of ihublite.
VM Names are set as vm-ENV_PREFIX-ENV_ID-PURPOSE-<Sequence>
Once docker is installed in all Node VMs we can start set up the Swarm cluster.
Appropriate connectivity (SSH) needs to be established between Deployment VM and Cluster VMs (docker swarm nodes).
Connect to the newly created Node VMs through ssh authentication and initialize swarm in app VM
|
SSH <ihublite-001 VM> docker swarm init Swarm initialized: current node (dxn1zf6l61qsb1josjja83ngz) is now a manager.
To add a worker to this swarm, run the following command:
docker swarm join \ --token SWMTKN-1-49nj1cmql0jkz5s954yi3oex3nedyz0fb0xx14ie39trti4wxv-8vxv8rssmk743ojnwacrr2e7c \ 192.168.99.100:2377
To add a manager to this swarm, run 'docker swarm join-token manager' and follow the instructions. |
Download IhubLite artifacts from the shared SharePoint location and copy the deployment artifacts to the Docker Swarm Manager enabled IhubLite VM home directory. [ ~ ].(After creating VM using above steps)
smartops-ihublite-R6.4.3.tar.gz contains the artifacts for ihublite .The package can be extracted using following command:
|
tar -xvf smartops-ihublite-R6.4.3.tar.gz |
A folder with the same name as the package will be created in the location where you extract the package. This will contain all the required files and folders.
the package is extracted to <package_name>
Navigate to ‘~/<package_name>/installer’ directory.
|
cd ~/<package_name>/installer/ |
Execute initialization script
|
sh init.sh |
Edit config.ini file with the environment details as below. Edit only the highlighted values with environment specific values
|
vi config_component.ini |
|
Description |
|
|
COMPONENT_NAME |
Name of the Component. |
|
DNS_NAME |
DNS for the environment. |
|
NETWORK_NAME |
New Overlay network to be created for the component. The network for ihublite is ihublite-overlay-network |
|
LB_NAME |
#Azure Load Balancer Name for RabbitMQ connection |
|
DEPLOY_OR_UPGRADE |
Flag to indicate if deploy from scratch or upgrade from existing release. To update value for this parameter as ‘Upgrade ’ after first deployment. |
|
MONGO_ADMIN_PASSWORD |
Admin Password for MongoDB. By default, it is set as 1hubl1t3 |
|
RABBIT_MQ_ADMIN_PASSWORD |
Rabbit MQ Admin Password. By default, it is set as admin |
Edit registry-pass.txt with procured Azure container registry key to access smartops container registry and download ihublite images
|
cd ../stack-repo #Update the azure container registry key vi registry-pass.txt #Save the key and exit |
Execute the following command to start deployment. The deployment for Ihublite takes 5 minutes to complete
|
cd ../installer ./deploy_component.sh |
Note: When deploying the services for first time, all the images are getting downloaded from image registry. So, there could be failures/delay in startup. If you see certain services failing after waiting for a period, you can try to redeploy using stop-start-stacks.sh for those specific stacks present in ~/<package_name>/ stack-repo, or force update specific services. E.g is shown below.
|
./stop-start-stacks.sh <stack-name> docker service update <stack-name>_<service-name> --force |
Create user ‘ihub’ in mongoDB instance
Login to mongo shell to execute this command
|
docker ps | grep mongo # take first parameter container id and execute below command docker exec -it <container_id> bash # execute below command to login to mongodb mongo -u ihublite -p <set_mongo_admin_password>> -authenticationDatabase admin # execute below script use admin db.createUser({user: "ihub", pwd: "admin",roles: [ { role: "userAdminAnyDatabase", db: "admin" }, "readWriteAnyDatabase" ]}) use IHUB db.UserCredentials.insert({"username" : "ihubmaster", "password" : "ENC(2RrUa86hRjtpcGAe1UwuHRn3zTYTJAdl", "role" : "ADMIN"}); exit exit # cd ../stack-repo ./stop-start-stacks.sh ihublite |
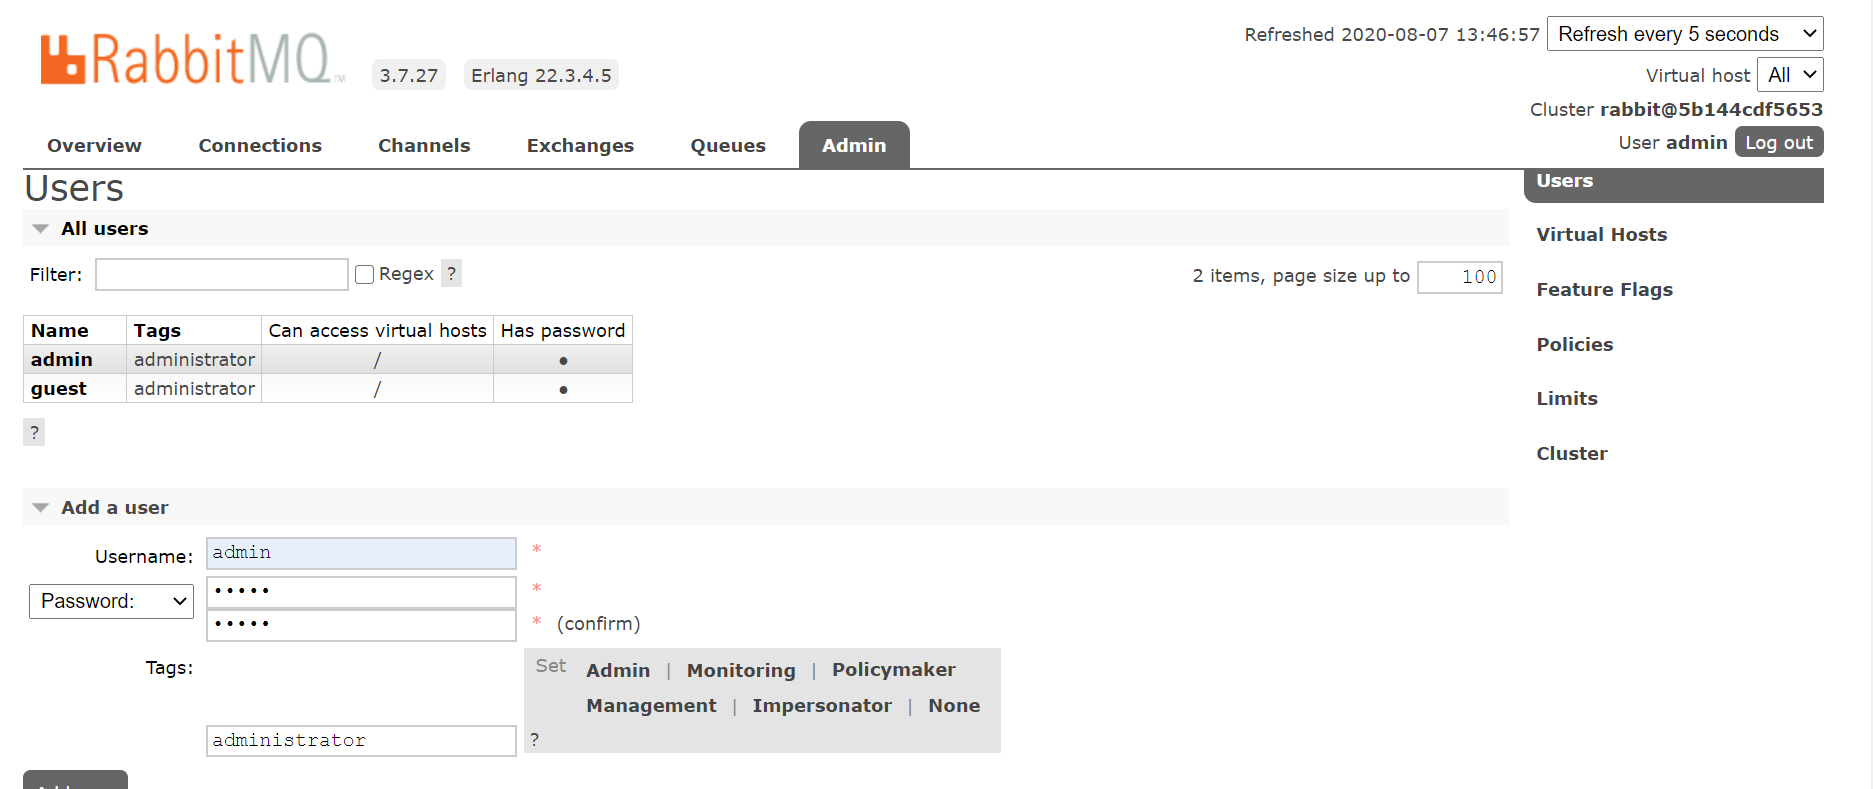
Go to rabbitmq console using http://<dns-name-ihublite>:<rabbitmq-port>
Login with default guest/guest credentials in RabbitMQ console
Create an admin user with credentials admin/admin.
Click on the created admin user and set permission for that user for vhost /
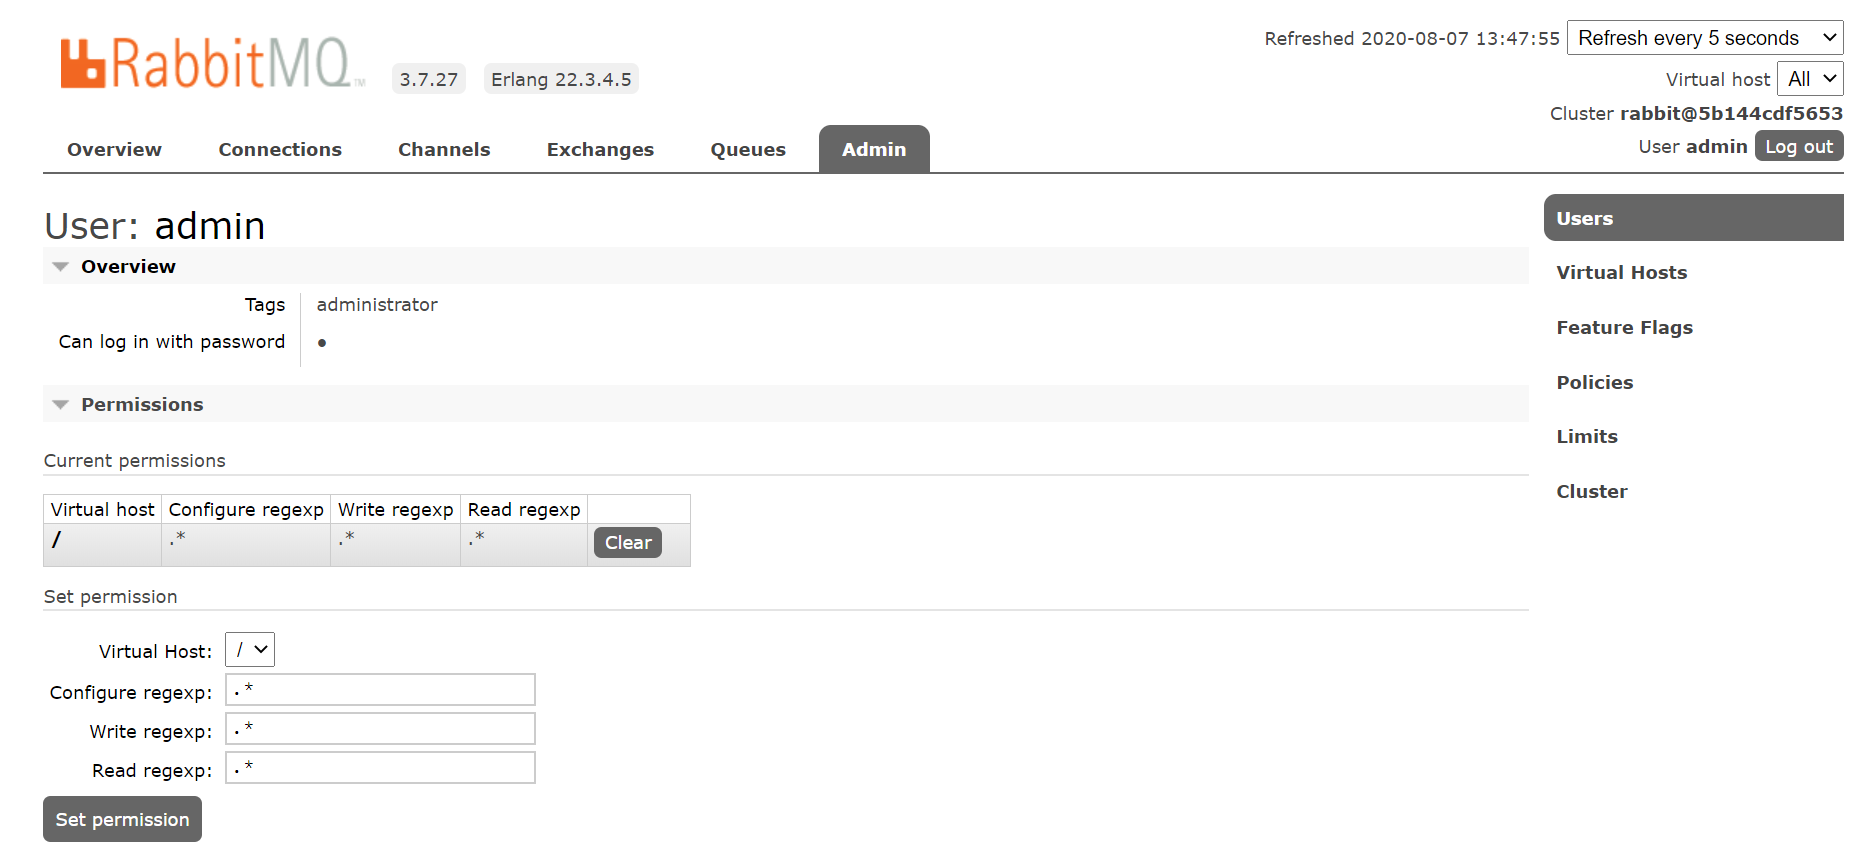
Logout and login again with admin/admin credential

On successful installation services in attached list will be deployed in cluster. The installed service can be found out using following command
|
~ docker service ls ID NAME MODE REPLICAS IMAGE PORTS r62sfj015rg1 ihublite-mongo_ihublite-mongo replicated 1/1 mongo:4.1.4 3vico691nzw2 ihublite_ihub-component-lite replicated 1/1 smartopsregistry.azurecr.io/smartops/ihub-component:6.4.3.96 e07zt2h70nt9 ihublite_ihub-services-lite replicated 1/1 smartopsregistry.azurecr.io/smartops/ihub-services:6.4.3.116 xv5rvp3twzy6 ihublite-rabbitmq_ihublite-rabbit replicated 1/1 rabbitmq:3.7-management |
Logs can be viewed from the container using following command
|
# the following command give the service logs with service name docker service logs ihublite_ihub-component-lite docker service logs ihublite_ihub-services-lite |
Following ports to be opened in NSG for accessing ihublite apis (8086,8070,15672)