Smart Vision v2.4-Application Deployment Process
Important Terms
|
Bastion VM
|
The Virtual Machine which has access to Kubernetes API server
|
|
Base Infra
|
The base Infrastructure which needs to be created before deploying product Infrastructure
|
|
Product Infra
|
The Kubernetes infrastructure required for respective product
|
|
SmartInstall
|
The Holistic Solution for deploying SmartOps applications in Kubernetes infrastructure
|
Prerequisites
-
Base infra and infrastructure specific to Invoice Extraction available in the environment. Refer infrastructure creation document (WIP) to get an understanding on how to create the infrastructure.
-
Installation engineer has access to bastion VM (VM having visibility to the Invoice Extraction Kubernetes Cluster)
-
Bastion VM has ability to connect to K8s API server of invoice extraction (kubectl commands work.)
Download the installation package in bastion VM
The Release packages are stored in SharePoint location and in azure artifacts. Please follow below steps for downloading.
Primary Download location: Share point
-
Navigate to sharepoint location:https://ustglobal.sharepoint.com/teams/InnovationEngineering/Shared%20Documents/Forms/AllItems.aspx?viewid=f349a736%2D8a62%2D467f%2D8448%2D067be464bd59&id=%2Fteams%2FInnovationEngineering%2FShared%20Documents%2FKnowledge%20Management%2FSmartOps%20Deployment
-
Open the required release folder (eg:7.0.3)
-
Download the product zip and move it to the target VM
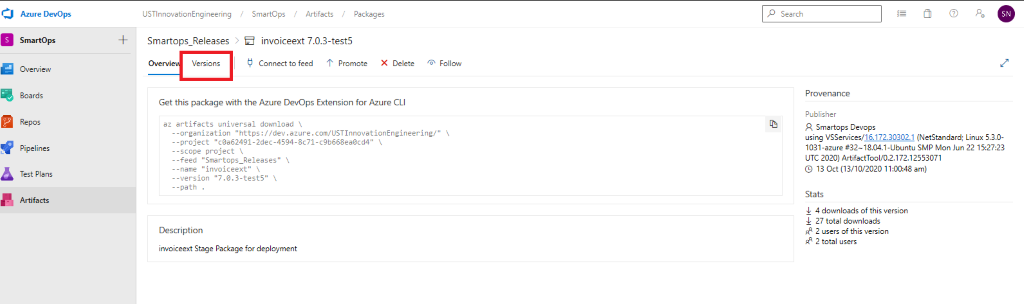
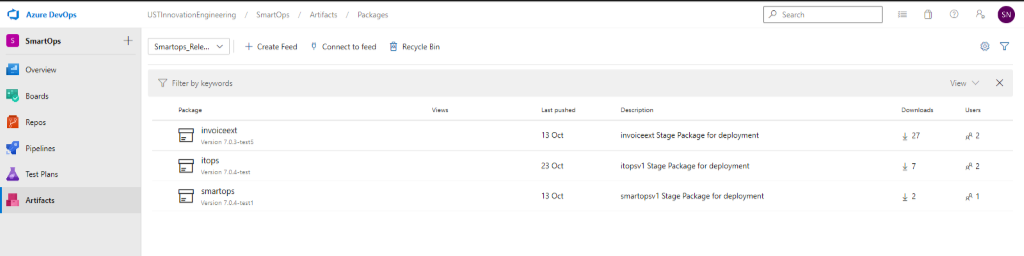
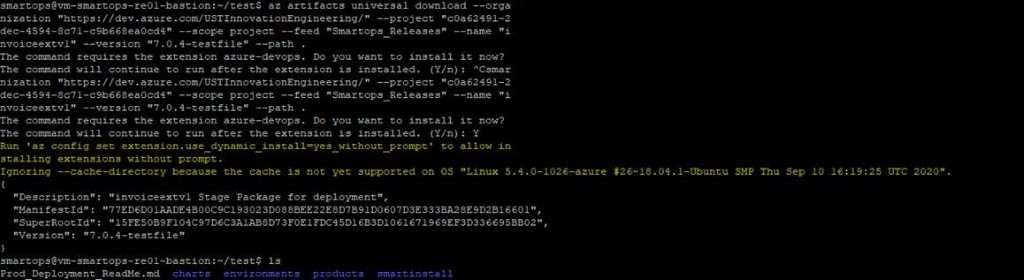
Secondary download location: Azure Artifacts
Prerequisite: using below command install az cli in the target deployment vm
-
Navigate to
https://dev.azure.com/USTInnovationEngineering/SmartOps/_packaging?_a=feed&feed=Smartops_Releases
-
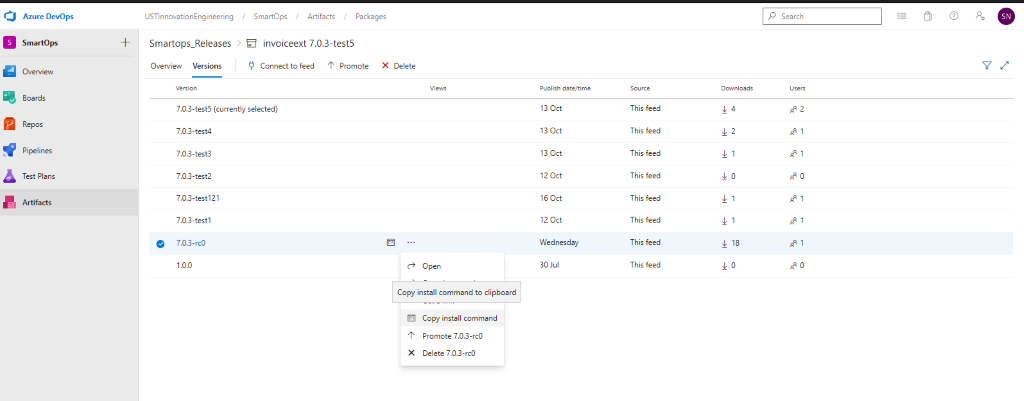
Click on the required package.

-
Click on Versions
-
Click on the options button (…) and select ‘Copy Install Command’. The download command will get copied to clipboard
-
Login to VM where you want to extract the package and execute the command.

Note: If its first time you will be prompted to install azure-devops extension. Give ‘Y’ and hit enter to continue.
Validation of Product Infra before Application Install
Az MYSQL Firewall policies
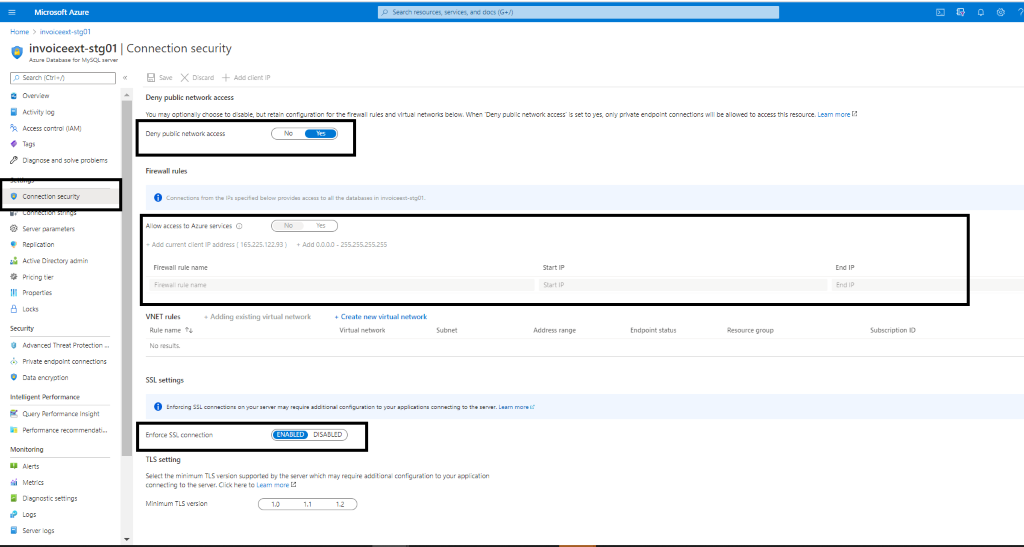
-
Public network access should be denied.
-
Allow access to Azure MySQL by configuring firewall policies
-
Enforce SSL connection should be Enabled
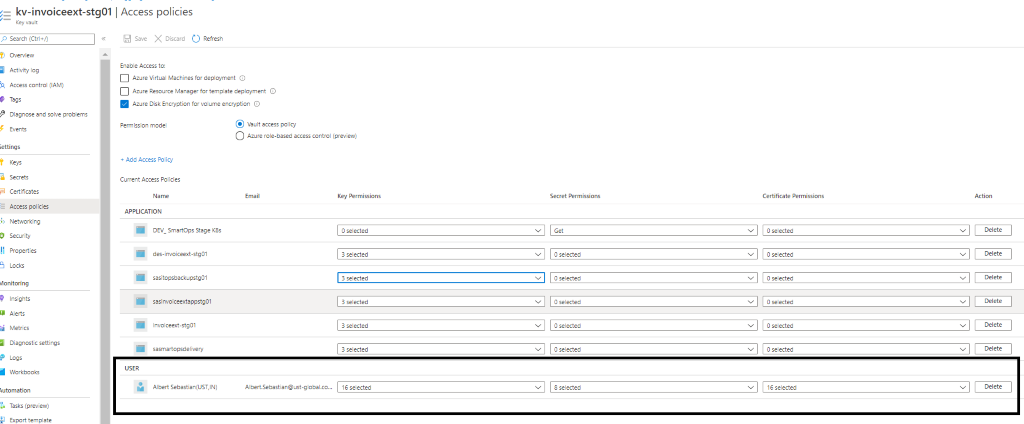
Key vault permissions for the Azure AD user.
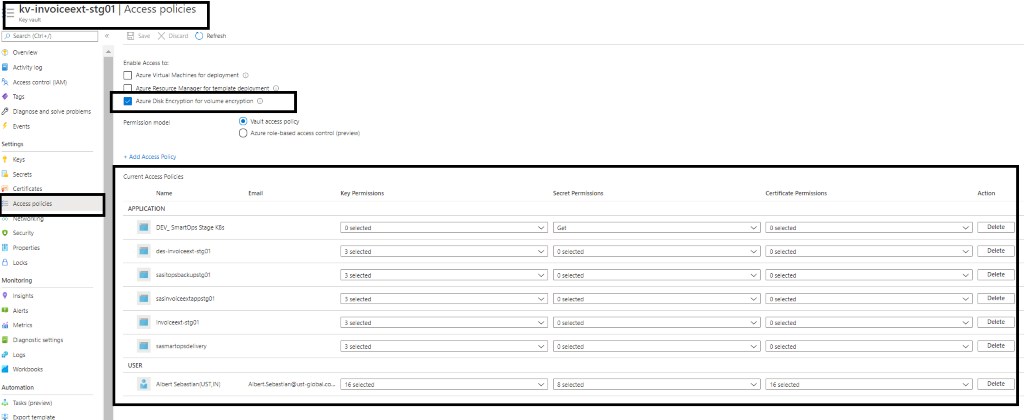
-
Access to key vault can be enabled by configuring Key Vault access policies.
-
Before proceeding with deployment, we need to validate
-
Access is enabled for Disk Encryption
-
Permission model set as Vault access policy
-
Respective applications and resources are added with required access under APPLICATION section
-
Azure service principal needs Get permission to Key Vault secrets.
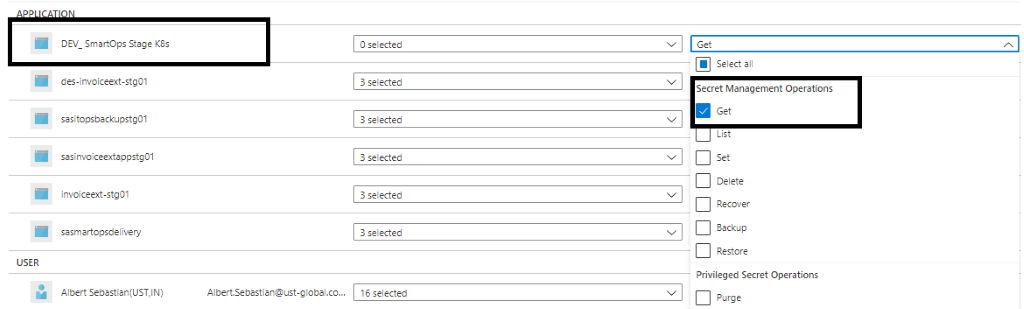
-
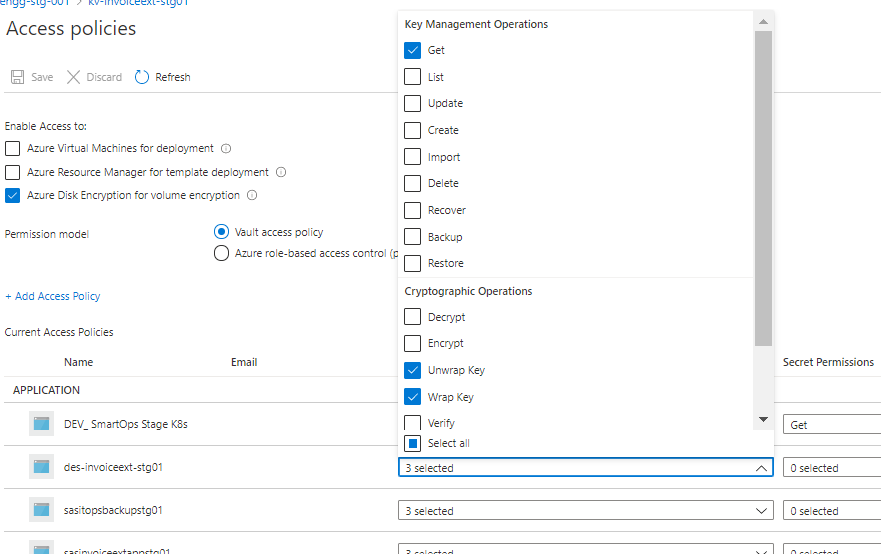
Disk Encryption set, storage account, Azure MySQL instance needs GET, Wrap and Unwrap Key permissions. Please refer below example for disk encryption set.
-
User’s access can be enabled by Adding users with required set of permission to access key, secret and certificate which is listed under USER section
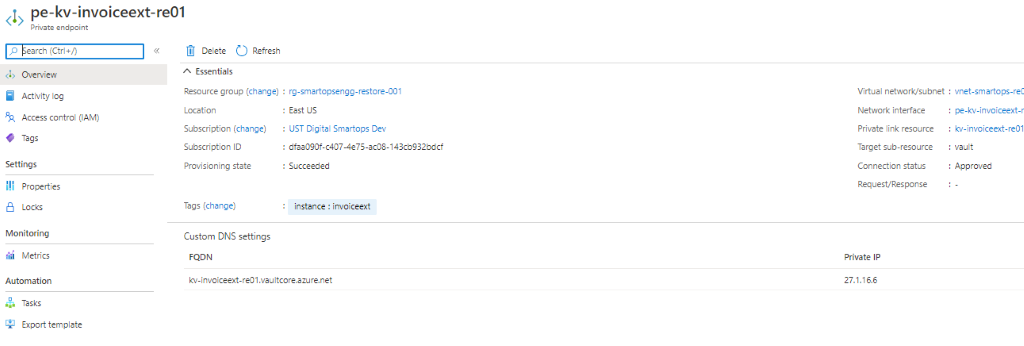
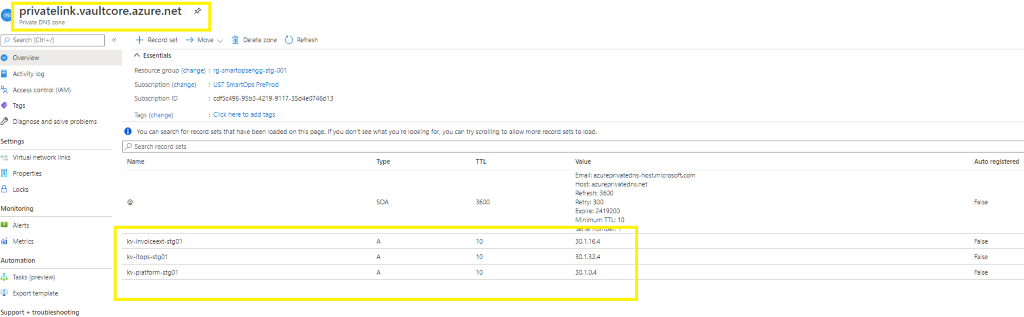
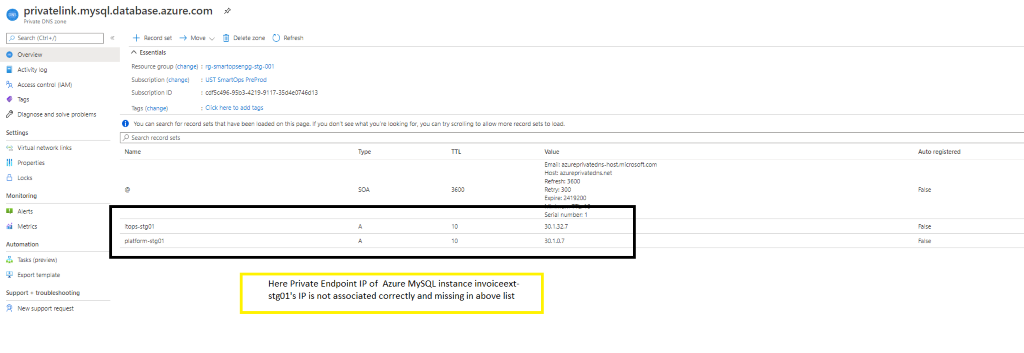
Private Endpoint’s IP associations
-
we have 4 private endpoints per environment. For these 4 private endpoints, we have 3 private DNZ zones. One private zone per Azure blob, Azure Key Vault and
Azure MySQL instances.
-
There should be a private IP against each of these services. If this private IP is not associated to the respective private endpoints, application deployments will fail as the K8s cluster will not be able to communicate with these private endpoints. We must manually add it via Azure portal, if found not associated.
PFB screenshots for reference
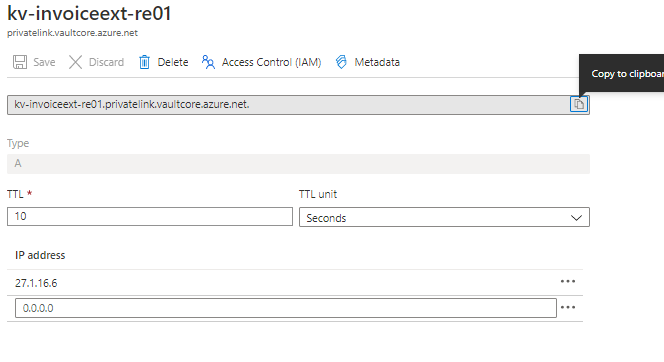
Key Vault Private Endpoint and its Private IP
 Above
Key Vault’s Private IP associated with respective Private Link of Key Vault
Above
Key Vault’s Private IP associated with respective Private Link of Key Vault
Update Private IP in Private Link
-
Please refer below screenshot when private endpoint’s IP is not associated with the private link.
-
When private endpoint IPs are not listed, include the same by adding record set of respective resource.
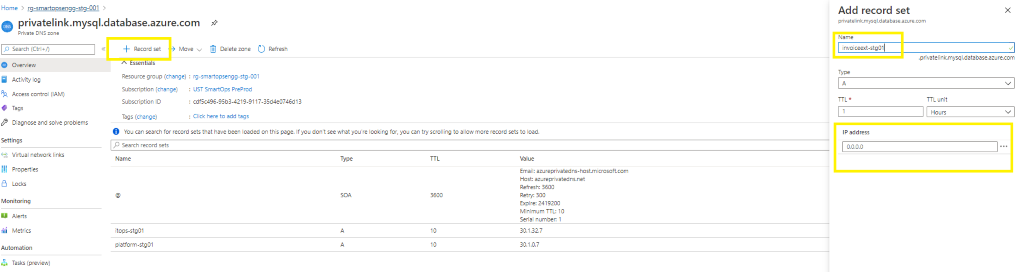
-
When adding new record set , update the instance name in Name field and add the private endpoint IP in the IP Address field.
-
If the record set is present but the IP is not associated then Click the record set (Here Azure Key Vault kv-invoiceext-re01)


Prepare the bastion VM
Install Tools: script to install prerequisite packages in bastion VM
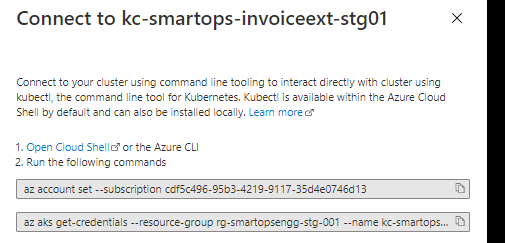
Connect to cluster (Kube config configured)
Pre-Check condition: Please check Python 3.6 is installed in the bastion VM. [ SmartInstall runs on Python 3.6]
Application Install
Setting secrets in Azure Key Vault.
-
Before starting the deployment, we must set secrets in Azure Key Vault using create-az-kv-secrets.sh script in kv-init folder with the updated values with respect to the product infrastructure created.
-
< Include kv init sc in package >
-
Before executing the create-az-kv-secrets.sh script, respective access policies must be set for the key vault for the Azure AD user.
-
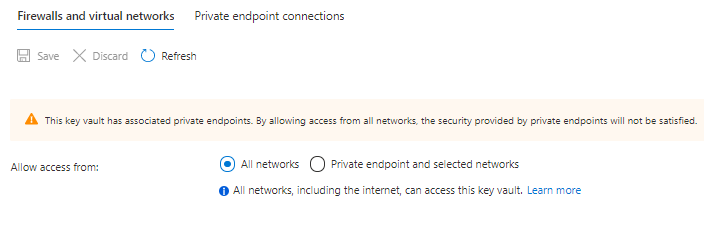
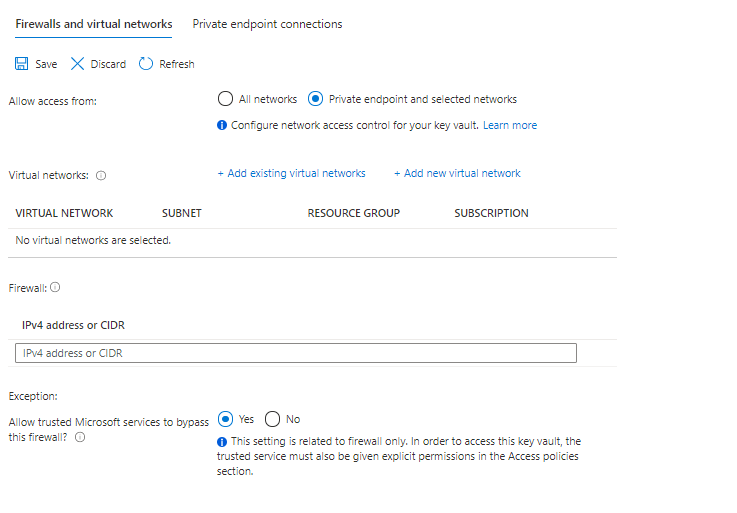
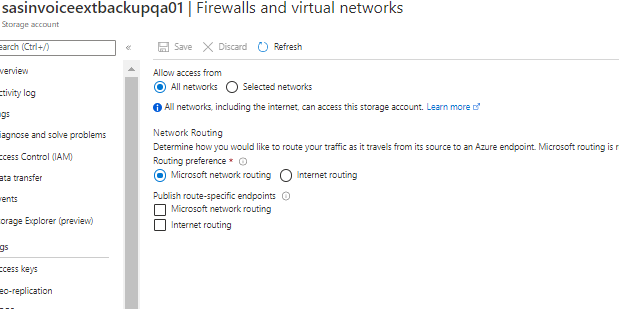
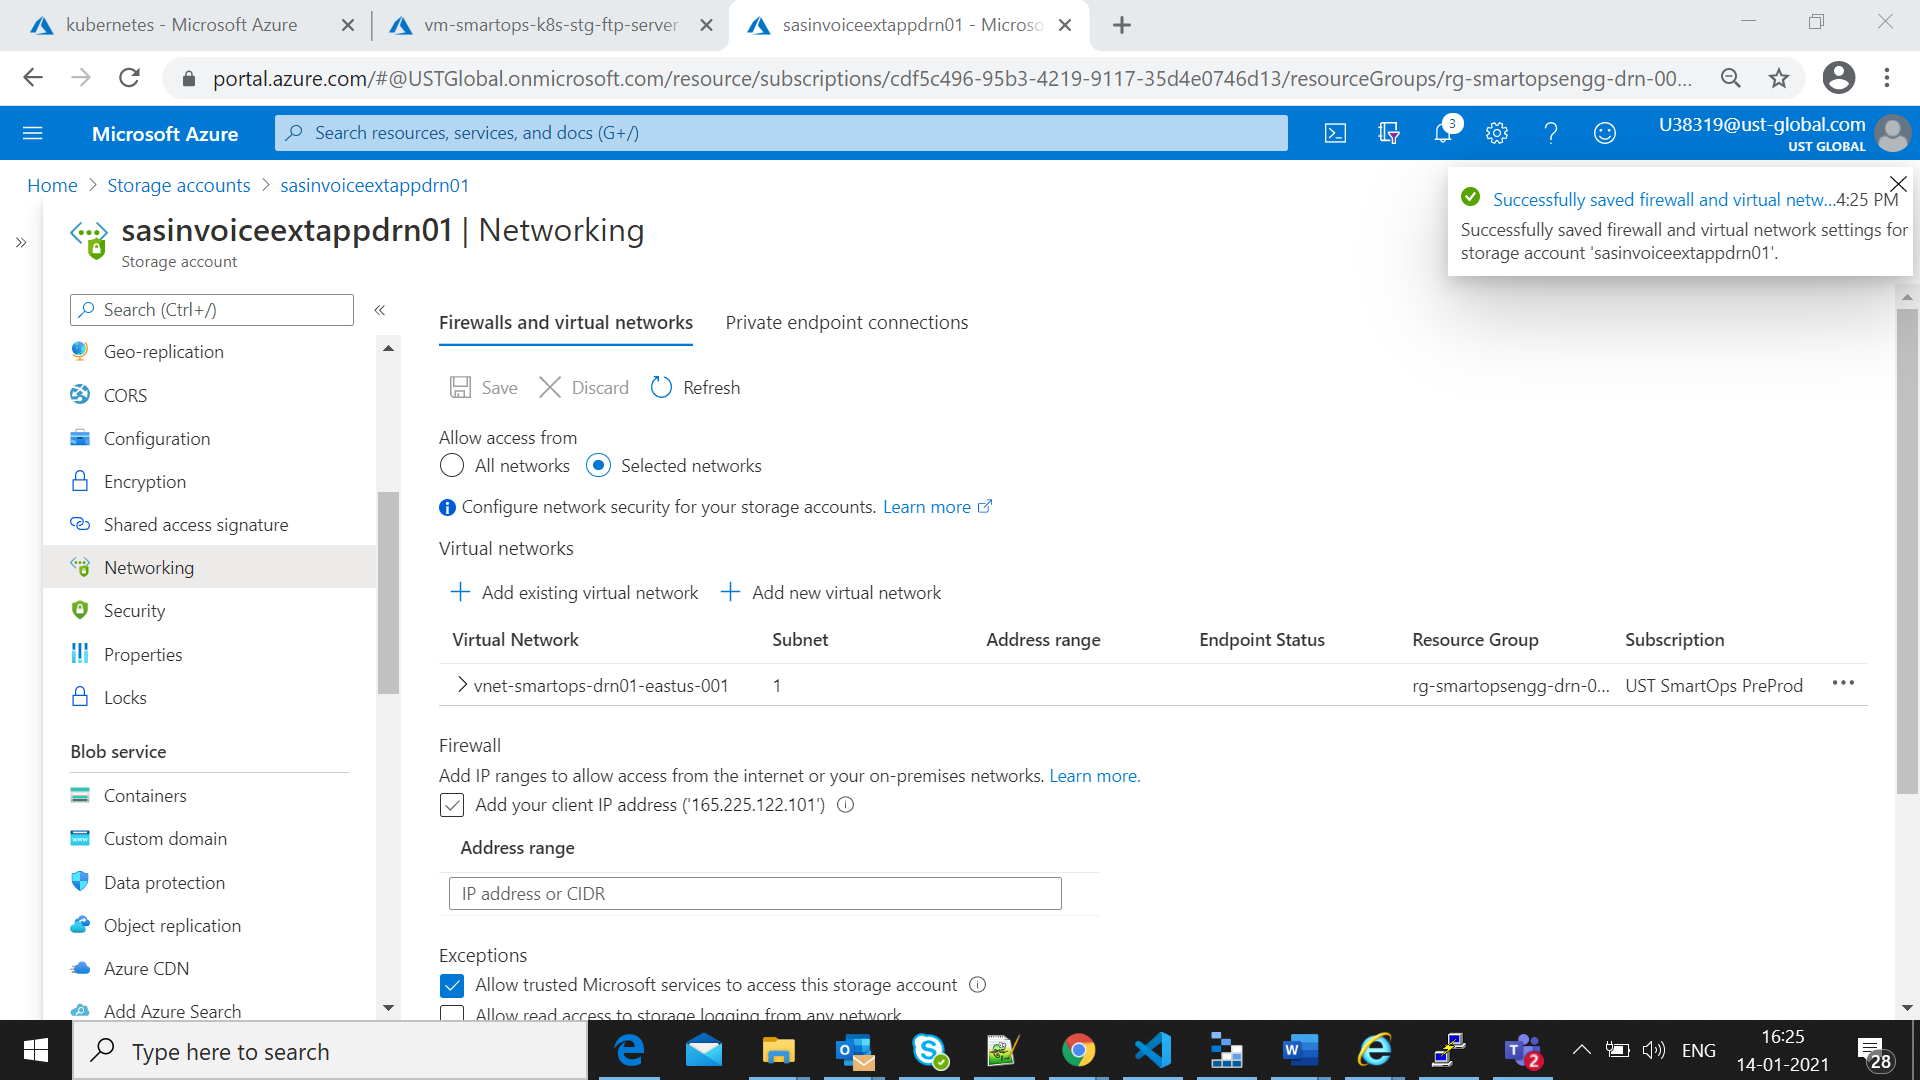
Before executing the create-az-kv-secrets.sh script, Key Vault’s firewall policies should be allowed access from All networks. Please refer below screenshot.
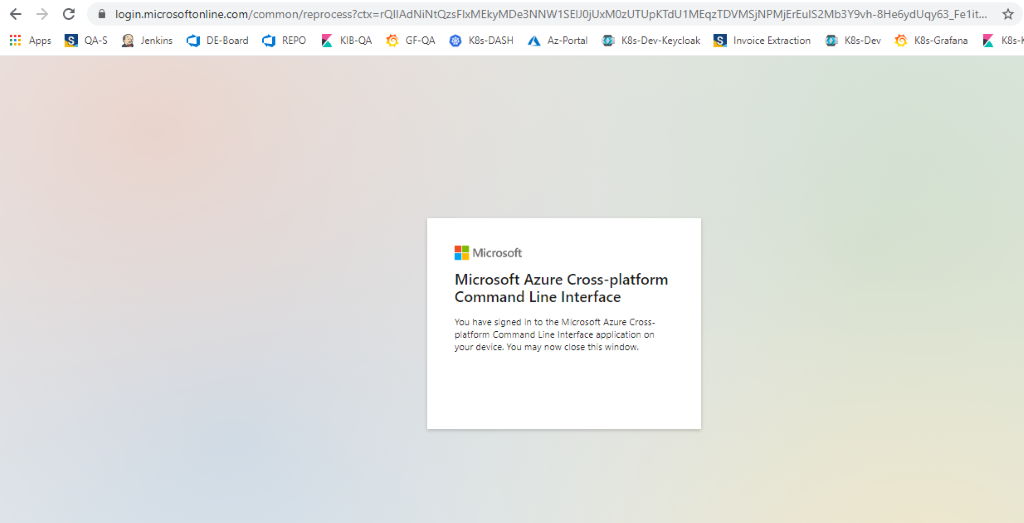
Azure Login from bastion VM
 Once Signed in successfully, there will be message in the browser like below
-
Set the Subscription by below command
az account set - -subscription <sunscription_id>

-
After updating the create-az-kv-secrets.sh with latest values with respect to the product infrastructure, execute the script with using below syntax
|
./create-az-kv-secrets.sh <subscription_id> <key_vault_name> <namespace_name>
|
-
On Successful completion, all the required secrets will get be created in Azure Key Vault instance.
-
Once the script is executed successfully and validated the secrets created, switch back Key Vault’s firewall policy from ‘All networks’ to ‘Private endpoint and selected networks’ and save the change. Please refer below screenshot.
Create / Update Env JSON file
-
Smart Install uses environment JSON file to install respective application.
-
Before deployment, environment JSON file needs to be updated as required.
-
A template of environment JSON is available in the package
-
Please refer below environment JSON file key values and its details
|
Keys
|
Sub Keys
|
|
|
Suggested Values
|
Info
|
|
name
|
|
|
|
stg01
|
Name of the environment
(Note: Click jacking fixes implemented will not take effect ,if the name space has a substring “dev” )
|
|
product
|
|
|
|
invoiceextv1
|
Name of product which needs to be deployed. Json file name in products folder.
|
|
version
|
|
|
|
7.0.3
|
Helm Chart version
|
|
dnsName
|
|
|
|
|
DNS name of the environment
|
|
includeIngress
|
|
|
|
true
|
Ingress needs to be deployed or not
|
|
ingressIp
|
|
|
|
|
IP of Ingress
|
|
isPrivateIngress
|
|
|
|
true
|
For Private Kubernetes cluster, the internal traffic is through internal Kubernetes load balancer.
|
|
isProduction
|
|
|
|
true
|
Debug logs will be enabled for DU containers based on the value provided here.For production this value should be true
|
|
isRollBackEnabled
|
|
|
|
true
|
Rollback will be enabled.
|
|
gpuEnabled
|
|
|
|
true
|
For Kubernetes cluster which needs GPU node pools
|
|
helmRepoLocation
|
|
|
|
../charts
|
Helm repo location. Either smartops-helm repo or the charts folder inside the package
|
|
defaultAppReplicaCount
|
|
|
|
2
|
Number for replicas of application containers
|
|
secretProvider
|
|
|
|
|
For managing kubernetes secrets
|
|
|
azure
|
|
|
|
Provider is Azure for K8s cluster deployed in Azure infrastructure
|
|
|
tenantId
|
|
|
|
Tenant ID of Azure subscription
|
|
|
servicePrincipal
|
|
|
|
Service principle client id and client secrets
|
|
|
|
clientId
|
|
|
|
|
|
|
clientSecret
|
|
|
|
|
|
keyVaultName
|
|
|
|
Azure keyvault name where the secrets are configured with its respective values
|
|
autoScaling
|
|
|
|
|
For critical applcation containers, autoscaling is enabled through kubernetes Horizontal Pod Autoscaler
|
|
|
enabled
|
|
|
true
|
Set true to enable autoscaling for supported services.
|
|
diskEncryption
|
|
|
|
|
Encryption for Data at rest.
|
|
|
enabled
|
|
|
true
|
|
|
|
azure
|
|
|
|
Azure Disc Encryptionset ID.
|
|
storage
|
|
|
|
|
Details of various data stores.
|
|
|
mysql
|
|
|
|
|
|
|
|
host
|
|
|
Azure MySQL instance name
|
|
|
|
port
|
|
|
Port number
|
|
|
|
backup
|
|
|
|
|
|
|
|
enabled
|
true
|
|
|
|
|
|
schedule
|
0 2 * * *
|
|
|
|
appFileStore
|
|
|
|
|
|
|
|
azure
|
|
|
Provider Azure
|
|
|
|
storageAccount
|
|
|
Storage account name for application files storage
|
|
|
modelFileStore
|
|
|
|
|
|
|
|
azure
|
|
|
Provider Azure
|
|
|
|
storageAccount
|
|
|
Storage account where the pre-trained models are stored for various applications.
|
|
|
backupFileStore
|
|
|
|
|
|
|
|
azure
|
|
|
Provider Azure
|
|
|
|
storageAccount
|
|
|
Storage account where backup files are stored
|
|
|
mongo
|
volumeSize
|
|
|
Mongo instance details with the volume configuration, backup and its schedule.
|
|
|
|
backup
|
|
|
|
|
|
|
|
enabled
|
true
|
|
|
|
|
|
schedule
|
0 2 * * *
|
|
|
|
elasticsearch
|
|
|
|
|
|
|
|
volumeSize
|
|
|
Elasticsearch instance details with the volume configuration, backup and its schedule.
|
|
|
|
backup
|
|
|
|
|
|
|
|
enabled
|
true
|
|
|
|
|
|
schedule
|
0 2 * * *
|
|
|
|
rabbitmq
|
|
|
|
|
|
|
|
volumeSize
|
|
|
RabbitMQ instance details with the volume configuration, backup and its schedule.
|
|
|
|
backup
|
|
|
|
|
|
|
|
enabled
|
true
|
|
|
|
|
|
schedule
|
0 2 * * *
|
|
|
|
appStatefulSets
|
|
|
|
Volume size configuration for application services which are statefulsets. Eg. du-archival
|
|
|
|
volumeSize
|
|
16Gi
|
|
|
|
|
|
|
|
|
|
|
|
|
|
|
|
|
logMonitoring
|
|
|
|
|
Details for enabling log monitoring, log retention, cleanup and storage volume size.
|
|
|
enabled
|
|
|
true
|
Recommended to set as true
|
|
|
logRetentionInDays
|
|
|
5
|
For logs before the configured number of days will be automatically removed as per the cleanup cron schedule.
|
|
|
logCleanUpCronSchedule
|
|
|
0 1 * * *
|
Time duing which the retention job will run.
|
|
|
|
|
|
|
|
|
|
logVolumeSize
|
|
|
128Gi
|
Immutable after first install.
|
|
|
|
|
|
|
|
|
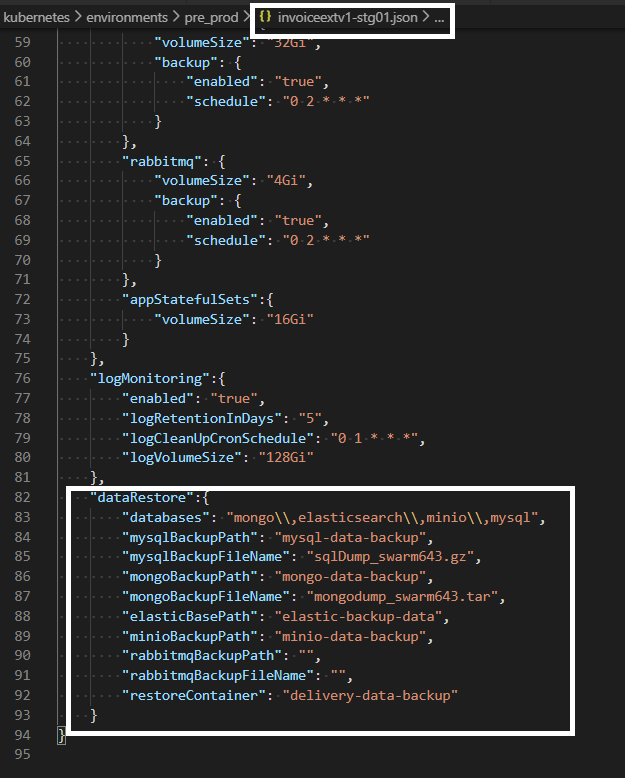
dataRestore
|
databases
|
|
|
|
This section applies only when smartinstall runs in restore mode. List of Data stores which needs to be restored
|
|
|
mysqlBackupPath
|
|
|
|
folder name inside Azure blob where mysql back up files are stored
|
|
|
mysqlBackupFileName
|
|
|
|
File name of mysql back up file
|
|
|
mongoBackupPath
|
|
|
|
folder name inside Azure blob where mongo back up files are stored
|
|
|
mongoBackupFileName
|
|
|
|
File name of mongo back up file
|
|
|
elasticBasePath
|
|
|
|
Path of Elasticsearch backup file in Azure blob
|
|
|
minioBackupPath
|
|
|
|
Folder name of Minio backup file in Azure blob
|
|
|
rabbitmqBackupPath
|
|
|
|
folder name inside Azure blob where RabbitMQ back up files are stored
|
|
|
rabbitmqBackupFileName
|
|
|
|
File name of RabbitMQ back up file
|
|
|
restoreContainer
|
|
|
|
Azure Blob container name where back up files are stored
|
|
customParams
|
|
|
|
|
New change as part of custom parameter and version change in product JSON
|
|
roleBasedAccess
|
superAdmin"
|
|
|
|
|
|
|
|
enabled
|
|
false
|
|
|
|
|
groupId
|
|
NA
|
|
|
|
productViewer
|
|
|
|
|
|
|
|
enabled
|
|
false
|
|
|
|
|
groupId
|
|
NA
|
|
|
|
productAdmin
|
|
|
|
|
| |
|
enabled
|
|
false
|
|
| |
|
groupId
|
|
NA
|
|
There are two paths for application install. You can take only one of the routes.
-
Restore data from an old Environment (E.g., 6.4.3) and install Invoice Extraction
-
Fresh Install Invoice Extraction.
Option 1: Restore data from an old Environment and install Invoice Extraction
Steps
-
Make sure data is copied to backup storage account
- Allow all networks if source is outside of the network.
-
Update env json file with back up path and file names ( datarestore section)
-
Please find below details of the key values which needs to be updated accordingly in the environment json file for restore deployments.
|
Keys
|
Info about the values which needs to be updated
|
|
databases
|
List of Data stores which needs to be restored
|
|
mysqlBackupPath
|
folder name inside Azure blob where mysql back up files are stored
|
|
mysqlBackupFileName
|
File name of mysql back up file
|
|
mongoBackupPath
|
folder name inside Azure blob where mongo back up files are stored
|
|
mongoBackupFileName
|
File name of mongo back up file
|
|
elasticBasePath
|
Folder name of Elasticsearch backup file in Azure blob
|
|
minioBackupPath
|
Folder name of Minio backup file in Azure blob
|
|
rabbitmqBackupPath
|
folder name inside Azure blob where Rabbitmq back up files are stored
|
|
rabbitmqBackupFileName
|
File name of RabbitMQ back up file
|
|
restoreContainer
|
Azure Blob container name where back up files are stored
|
Once the packages are downloaded to bastion VM, execute below commands to Install the application with data restore
cd <package_path>/kubernetes/ smartinstall

|
python3 restore.py --product ${product} --env ${environment} --kubecontext ${kubecontext} --verbose
|
-
product – The application which needs to be deployed e.g. invoiceext
-
env – The environment which the application needs to be deployed e.g dev, qa
If the process is disrupted and ended due to any error in Infrastructure, restart execution using same above command for restore after correcting infrastructure.
If there is any interruption in network connectivity ,the session can be resumed using below command from bastion VM

If the process is disrupted and ended due to any error, restart execution using
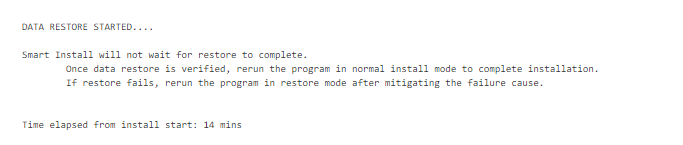
Verify the restore process has started successfully via K9s
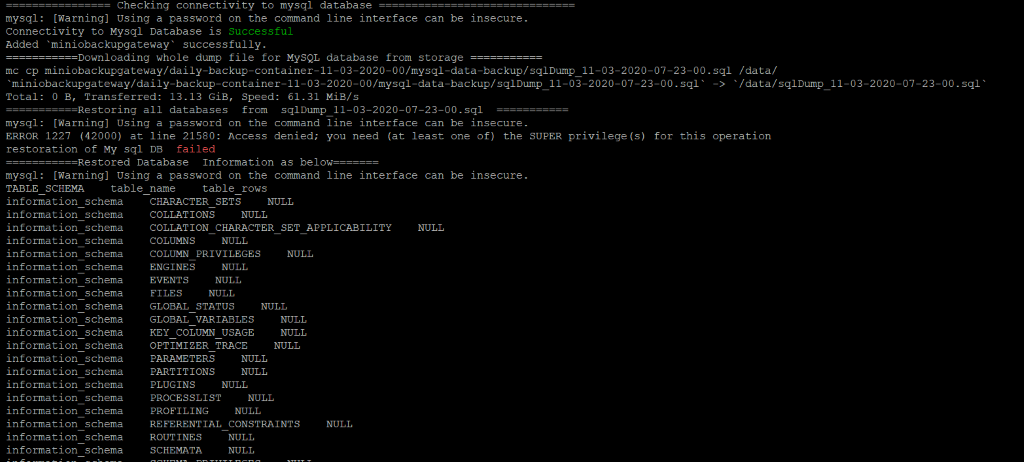 Sample Error Log where the restore has failed.
-
MySQL - access the server through PHPMyAdmin and ensure all dbs are in place. Analyze the logs for list of MySQL databases and tables restored.
-
Mongo - access Mongo Express and verify
-
RabbitMQ - via RabbitMQ management UI
-
Elasticsearch - Analyse smart-recovery-job pod's logs and ensure the elasticsearch restore has completed successfully
-
Minio - Verify Files in IE appfilestore buckets.
Smart Recovery Start
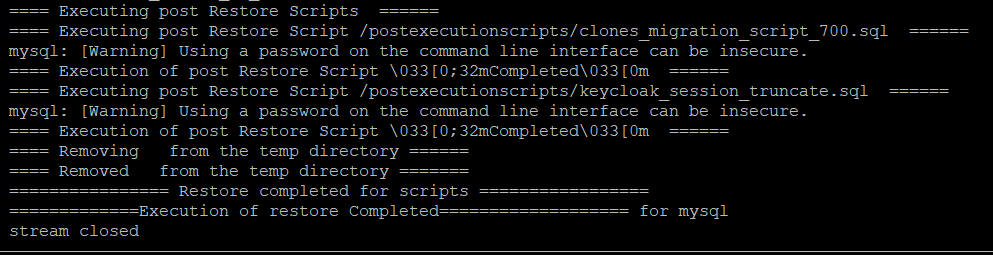
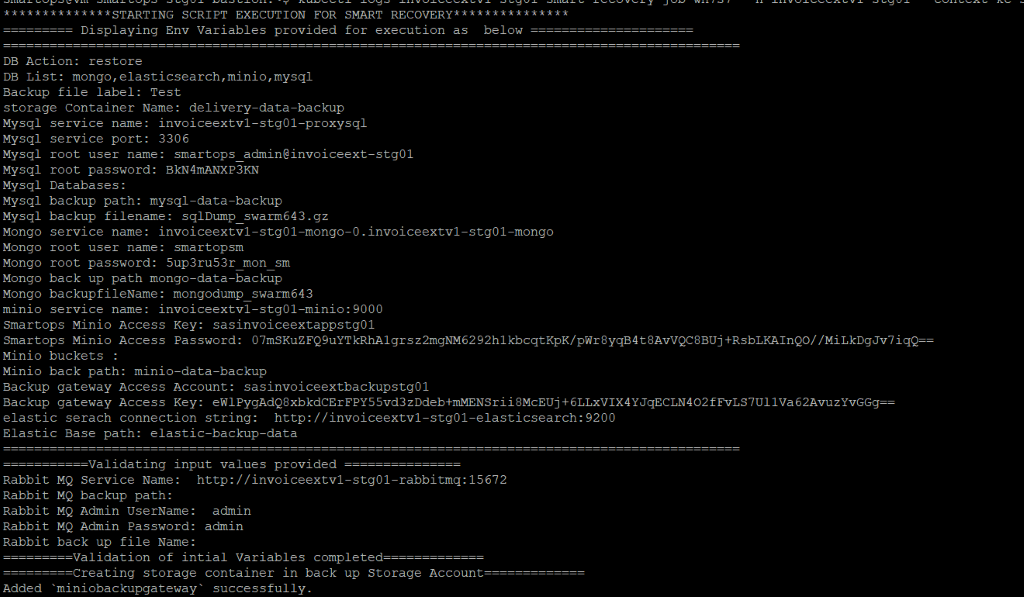 MySQL Restore
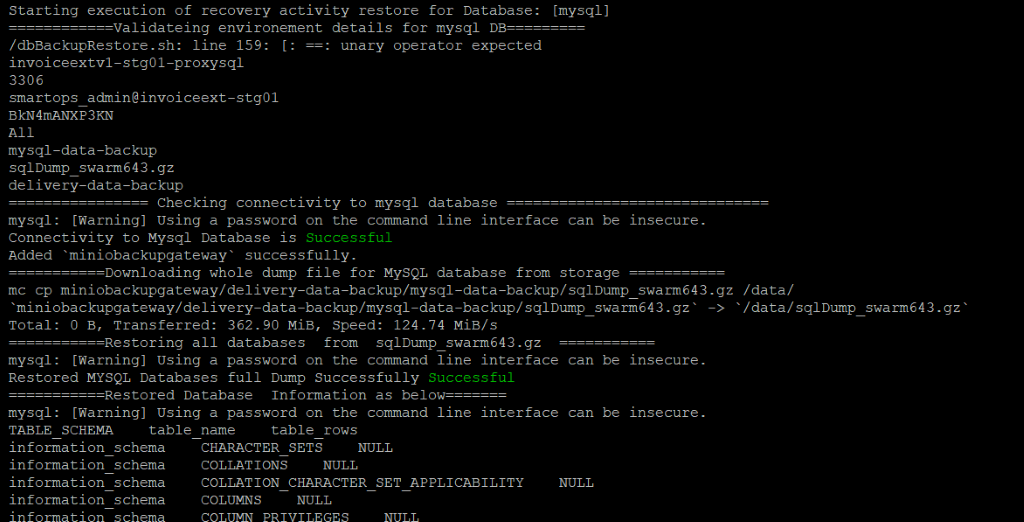 MySQL restore completed
 Mongo Restore
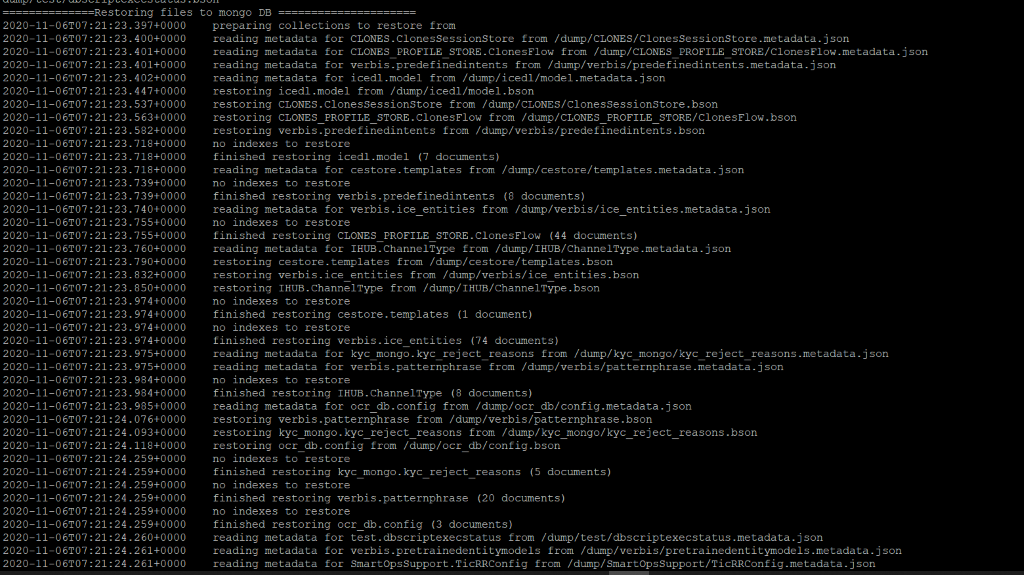 Mongo restore completed
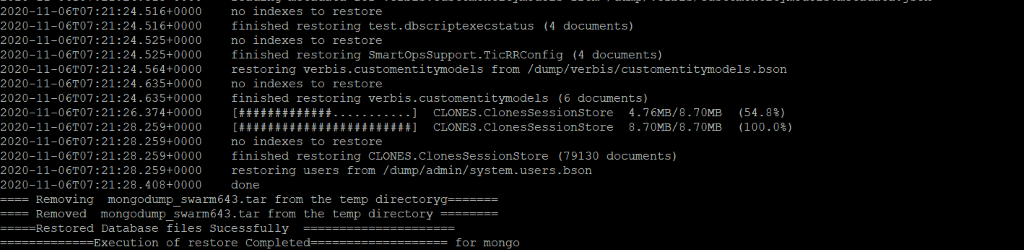 Minio Restore
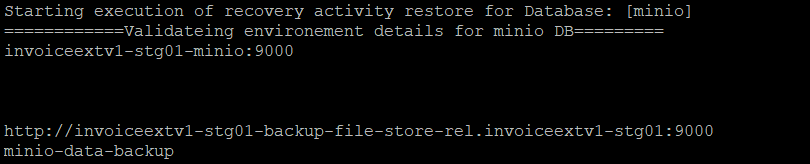
Note: Minio restore completion can be verified through Kibana logs.
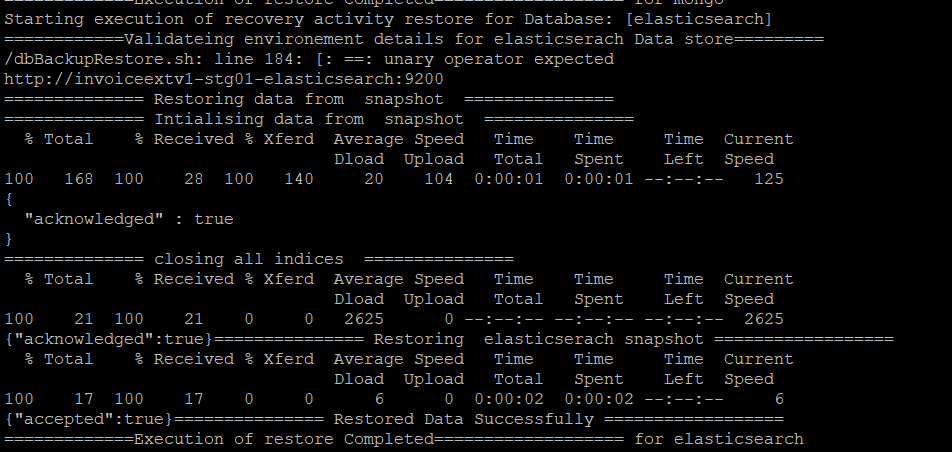
Elasticsearch Restore
Steps for Database Validation of Data counts after restore process
Verify Mysql Table Counts.
Following query can be used for Mysql validation to fetch table counts from current production environment.Execute the query by logging in existing production environment.
SELECT TABLE_SCHEMA ,table_name, table_rows FROM INFORMATION_SCHEMA.TABLES
The mysql table data information is printed in Smart-Recovery logs as in below screenshots in restored environement

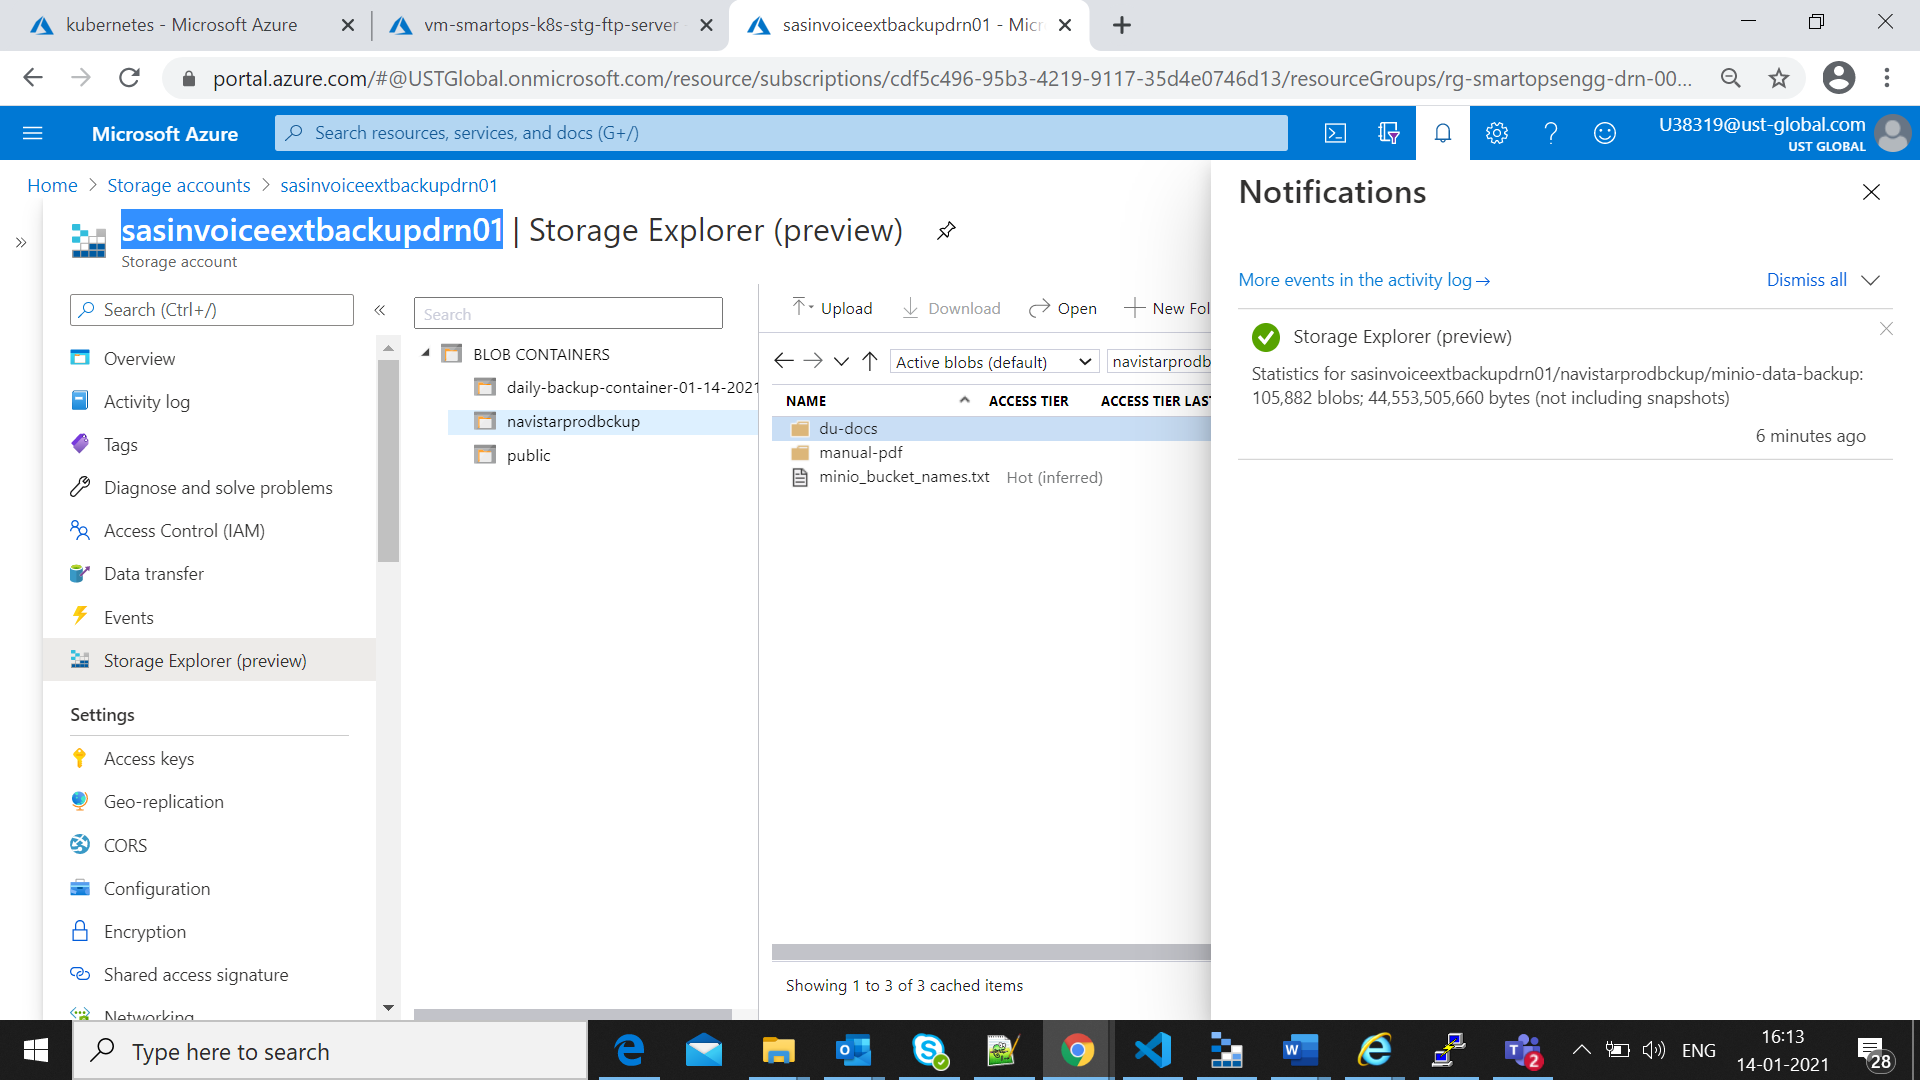
Verify Minio Table counts
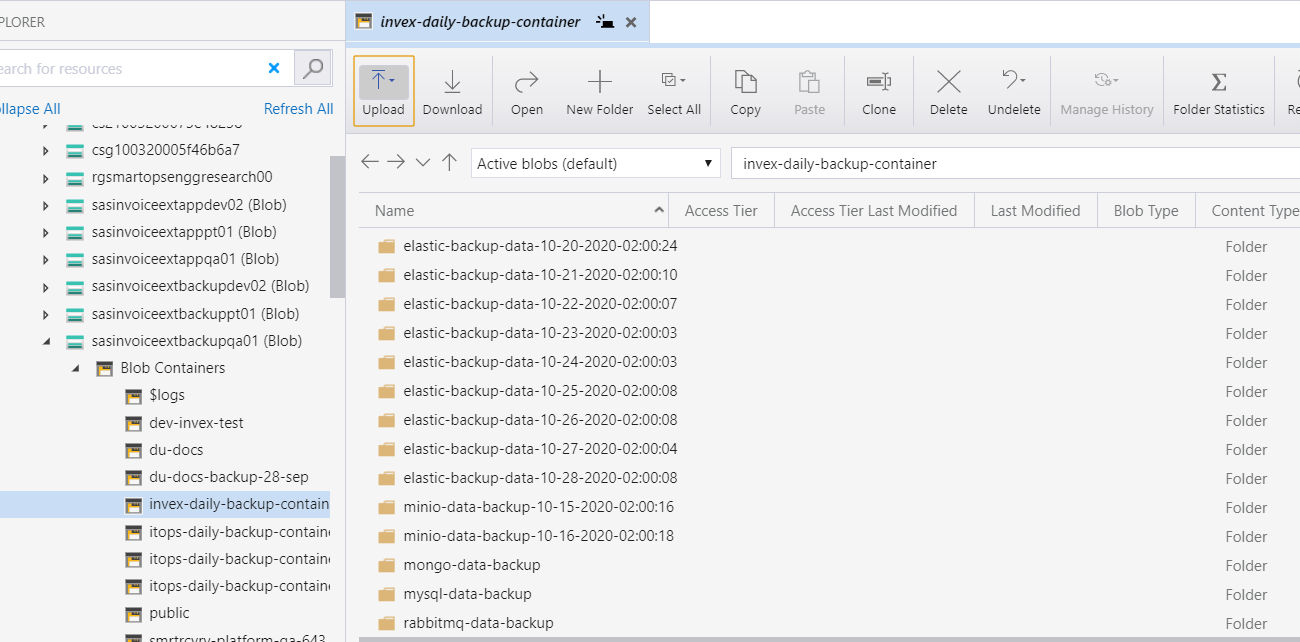
Login to azure portal and open backup storage account.(eg: sasinvoiceextbackupdrn01)
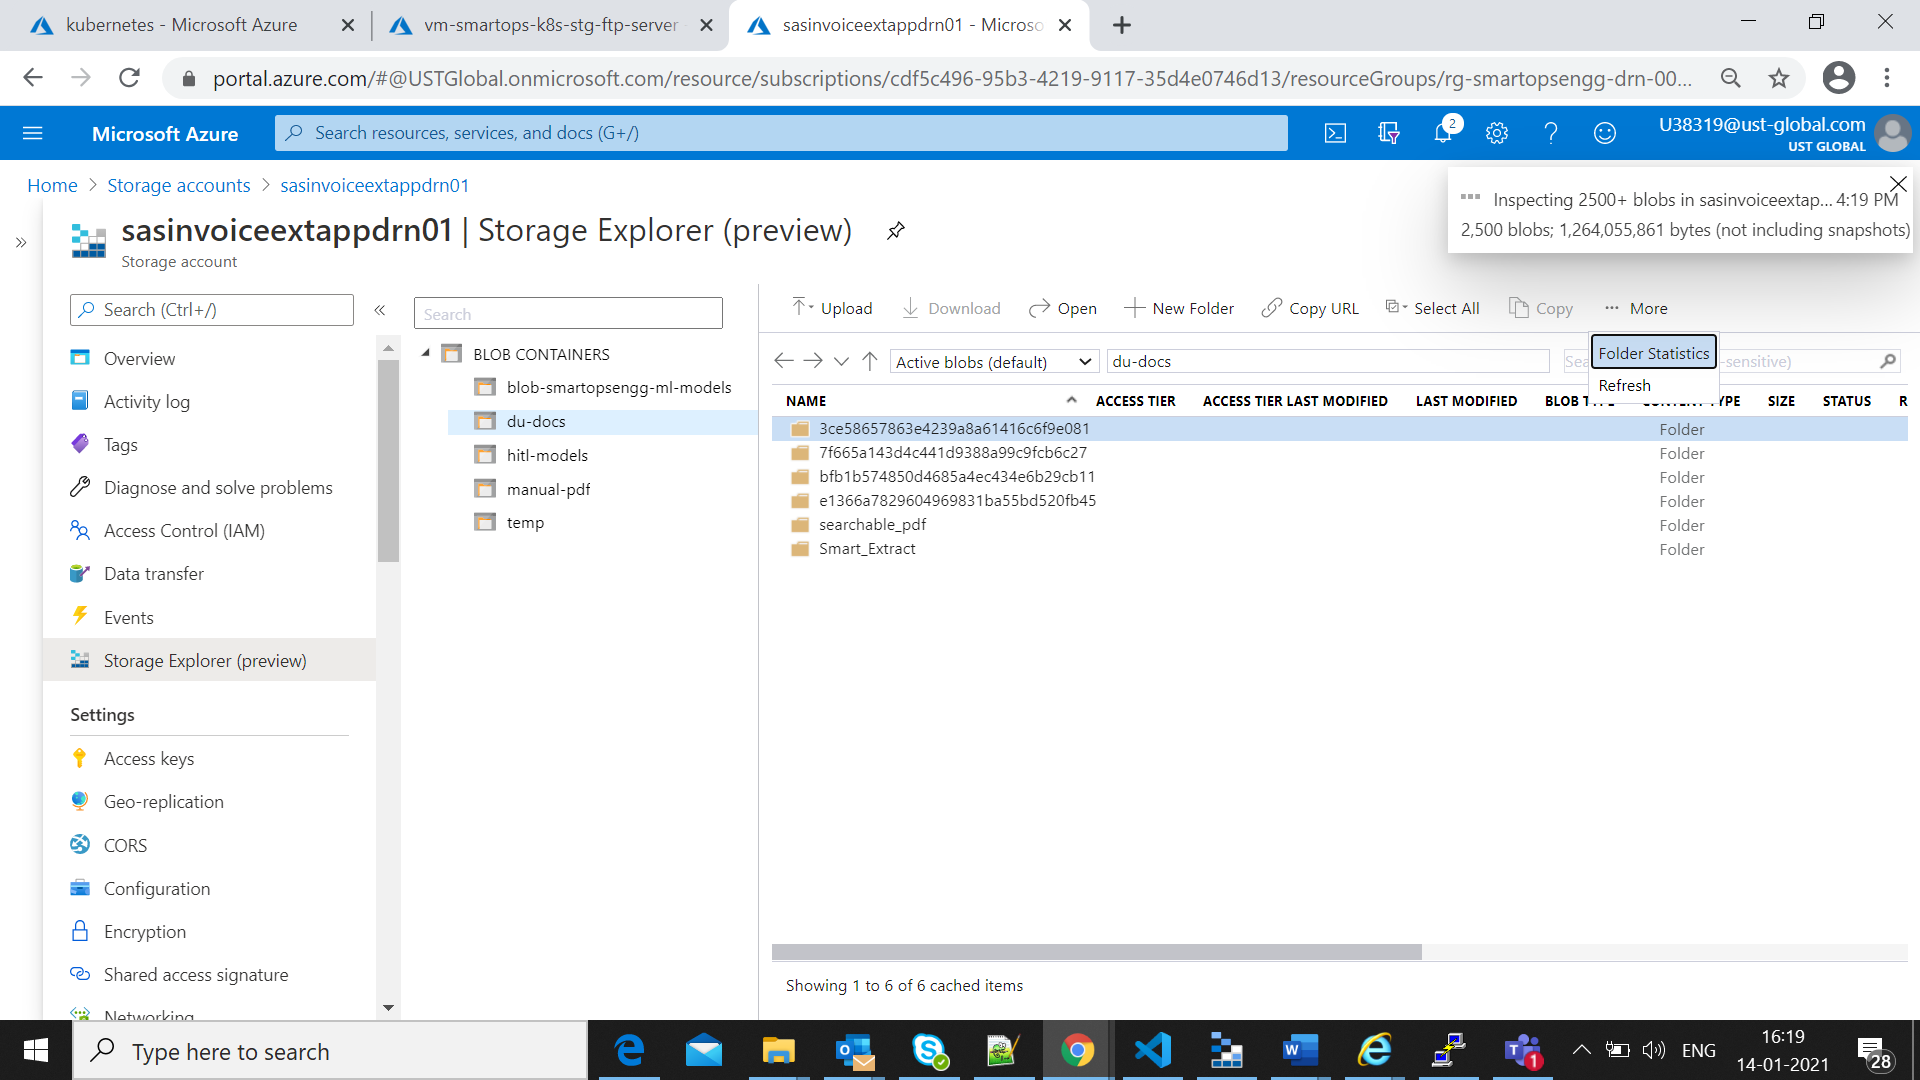
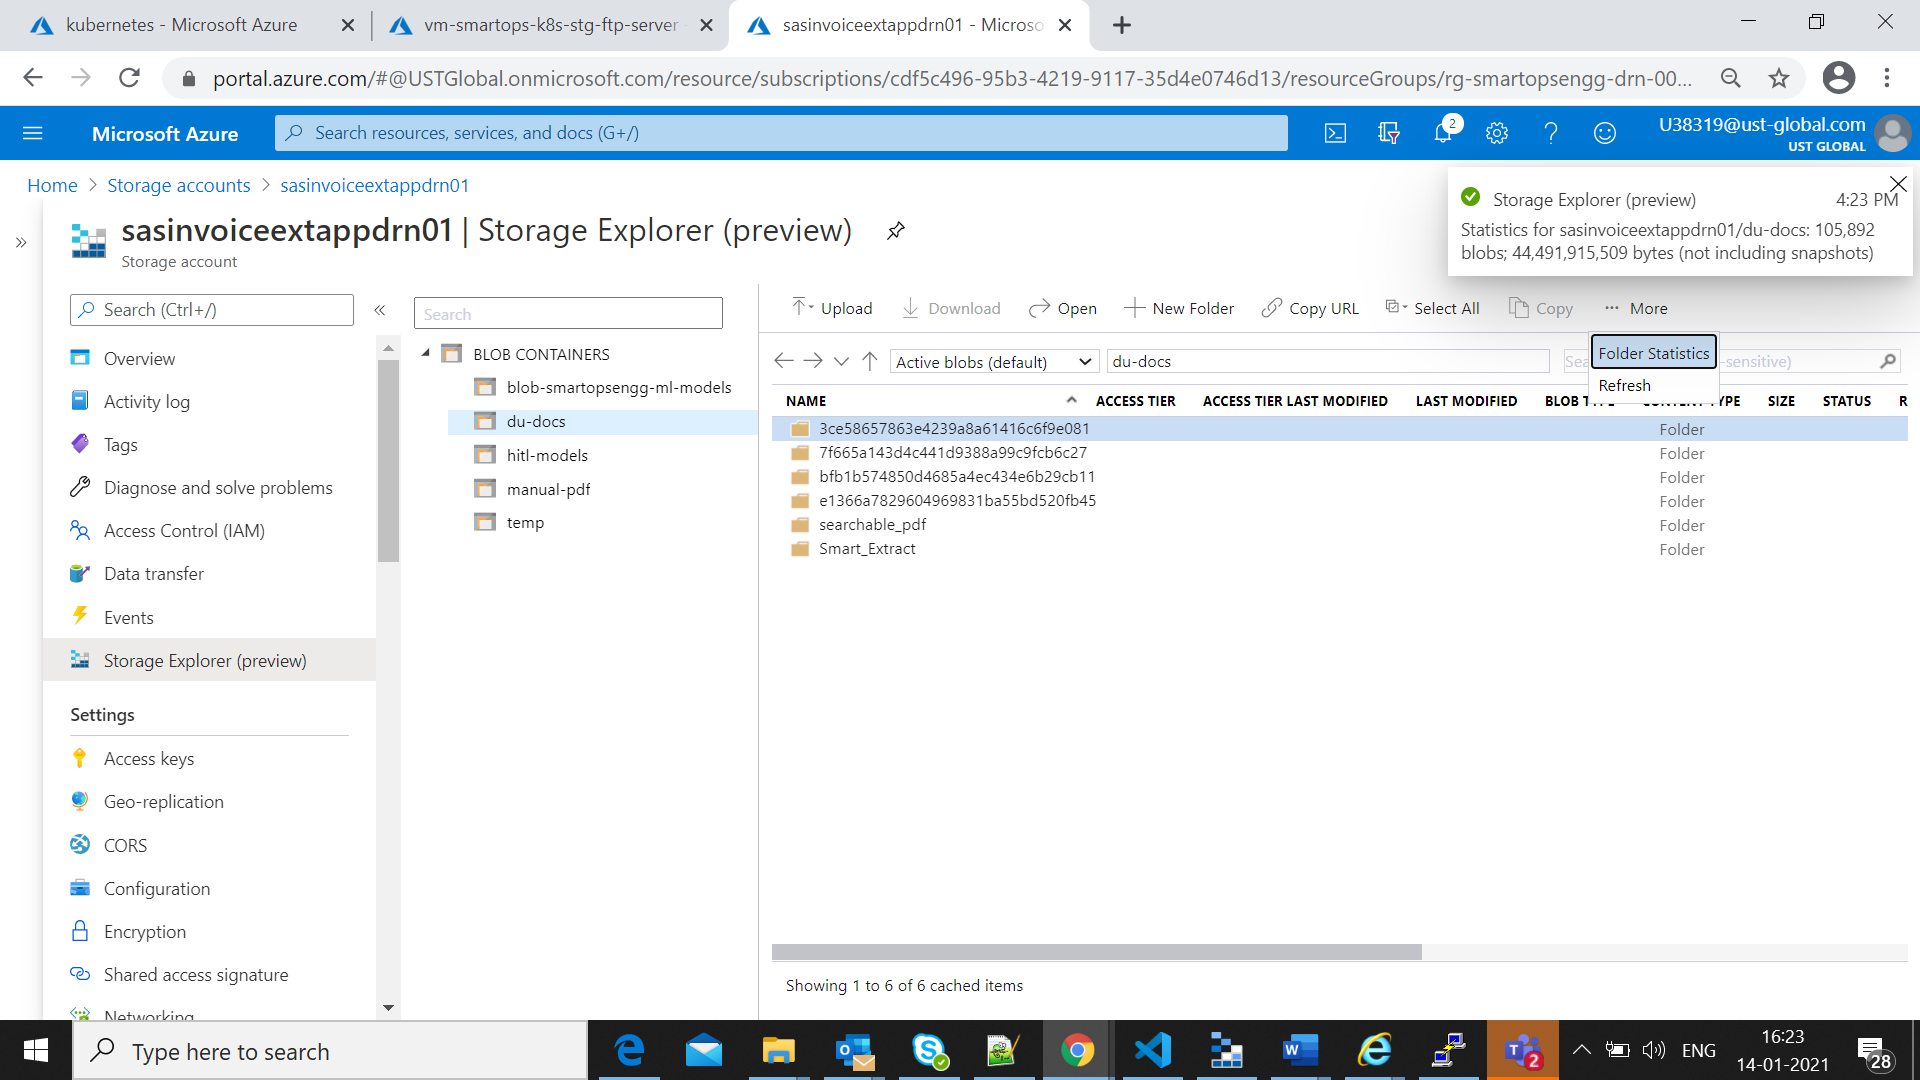
Open Storage expolorer and move to the back up container. Calculate the blob count in buckets available in minio-data-backup folder,by clickin gon folder statistics as in below screen shot
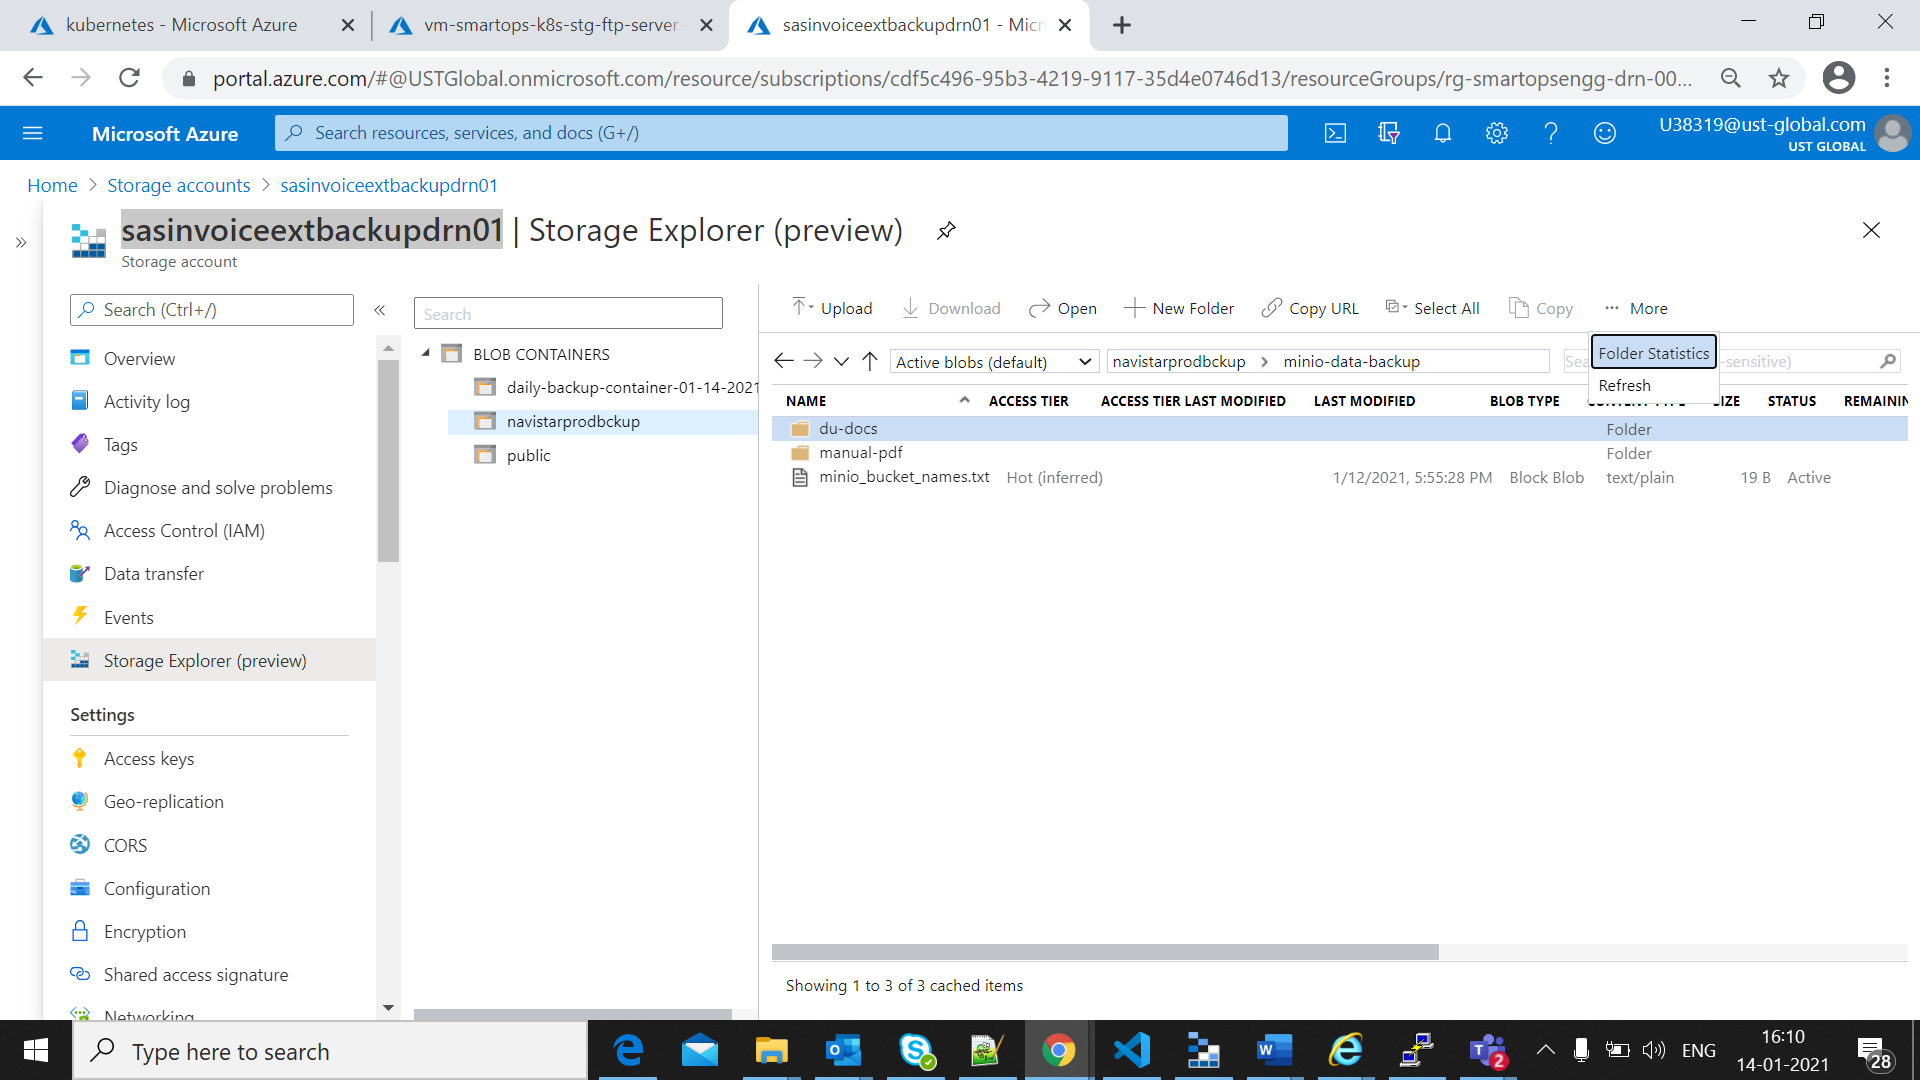
The blob count will be displayed as in below screen shot
Once restore process completed successfully for minio as mentioned in restore process completion, the file count for minio can be validated in storage account for App file Store.
Enable all networks for appfile store.
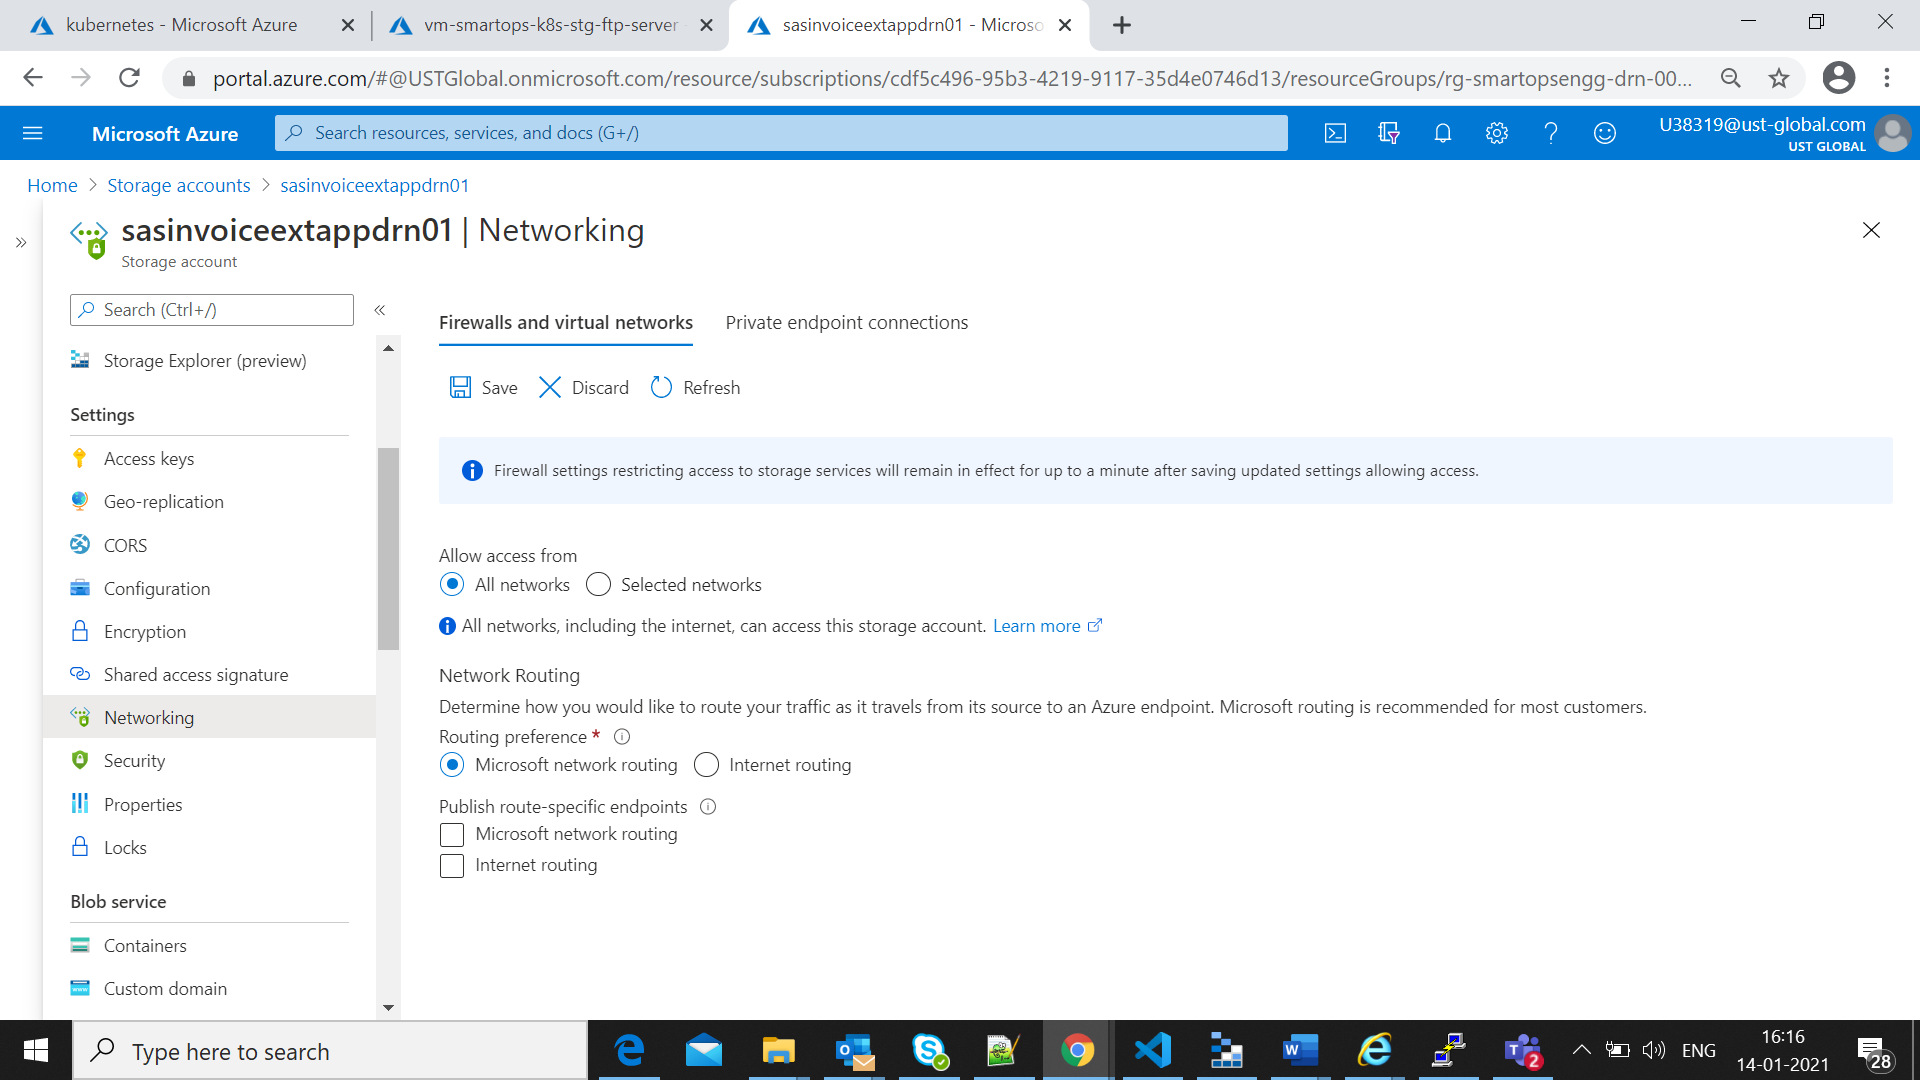
Validate the count of buckets restored from backup by clicking the folder properties
Set the Networking setting back to “Selected Networks” once the validation completes
-
Once the restore is completed successfully, run smartinstall in install mode to deploy Invoice Extraction
-
Open tool “screen” to have an uninterrupted session for running deployment
-

cd <package_path>/kubernetes/smartinstall
-
Execute install.py
|
python3 -u install.py --product ${product} --env ${environment} --kubecontext ${kubecontext} --verbose
|
-
product – The application which needs to be deployed e.g. invoiceext
-
env – The environment which the application needs to be deployed e.g dev , qa
-
kubecontext - The kubecontext of the product infrastructre
If there is any interruption in the connectivity ,the session can be resumed using below command

Option 2: Fresh Install Invoice Extraction
Once the packages are downloaded to bastion VM , execute below commands to Install the application without data restore
Open tool “screen” to have an uninterrupted session for running deployment

|
python3 -u installWithDataInit.py --product ${product} --env ${environment} --kubecontext ${kubecontext} --verbose
|
-
product – The application which needs to be deployed e.g. invoiceext
-
env – The environment which the application needs to be deployed e.g dev , qa
-
kubecontext - The kubecontext of the product infrastructure
Open tool “screen” to have an uninterrupted session for running deployment

HTTPS Enablement after Application Installation
Please follow the steps mentioned in below video for Certificate generation(Internal to Smartops Team)
https://web.microsoftstream.com/video/fc814048-9405-423d-adca-22d28ecc30bc?list=trending
Once the certificate is available follow below steps to enable HTTPS enablement
Application gateway Settings to Upload certificates
-
Login to Azure portal
-
Select application gateway created for the environment
-
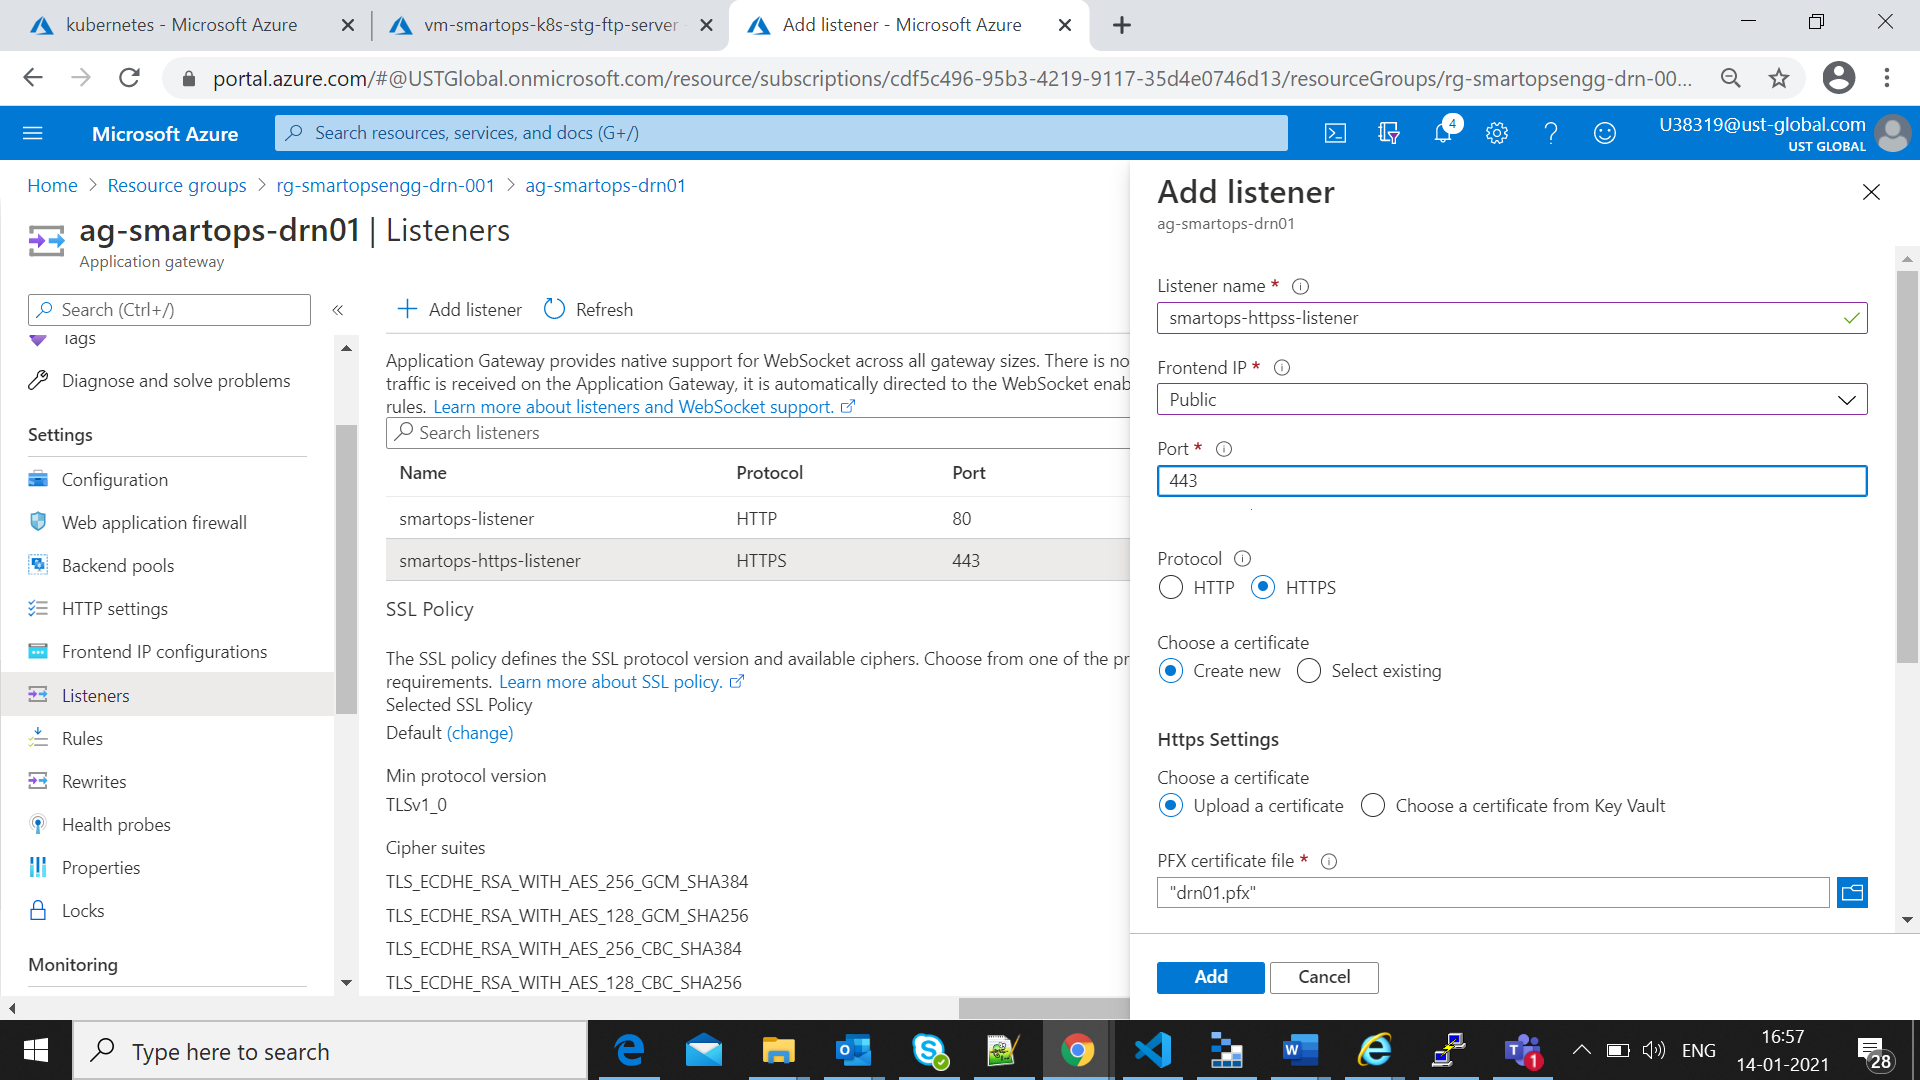
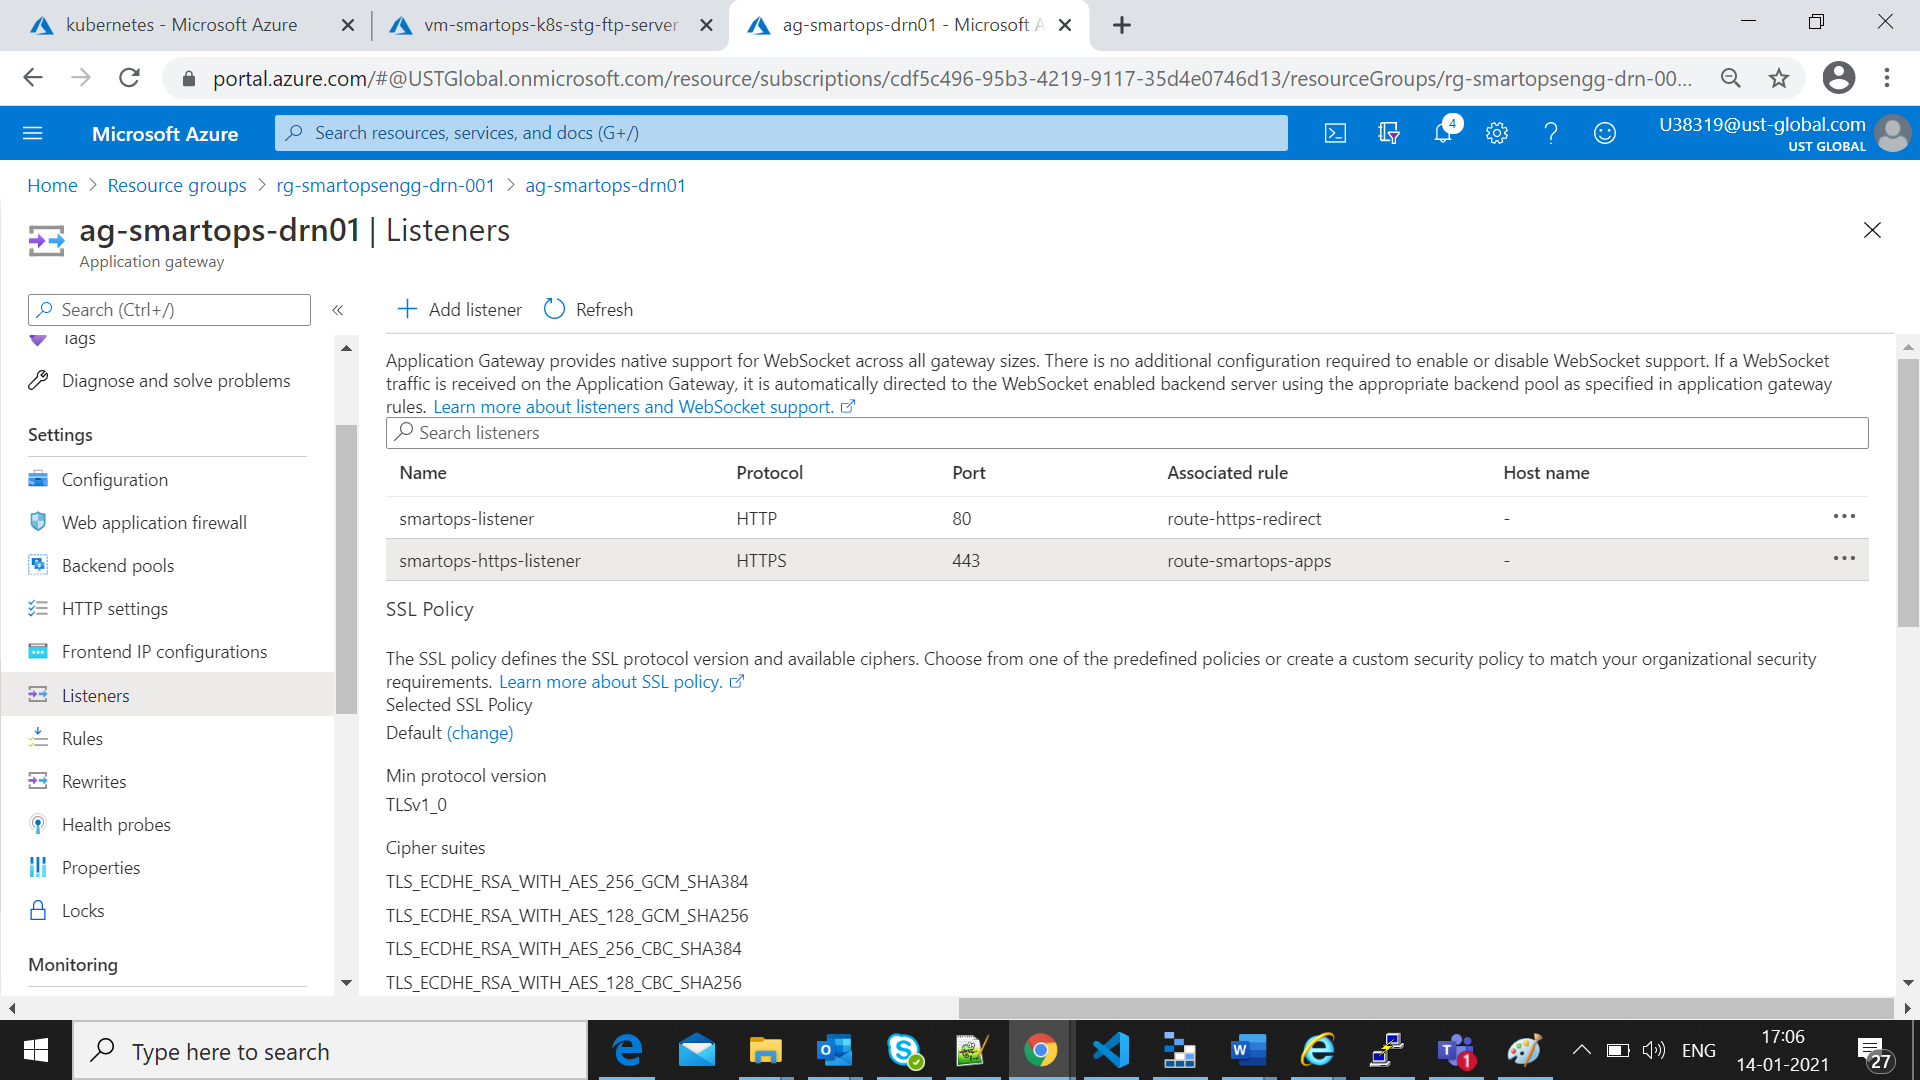
Select Listeners and add a new listener for https as in following screen shots
-
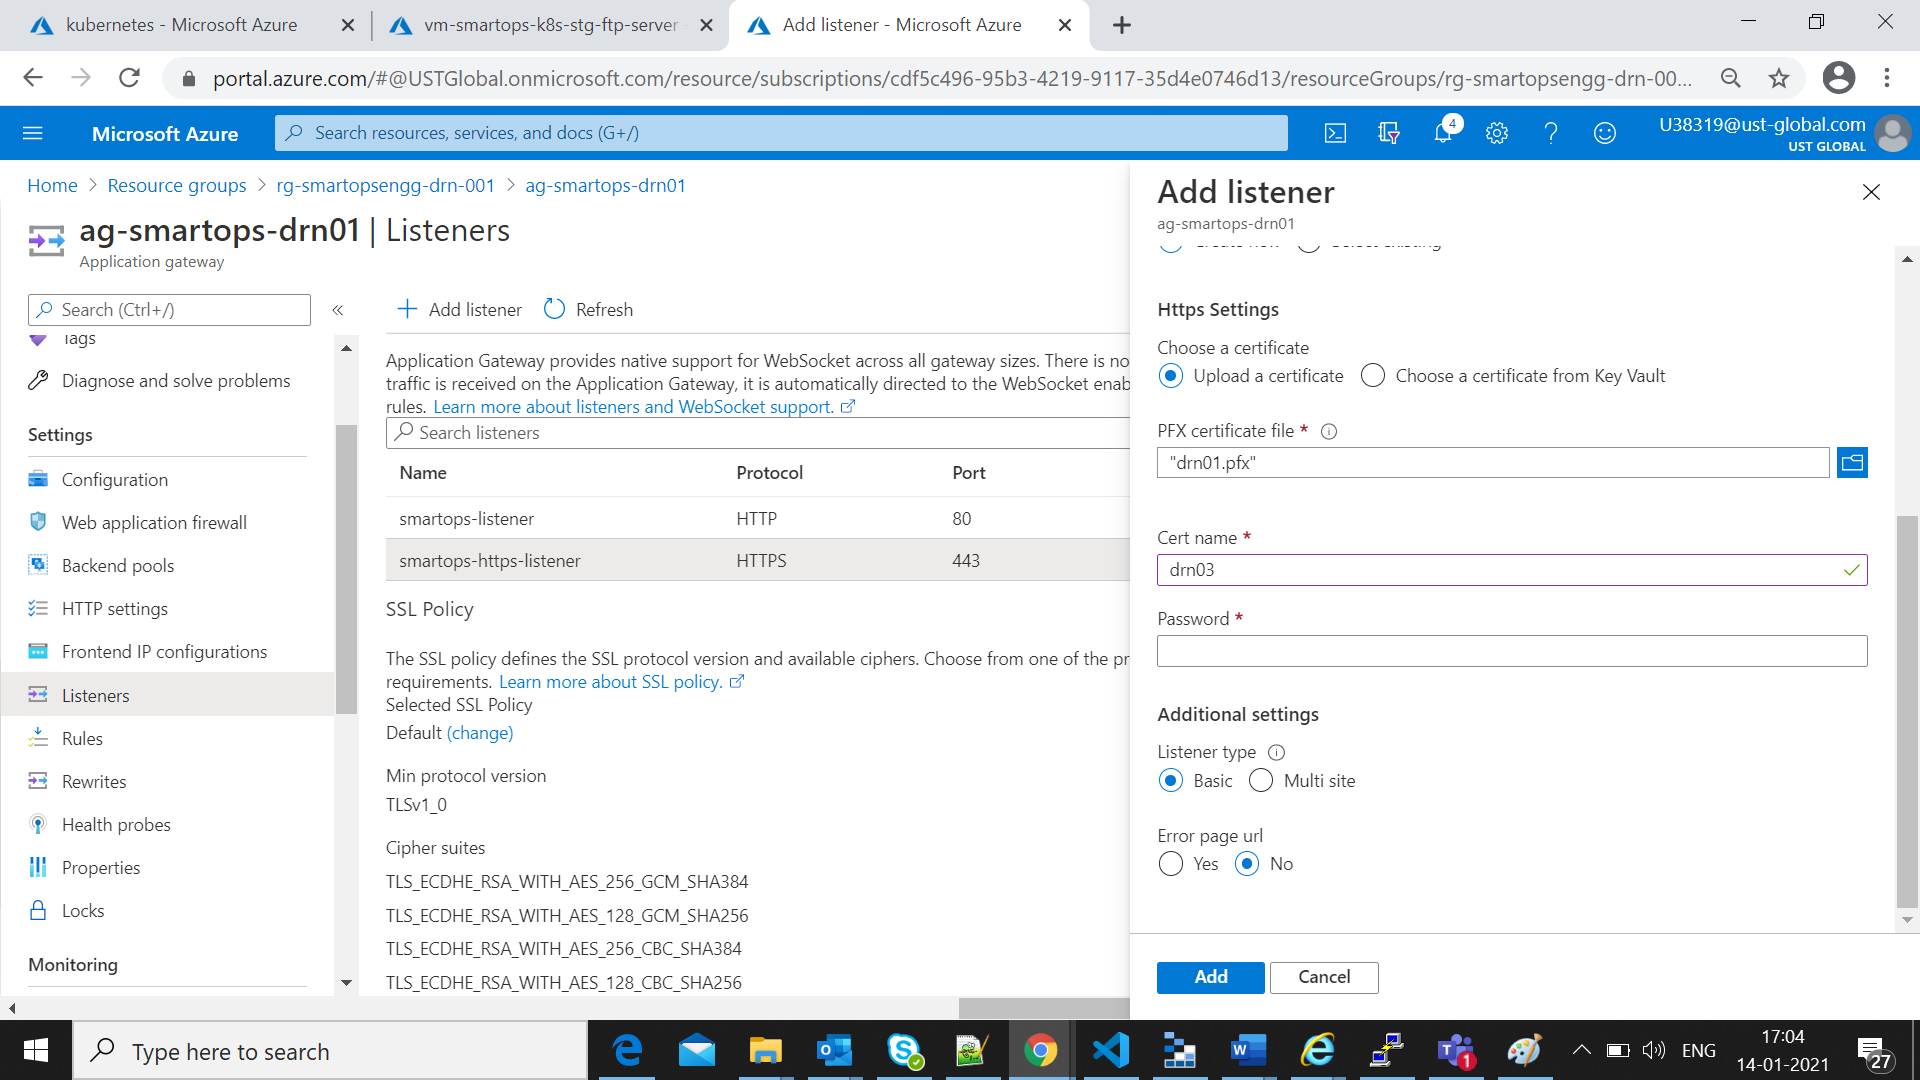
Upload the verified certificate file in .pfx format for the environment and provide the Cert-name same as the pfx name
-
Use the same password used for generating the certificates
-
Listener added successfully
-
Create a new rule for redirecting http traffic to https listener.

-
Select Back end Target values as below by selecting redirection and setting Target URL as “https://<dns-name>”
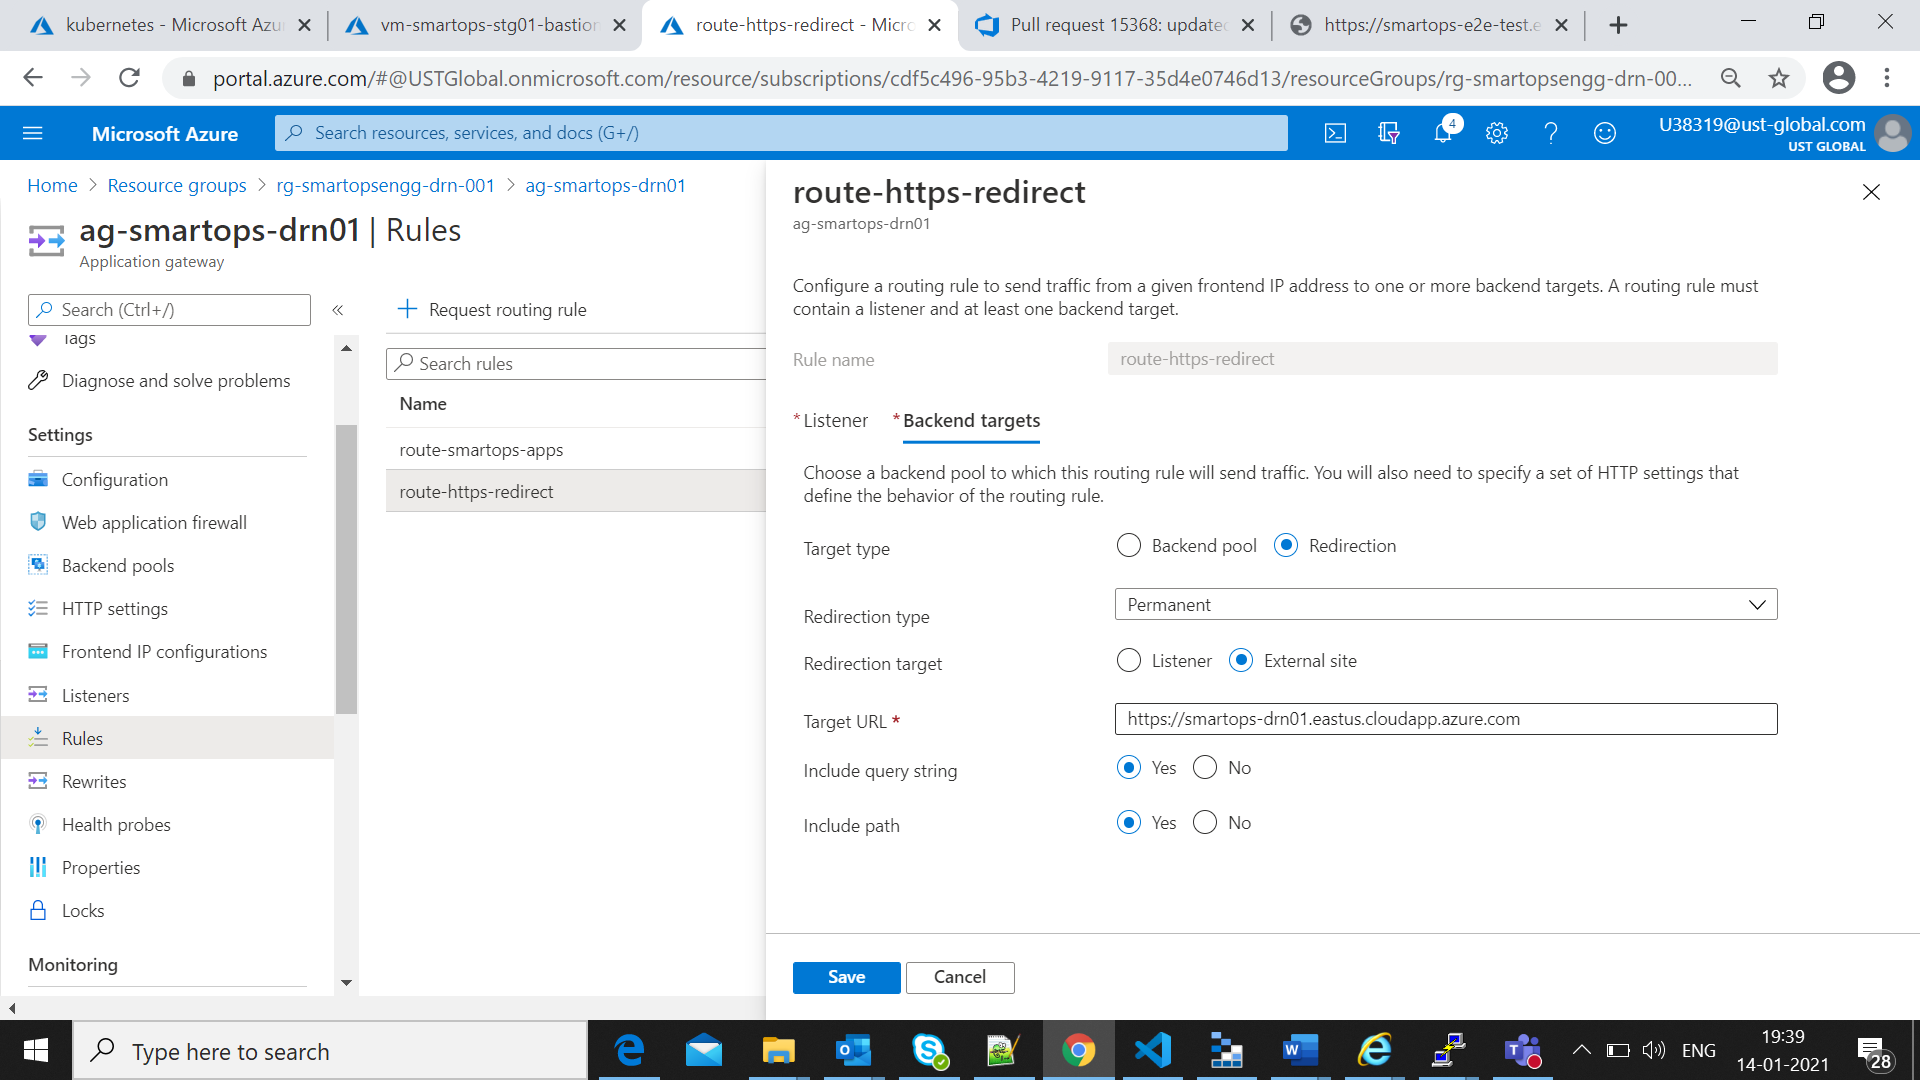
-
Edit existing rule “route-smartops-apps” and select the listener as the newly created “smartops-https-listener” as below
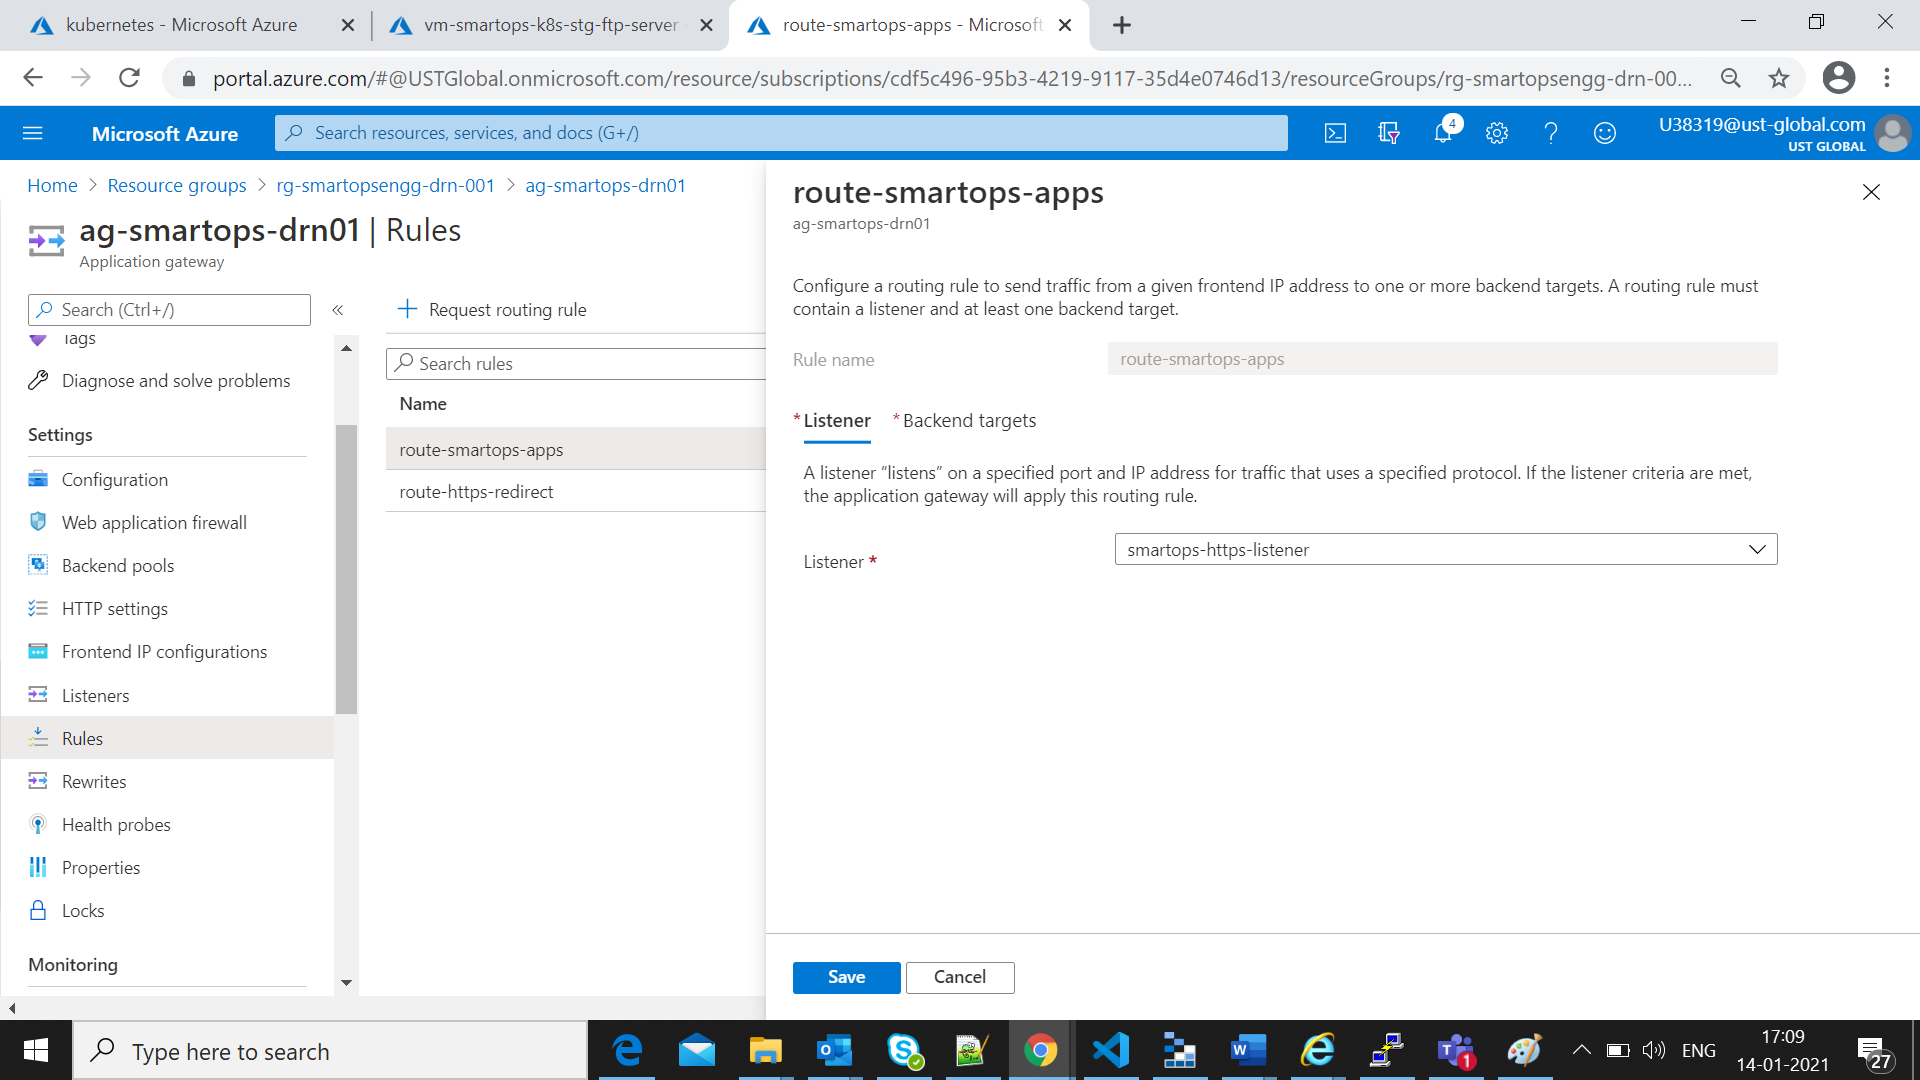
-
Also reset the targetURL in backend targets for path based rules as “https”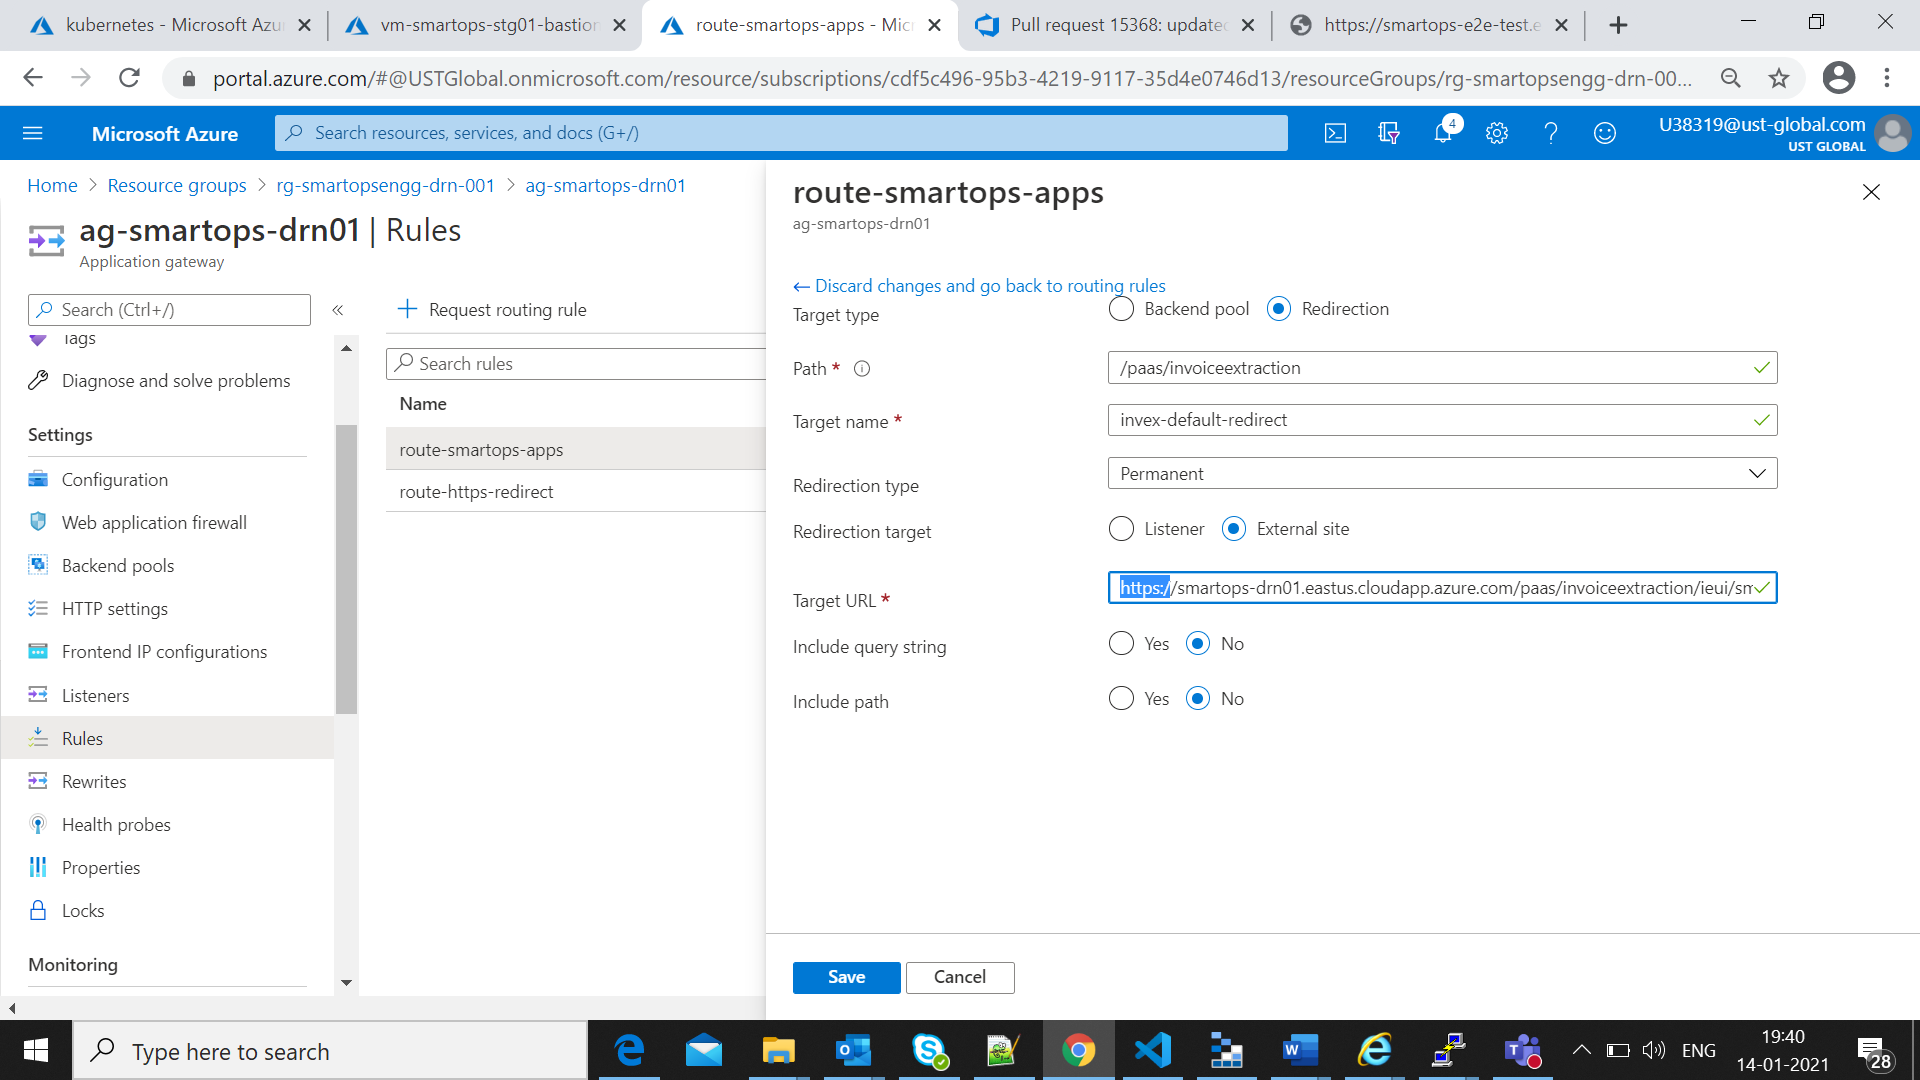
-
Click on Save to get the changes reflected.
Validation for Successful Deployment
After Successful completion of Smart install installations, access the deployment in k9s and check all pods are in ready state
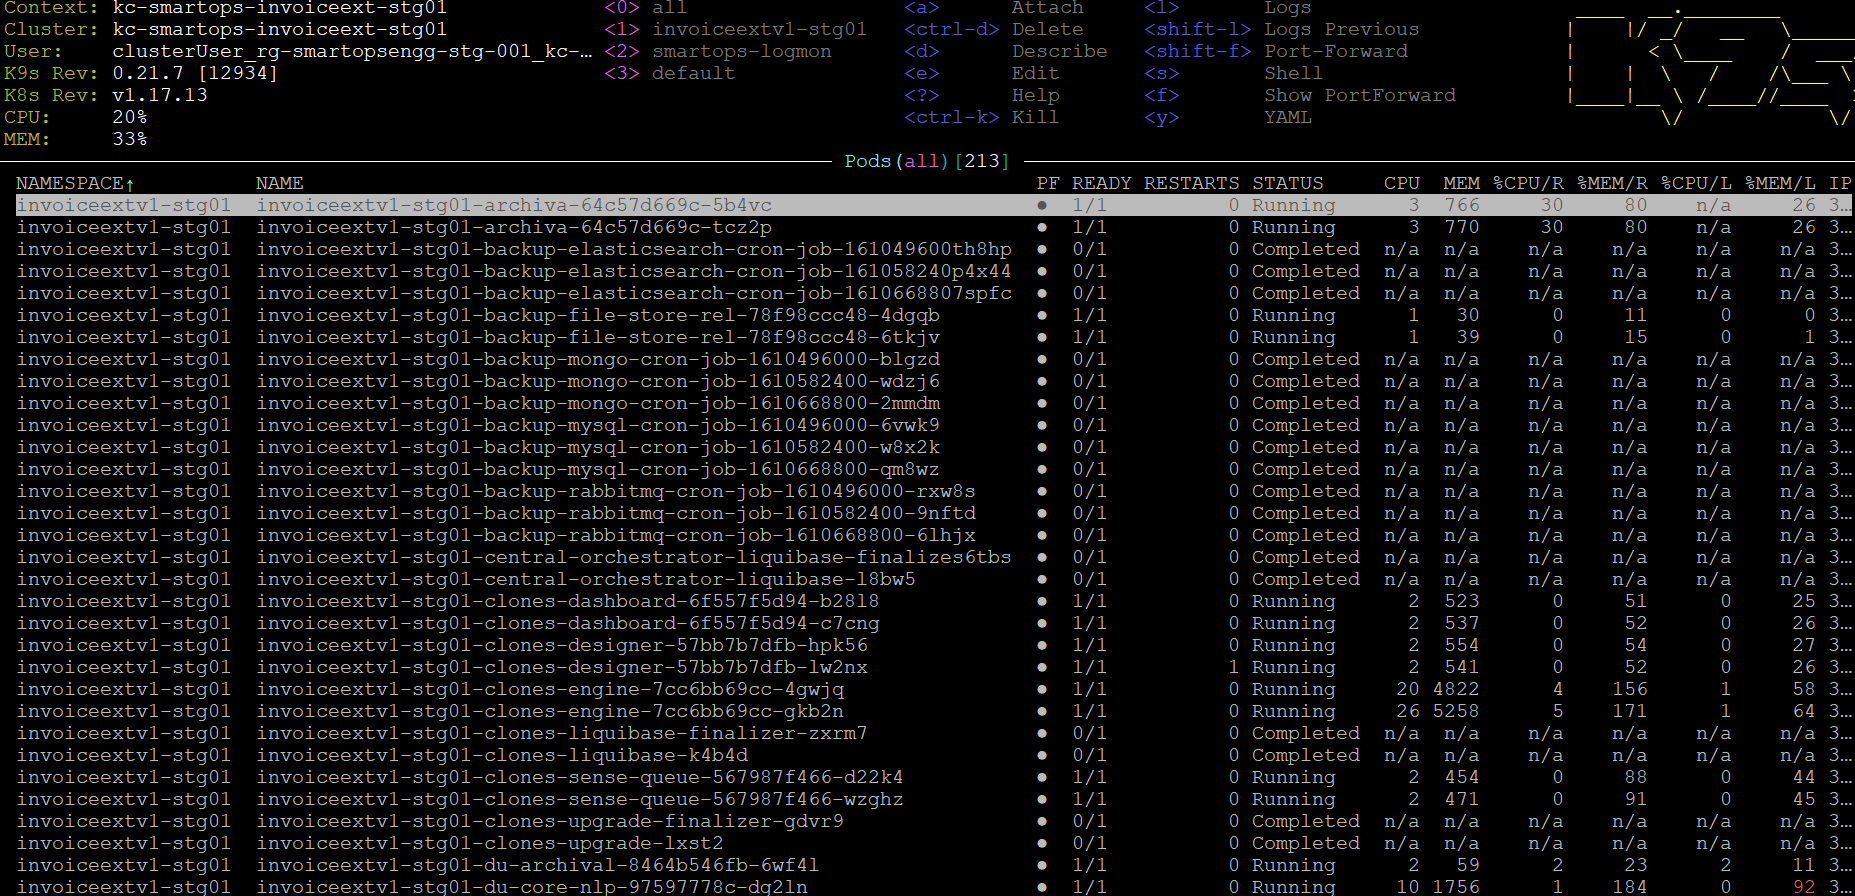
All pods created via Kubernetes jobs will be in completed state
Access Key cloak admin URL(Refer Appendix) and
maintenance URL s from windows VM to verify the URL access
After Validation Generate offline token and restart application Stacks
Appendix
Appendix consists of the following sections
Creating Keys in Azure Key Vault for Data Encryption
For enabling Data Encryption for Azure MySQL, Storage Accounts and enabling Disk Encryption for Volumes in Kubernetes cluster, we need to create Encryption keys in Azure Key vault which is used to encrypt the data.
- Select the key vault and click ‘Keys’
- Set a Key name and click ‘Create’. Key Type and Key Size can be set with the default values unless there is a specific requirement.
Following are the additions to keyvaults as part of Smart Vision 2.4:
<NAMESPACE>-rhub-rsa-public-key with value TBA
<NAMESPACE>-rhub-rsa-private-key with value TBA
<NAMESPACE>-jfrog-artifactory-username with value so-maven-publisher
<NAMESPACE>-jfrog-artifactory-password with value
@rt1factPublisher
Azure Disk Encryption in AKS
Reference: https://docs.microsoft.com/en-us/azure/aks/azure-disk-customer-managed-keys
# Create a DiskEncryptionSet
# key vault name, rg, etc needs to be changed accordingly
#key key-smartops-k8s-disk-enc-001 ( key name given as an example ) needs to be created in Azure key Vault before creating the Disk Encryption Set
keyVaultId=$(az keyvault show --name kv-engg-resrch-001 --query [id] -o tsv)
keyVaultKeyUrl=$(az keyvault key show --vault-name kv-engg-resrch-001 --name key-smartops-k8s-disk-enc-001 --query [key.kid] -o tsv)
az disk-encryption-set create -n smartops-k8s-des-001 -l eastus -g rg-smartopsengg-dev-001 --source-vault $keyVaultId --key-url $keyVaultKeyUrl
Azure cloud shell:
Ensure Get, Wrap and Unwrap permission is set for the disk encryption set to the key created in Az key vault.
Please refer des-platform-qa01 in above pic
IMPORTANT: After creating the disk encryption set, select the disk encryption set and click on allow access to disk encryption key created in the key vault. PFB pic

K8s storage class
#currently kept as a part of env-setup template. Can be changed as required
#diskEncryptionSetID values needs to be changed accordingly ( subscriptions, resourceGroups, diskEncryptionSets)
kind: StorageClass
apiVersion: storage.k8s.io/v1
metadata:
name: pvc-ade-custom-storage-class
provisioner: kubernetes.io/azure-disk
parameters:
kind: Managed
skuname: Premium_LRS
diskEncryptionSetID: "/subscriptions/dfaa090f-c407-4e75-ac08-143cb932bdcf/resourceGroups/rg-smartopsengg-dev-001/providers/Microsoft.Compute/diskEncryptionSets/smartops-k8s-des-001"
After deploying storage class, respective changes need to be made in statefulset’s pvcs referring to above custom storage class.
Data Encryption of Azure Database for MySQL with a customer-managed key
References:
https://docs.microsoft.com/en-us/azure/mysql/howto-data-encryption-portal
https://docs.microsoft.com/en-us/azure/mysql/concepts-data-encryption-mysql
Key Encryption Key [ KEK ]
Data Encryption Key [ DEK ]
Symmetric key used to encrypt a block of data
-
DEK, encrypted with KEK are stored separately
-
MySQL server needs below permissions on Azure Key Vault
-
Key Vault and Azure Database for MySQL must belong to same Azure AD
-
Enable soft delete feature on Key Vault instance
-
Key must be in ‘Enabled’ state
-
When keys are imported , only .pfx, .byok, .backup file formats are supported
-
If key vault generates the key , create a key backup before using for the first time.
When you configure data encryption with a customer-managed key in Key Vault, continuous access to this key is required for the server to stay online.
If the server loses access to the customer-managed key in Key Vault, the server begins denying all connections within 10 minutes. The server issues a corresponding error message and changes the server state to Inaccessible
. Some of the reason why the server can reach this state are:
-
If we create a Point in Time Restore server for your Azure Database for MySQL, which has data encryption enabled, the newly created server will be in
Inaccessible state. You can fix this through Azure portal
or CLI.
-
If we create a read replica for your Azure Database for MySQL, which has data encryption enabled, the replica server will be in Inaccessible
state. You can fix this through Azure portal or CLI.
-
If you delete the Key Vault, the Azure Database for MySQL will be unable to access the key and will move to Inaccessible
state. Recover the Key Vault and revalidate the data encryption to make the server
Available .
-
If we delete the key from the Key Vault, the Azure Database for MySQL will be unable to access the key and will move to Inaccessible
state. Recover the Key and revalidate the data encryption to make the server
Available .
-
If the key stored in the Azure Key Vault expires, the key will become invalid and the Azure Database for MySQL will transition into Inaccessible
state. Extend the key expiry date using CLI and then revalidate the data encryption to make the server
Available .
Limitations
-
Support for this functionality is limited to General Purpose and Memory Optimized pricing tiers.
-
This feature is only supported in regions and servers which support storage up to 16TB. For the list of Azure regions supporting storage up to 16TB, refer to the storage section in documentation here
-
Encryption is only supported with RSA 2048 cryptographic key.
Steps
Errors Observed while configuring
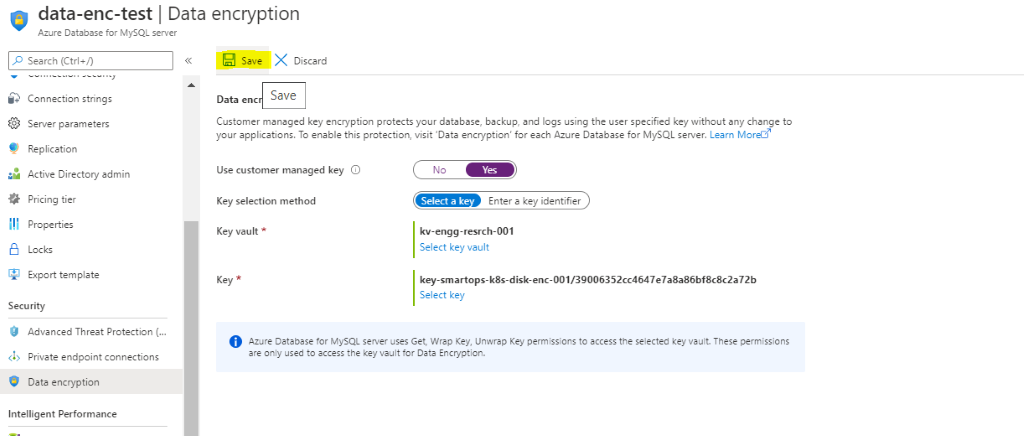
If soft –delete is not enabled for keyvault , will get error like below
-
The above issue has been resolved when new keyvault instance created with soft delete enabled and enabling purge protection after key vault creation.
-
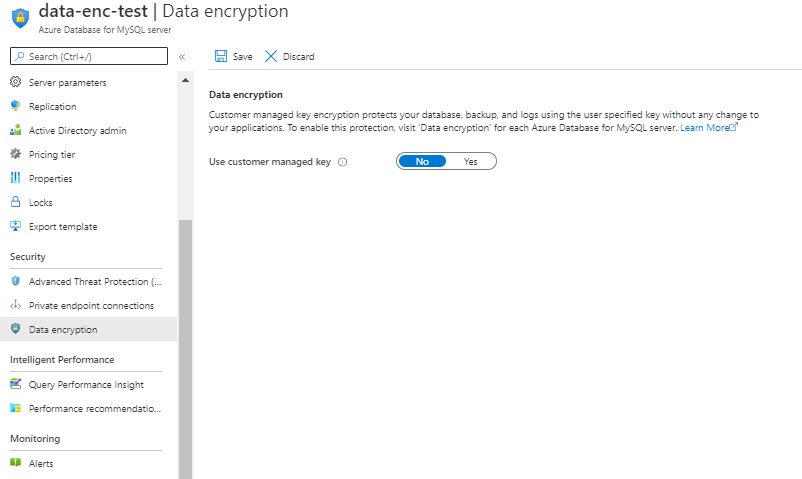
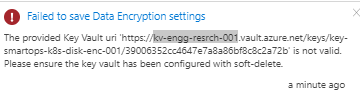
PFB screenshot after configuring CMK for enabling Data Encryption.
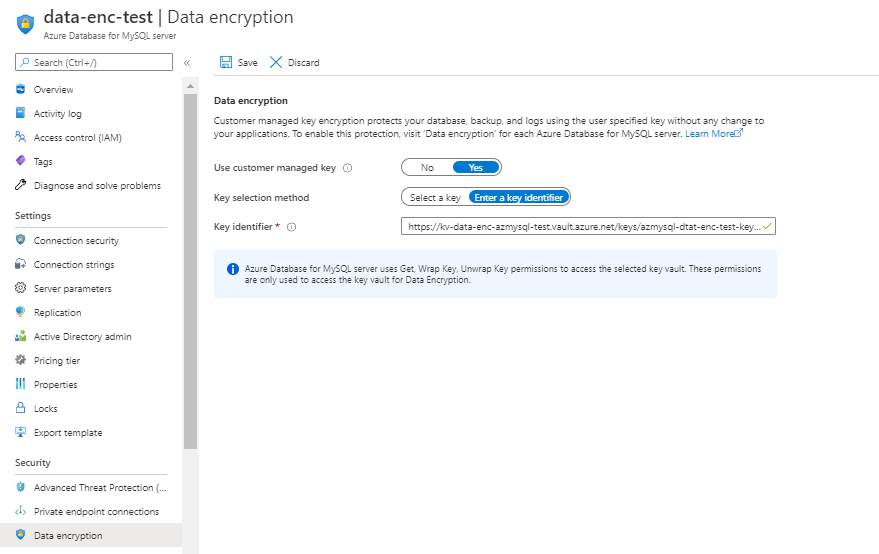
Data Encryption of Azure Storage account using Customer Managed Key
Steps
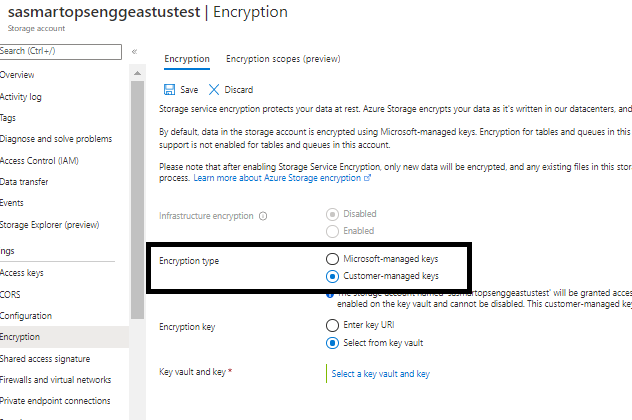
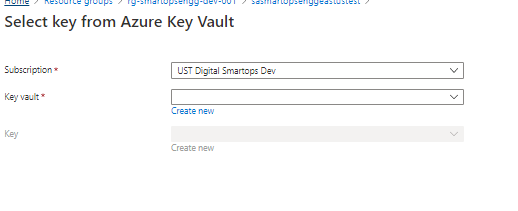
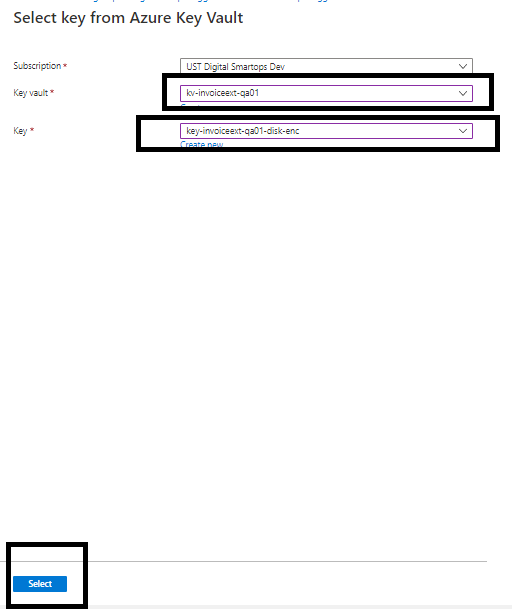
Select the key vault and key by clicking ‘Select a key vault and key’
Secondary download location: Azure Artifacts
- Navigate to https://dev.azure.com/USTInnovationEngineering/SmartOps/_packaging?_a=feed&feed=Smartops_Releases
- Click on the required package.
- Click on Versions

- Click on the options button (…) and select ‘Copy Install Command’. The download command will get copied to clipboard

- Login to VM where you want to extract the package and execute the command.
Please Note: If its first time you will be prompted to install azure-devops extension. Give ‘Y’ and hit enter to continue.
List of containers for which autoscaling is enabled
|
Container name
|
CPU Threshold
|
min replicas
|
max replicas
|
|
du-core-nlp
|
80%
|
2
|
4
|
|
du-pipeline
|
80%
|
2
|
4
|
|
du-rest
|
80%
|
2
|
4
|
|
du-scheduler
|
80%
|
2
|
4
|
|
du-tikaserver
|
80%
|
2
|
4
|
|
clones-engine
|
80%
|
2
|
4
|
How to monitor Kubernetes deployments using K9s
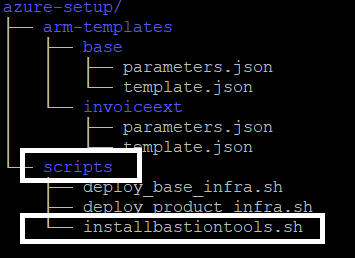
K9s is installed when the installbastiontools.sh script is executed. Please refer
Staying in home directory execute below command to open K9s
K9s/k9s
Or
cd k9s
./k9s

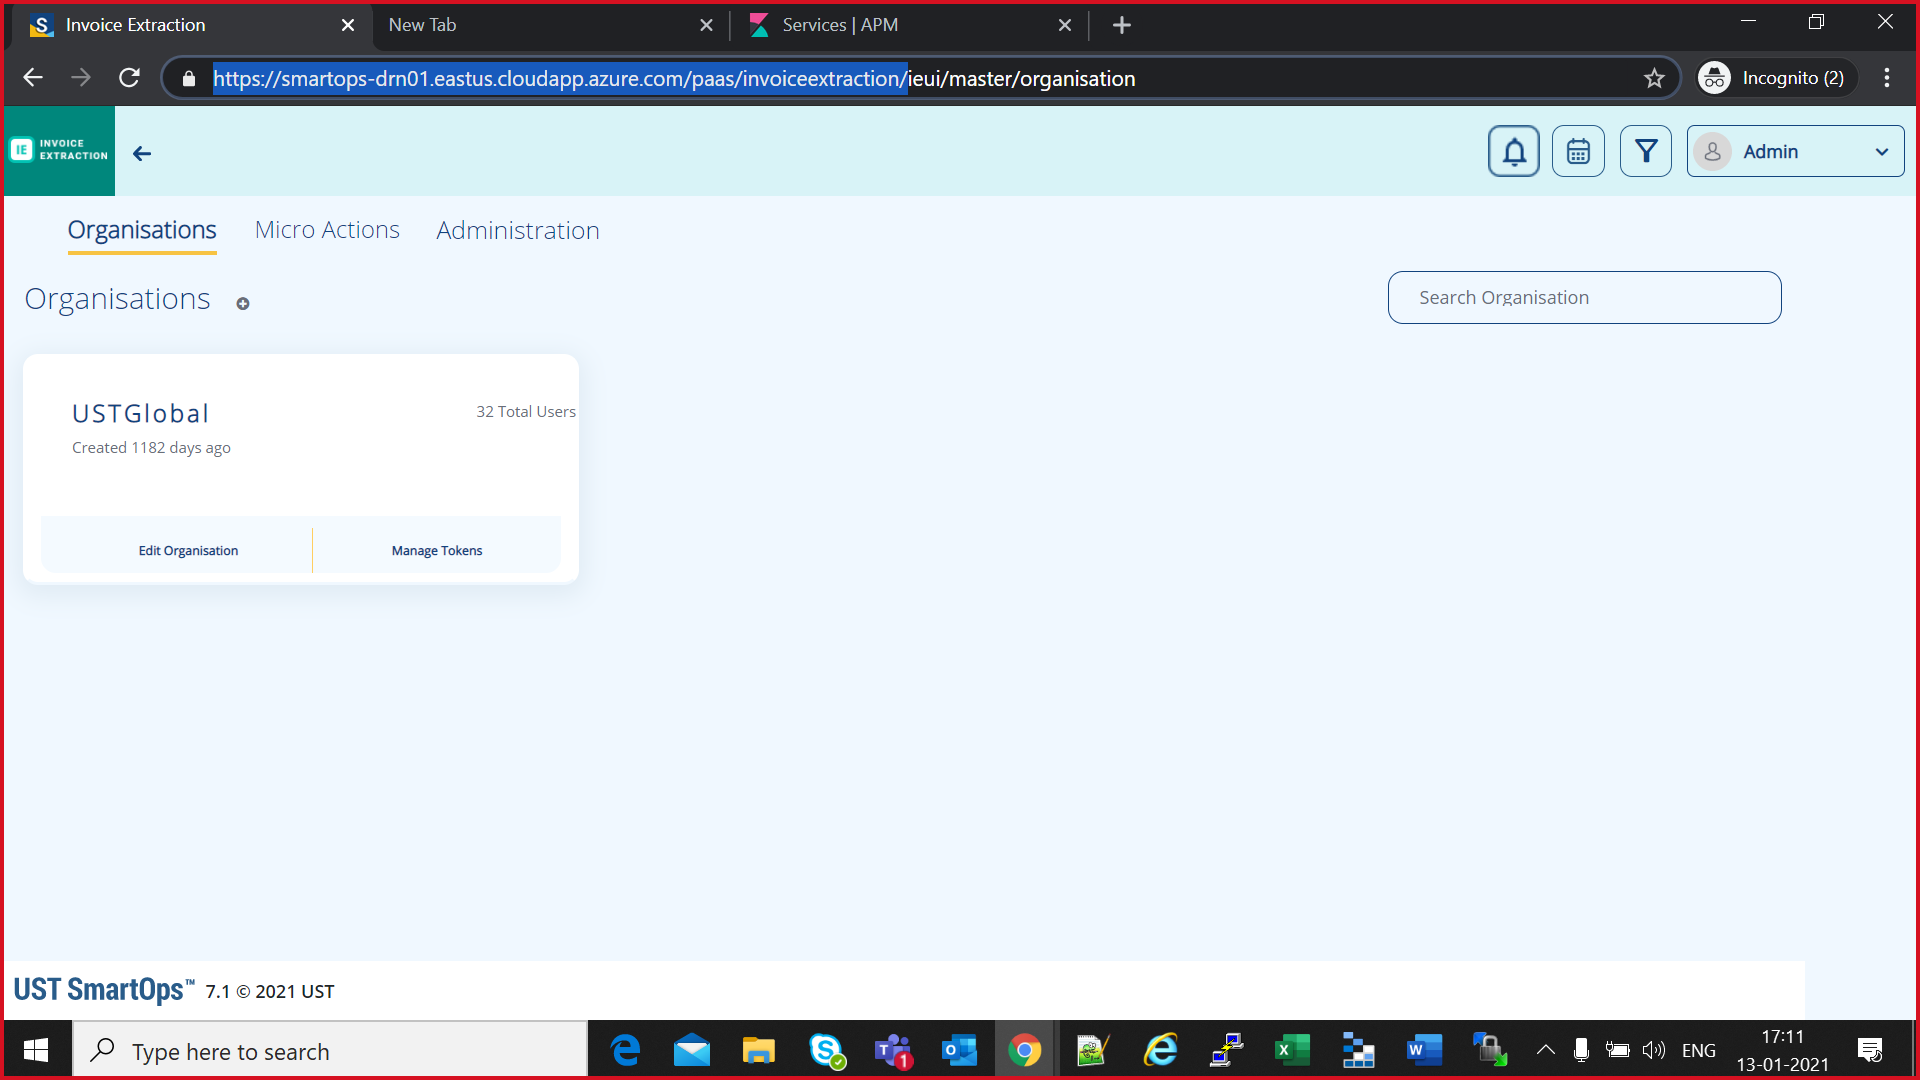
Generating Offline Token
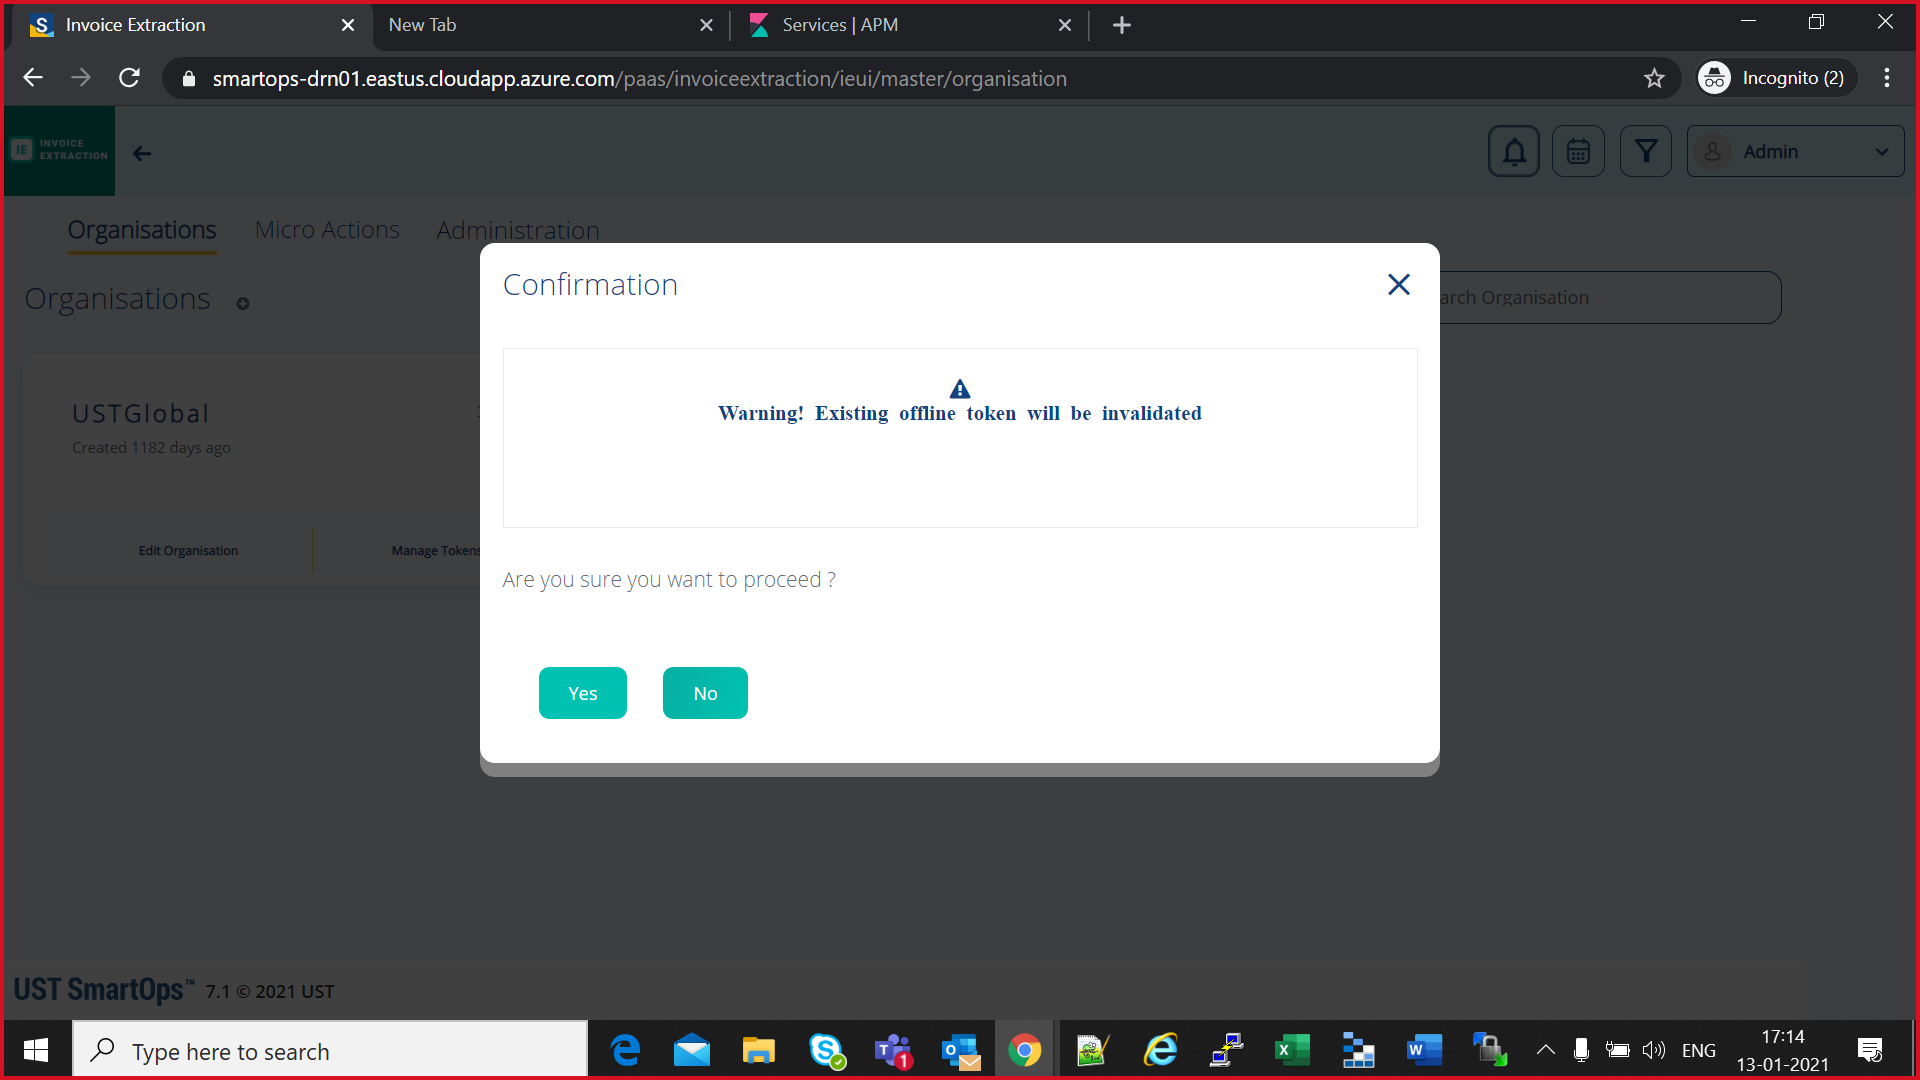
- Login to keycloak master URL to generate offline token
https://<dns-name>/paas/invoiceextraction/ieui/smartops/master/
- Revoke existing offline Token
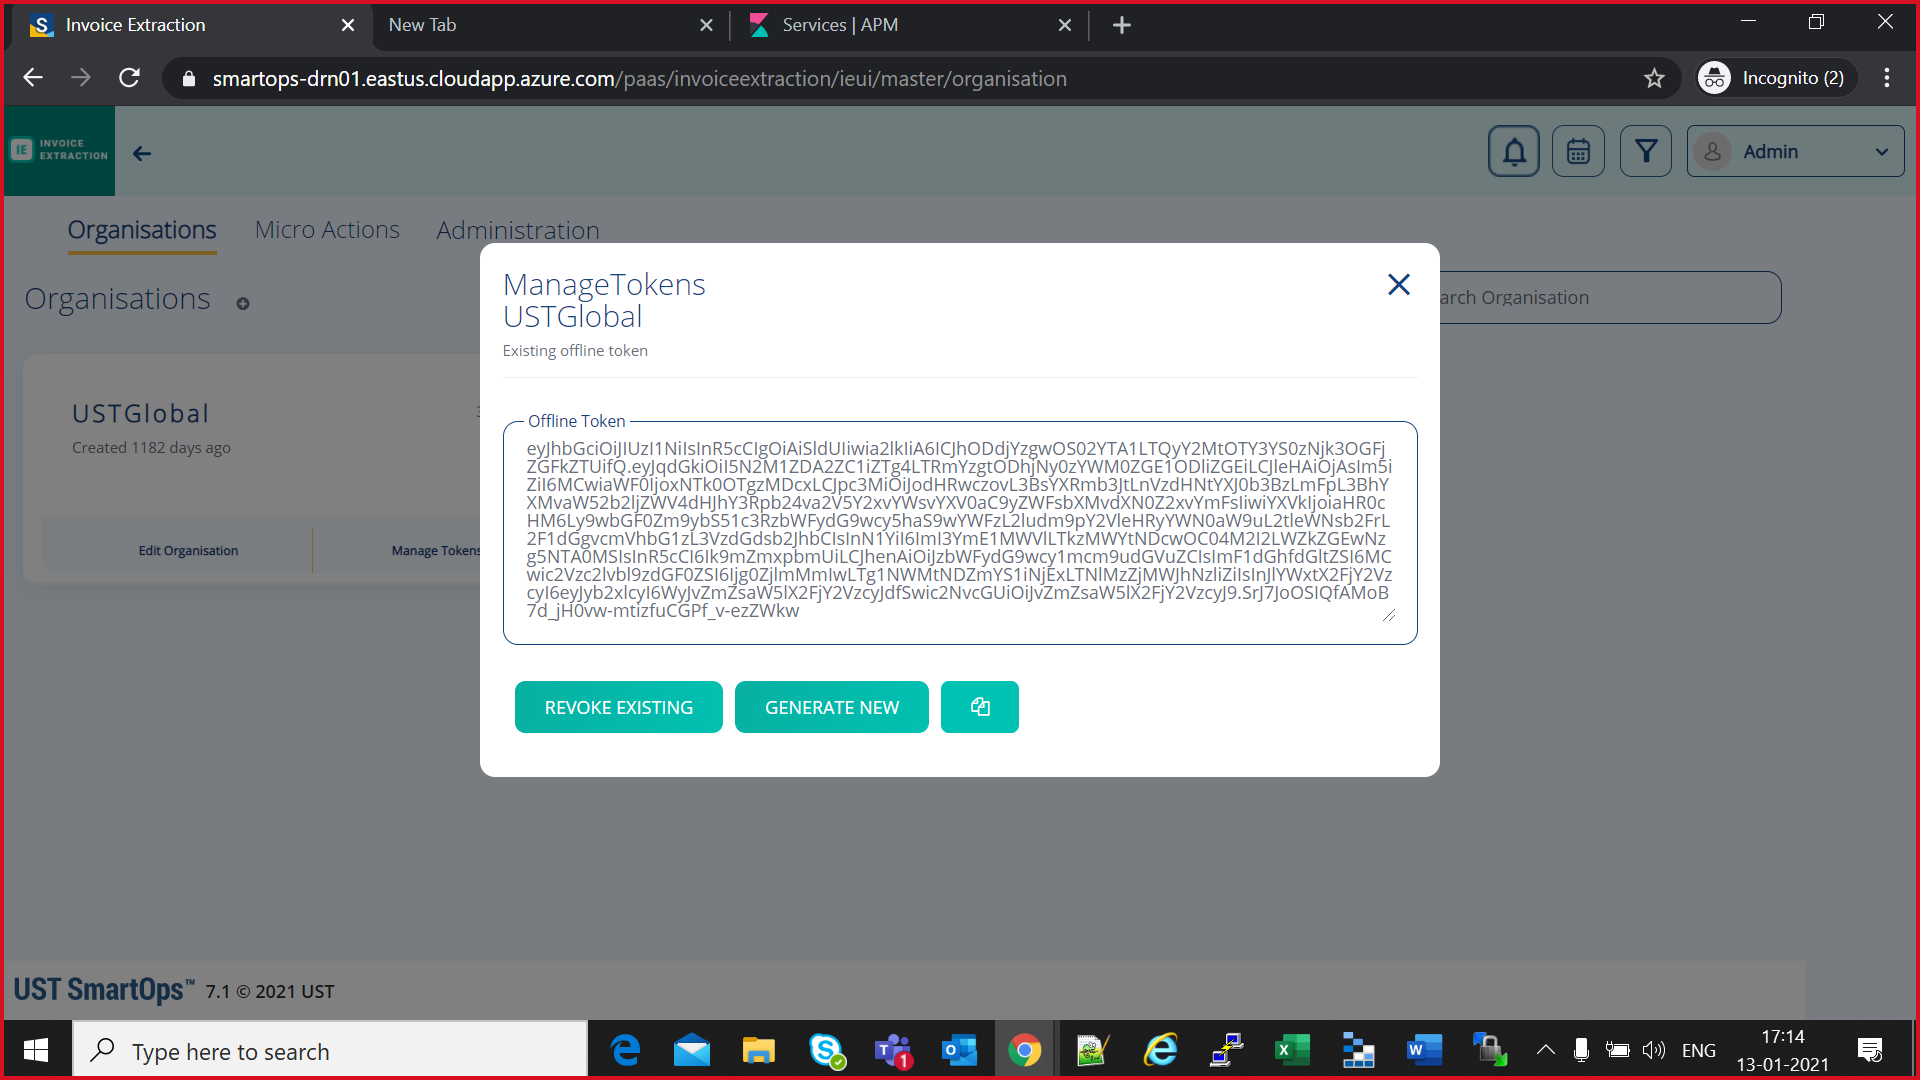
- Confirm revoke process of existing offline token by clicking “Yes”
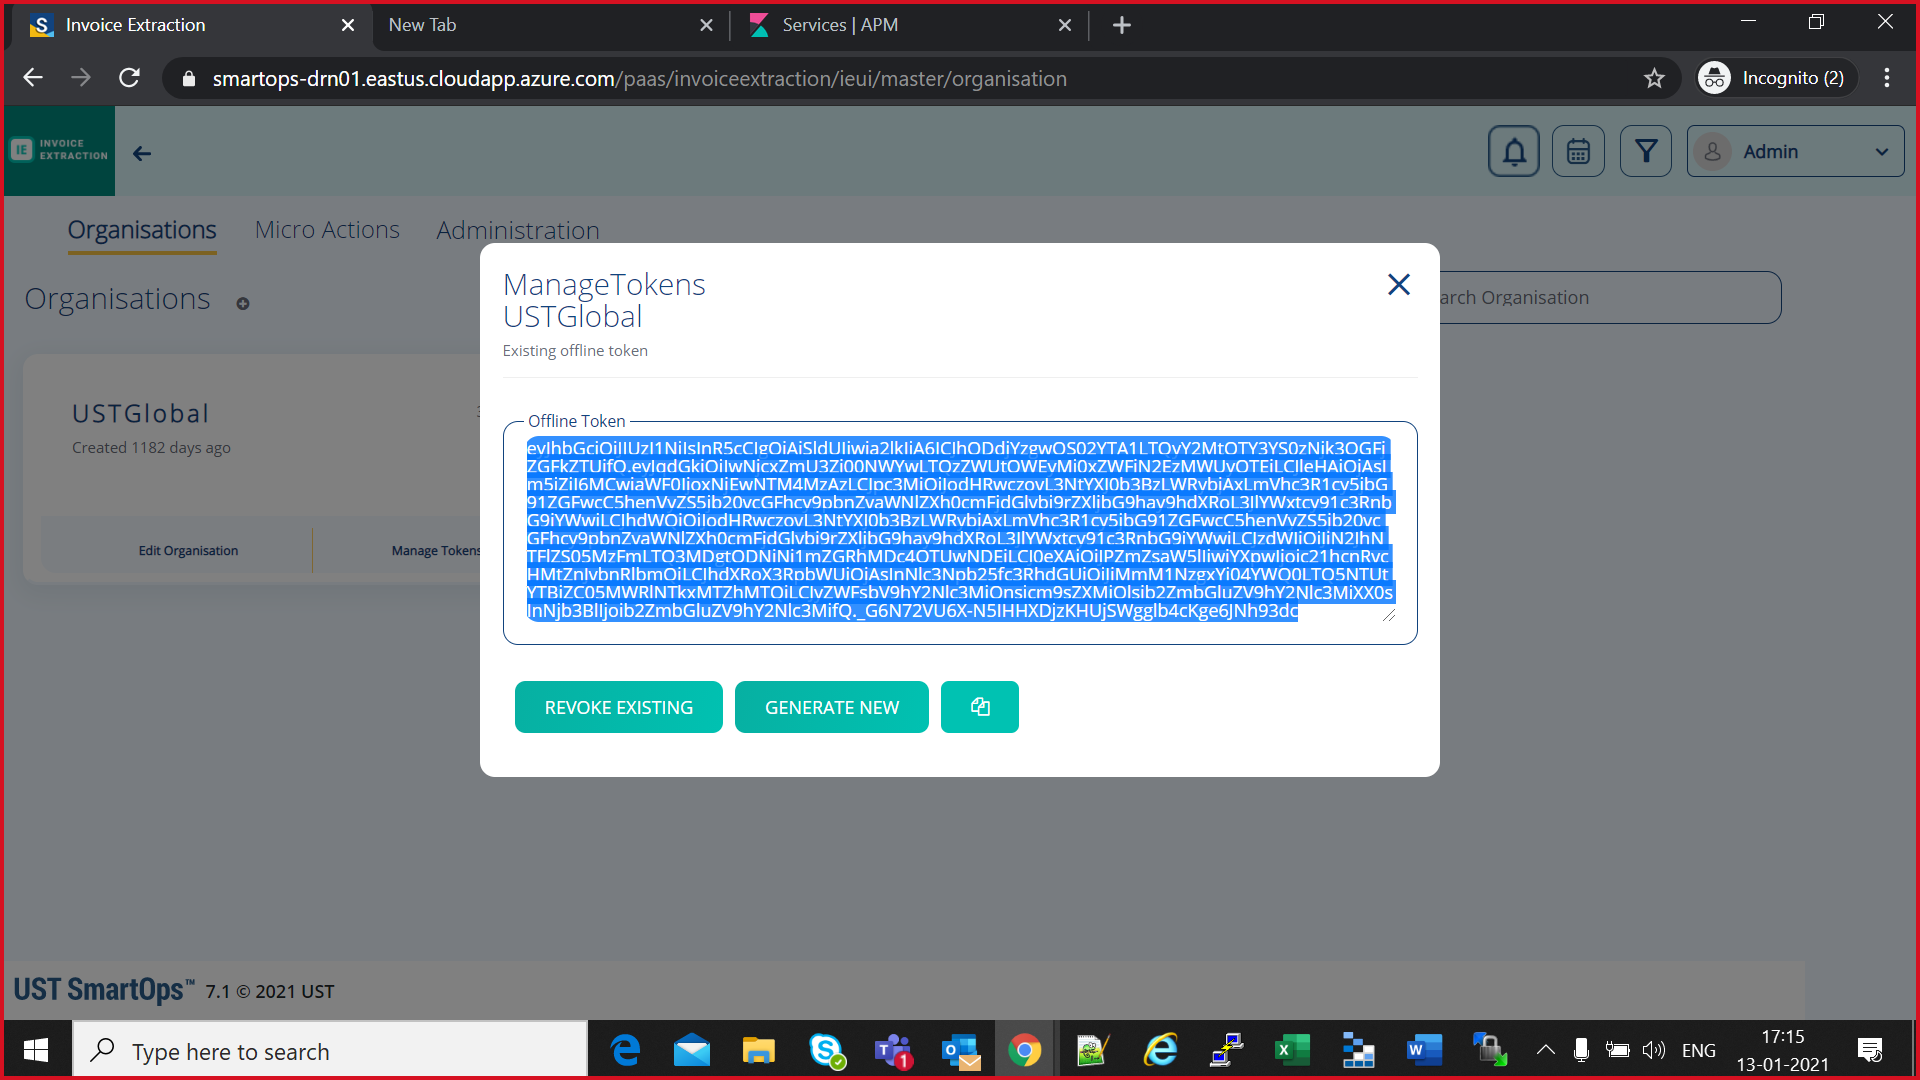
- Click on “generate New offline Token” button

- Confirm on generate new offline Token

- Newly generated offline token will be available
-
Copy the offline token
-
Login to bastion VM
-
Do az login to with a user who has edit access for Secrets in Keyvault.
-
Execute below command to update the offlline token in Keyvault from bastionVM.
az keyvault secret set --subscription <subscription-id> --vault-name <keyvault-name> --name <product-name>-<env-name>-offline-token --value "offline-token-value" -e base64
eg:
az keyvault secret set --subscription cdf5c496-95b3-4219-9117-35d4e0746d13 --vault-name kv-invoiceext-drn01 --name invoiceextv1-drn01-offline-token --value "eyJhbGciOiJIUzI1NiIsInR5cCIgOiAiSldUIiwia2lkIiA6ICJhODdjYzgwOS02YTA1LTQyY2MtOTY3YS0zNjk3OGFjZGFkZTUifQ.eyJqdGkiOiIwNjcxZmU3Zi00NWYwLTQzZWUtOWEyMi0xZWFiN2EzMWUyOTEiLCJleHAiOjAsIm5iZiI6MCwiaWF0IjoxNjEwNTM4MzAzLCJpc3MiOiJodHRwczovL3NtYXJ0b3BzLWRybjAxLmVhc3R1cy5jbG91ZGFwcC5henVyZS5jb20vcGFhcy9pbnZvaWNlZXh0cmFjdGlvbi9rZXljbG9hay9hdXRoL3JlYWxtcy91c3RnbG9iYWwiLCJhdWQiOiJodHRwczovL3NtYXJ0b3BzLWRybjAxLmVhc3R1cy5jbG91ZGFwcC5henVyZS5jb20vcGFhcy9pbnZvaWNlZXh0cmFjdGlvbi9rZXljbG9hay9hdXRoL3JlYWxtcy91c3RnbG9iYWwiLCJzdWIiOiJiN2JhNTFlZS05MzFmLTQ3MDgtODNiNi1mZGRhMDc4OTUwNDEiLCJ0eXAiOiJPZmZsaW5lIiwiYXpwIjoic21hcnRvcHMtZnJvbnRlbmQiLCJhdXRoX3RpbWUiOjAsInNlc3Npb25fc3RhdGUiOiJiMmM1NzgxYi04YWQ0LTQ5NTUtYTBiZC05MWRlNTkxMTZhMTQiLCJyZWFsbV9hY2Nlc3MiOnsicm9sZXMiOlsib2ZmbGluZV9hY2Nlc3MiXX0sInNjb3BlIjoib2ZmbGluZV9hY2Nlc3MifQ._G6N72VU6X-N5IHHXDjzKHUjSWgglb4cKge6JNh93dc" -e base64
-
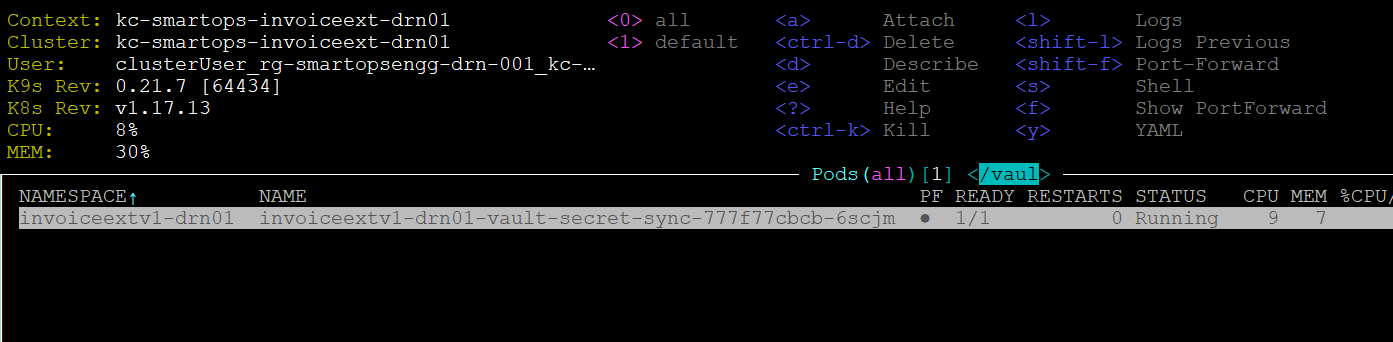
Open k9s/k9s
-
Recreate “vault-secret-sync” pod to get the updated offline token secret. Click on “Cntrl+d“ to recreate the pod
-
Following list of containers needs restart after offline token Updation
|
Container name
|
|
pwf-invoice-extraction-api
|
|
pwf-invoice-extraction-listener
|
|
pwf-invoice-extraction-listener-du
|
|
pwf-invoice-extraction-scheduler
|
|
du-pipeline
|
-
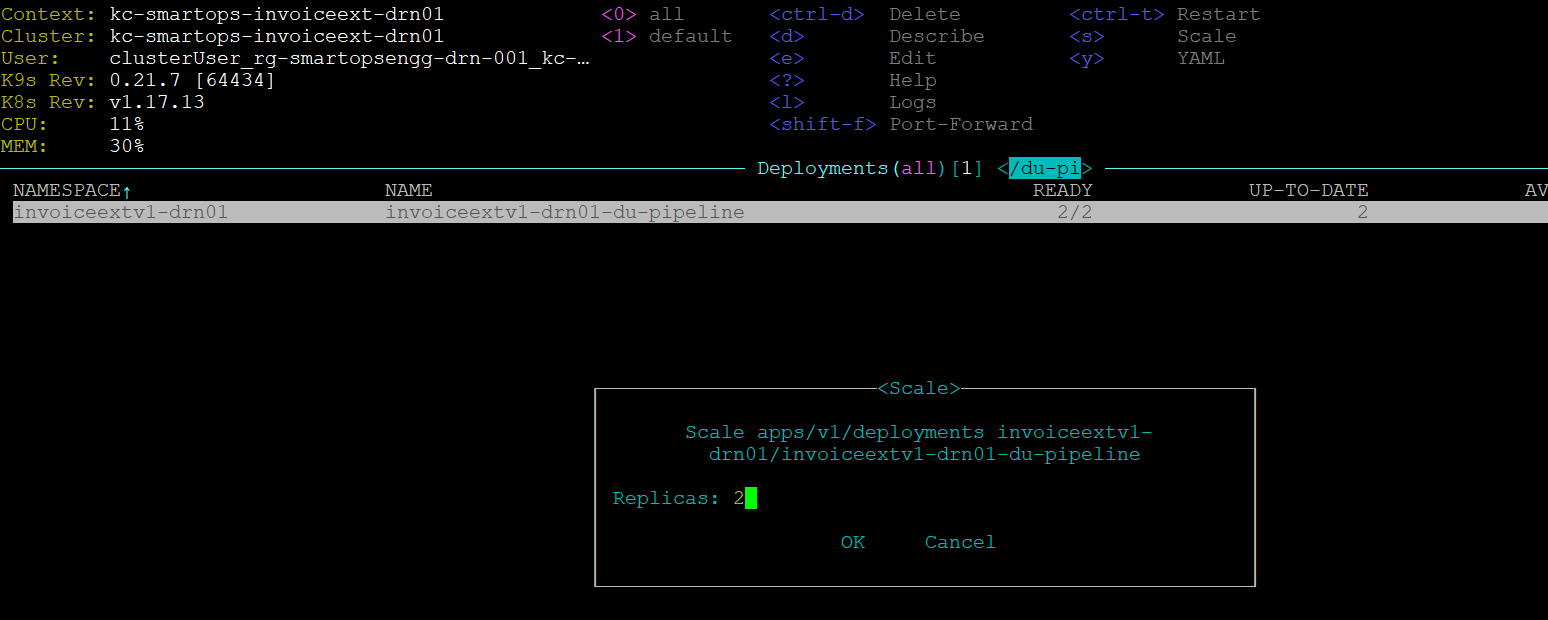
IN K9s/Deployments, select the respective deployments and scale down replicas to “0”

-
Wait for a minute and set back replica count to 2 again. The existing pods will be removed, and new pods will be created
-
Execute this step for all deployments in the list mentioned above
Maintenance URLS
Following set of URLs are used for maintenance purpose of application. Credentials for the maintenance URL is updated in below table.
Note: Maintenance URL access will be blocked from internet for production environments. Restriction rules are handled in WAF rules
Access to maintenance URLS are allowed from Windows bastion VM only.
Refer document for accessing production windows bastion VM
Eg:http://<ip_of_kub_internal_lb>/paas/<product>/kibana/
|
|
URL
|
UserName
|
Password
|
|
PHPMyAdmin
|
http://< ip_of_kub_internal_lb >/paas/invoiceextraction/phpmyadmin/
|
smartops-dev@<db_name>
eg: smartops-dev@invoiceext-drn01
|
EAHlmFoxa1ZpJbXC
|
|
Mongo Express
|
http://<ip_of_kub_internal_lb >/paas/invoiceextraction/mongoexpress/
|
mongoex
|
sm@rt0ps_mon_ex
|
|
Kibana URL
|
http://< ip_of_kub_internal_lb >/paas/invoiceextraction/kibana/
|
smartops
|
7PQgHBVsbarM7TVc
|
|
Grafana URL
|
http://< ip_of_kub_internal_lb>paas/invoiceextraction/grafana/
|
smartopsdev@ustglobal.com
|
7X03P7vQ064fp0d
|
AD Integration Steps
Refer following Documentation for AD integration
AD Integration Document
*Contact SmartOps Support team< smartops-support-team@ust.com
> for credentials to access online documentation
Known Issues
|
Issues
|
Remarks
|
|
smartops-secrets stack failure
|
Secrets not correctly updated in Azure Key Vault or smartops-secrets chart
|
|
401 error while Offline Token generation
|
1.Getting 401 error while opening keycloak admin screen for offiline token generation
2. This error could be occurring due to a corrupted or invalid certificate. Upload a valid certificate in Application gateway to resolve this error.
|
|
Restore failures
|
1.All databases should be deployed and running in healthy state
2. Databases secrets are correctly set in Azure key vault and the deployments can derive those values in the cluster
3. Env json storage account and file names should be updated correctly.
4. Connectivity issues to be mitigated with Storage account and Azure key vault
|
Post Deployment Activity from Deployment perspective
As we have changed the artifacts reference from Archiva to jFrog-Artifactory, it is expected to uninstall 2 stacks deployed for smartops-archiva
|
helm uninstall invoiceextv1-stg01-smartops-archiva-rel --kube-context kc-smartops-invoiceext-stg01 -n invoiceextv1-stg01
helm uninstall invoiceextv1-stg01-smartops-archiva2-rel --kube-context kc-smartops-invoiceext-stg01 -n invoiceextv1-stg01
|
FAQ
-
When existing working offline token got invalidated after keycloak restartWhen existing working offline token got invalidated after keycloak restart
1. Login to SmartOps Master Admin UI, Revoke the offline tokens generated for all the organizations.
2. Navigate to Keycloak Administration console, do the below step(3) for all organizations except master.
3. Go to Users tab,
select sense_master user, go to Consents tab, check if there are any Offline Token entries, if yes, then click on Revoke button. 
4. Uninstall keycloak services in K8.
5. Clear invalid offline token entries from DB, if any. Execute the below SQL scripts in MySQL.
TRUNCATE table keycloak.offline_client_session;
TRUNCATE table keycloak.offline_user_session;
6. Install keycloak services in K8.
7. Login to SmartOps Master Admin UI, Generate new offline token for all the organizations
8. Update keyvault with new token generated for USTGlobal
9. Restart secret vault sync
pod to reflect the new value
10. Confirm that pods are using new offline token.