SmartVision 2.7 - Deployment Process
The documentation consists of deployment process for SV Product Phase 1 with Release-2.7 & Migration From Smartinstall to Smartpkg.
Contents
Overview
SmartOps product deployment configuration has been revised to support better flexibility and configuration. Products will be packaged in new format referred as “Smart package” and will be deployable using tool “smartpkg”. This document covers instructions to migrate existing environment configuration to new format and installation of SV Product Phase 1 with 2.7 using new mechanism. Same set of instructions can be followed hereafter except the migration steps, which applies only for first time.
SV Product Requirements:
-
Download product env file from share point
-
Upgrade smartpkg library.
-
New secrets key. Following is list of secrets as per release.
SV_2.7_Secrets.zip (Password to access the file will be shared seperately).
Prerequisite steps
-
Verify and validate the smartpkg library. Update the smartpkg version to a latest version if needed.
-
Check the DB backup from storage account. Trigger the cronjob to get the latest backup - if needed.
-
Sealed Secret Controller Installation
-
Backup and generate sealed secret from the existing secret.
-
Take a backup for all the helm manifests
-
Delete helm releases
Pre-Deployment Activity
-
Validate and upgrade smartpkg package version.
-
Login to the VM Server
-
Validate if the smartpkg has installed and if they use the latest version. Run command below.
$ python3 -m pip list | grep smartpkg Note: Proceed step #c if smartpkg version is not latest version.
-
Uninstall the smartpkg library. Run command below.
$ python3 -m pip uninstall smartpkg==<old_version> -
Install the smartpkg library with the latest version.
$ python3 -m pip install smartpkg==<latest_version> -
i https://<azure_token>@pkgs.dev.azure.com/USTInnovationEngineering/SmartOps/_packaging/python-lib/pypi/simple -- -
Verify the installation by => smartpkg --help
Note: If smartpkg: command not found error shows up, logout and login or open a new session.
-
-
Check the DB backup from storage account. Trigger the cronjob to get the latest backup - if needed.
-
Sealed Secret Controller Installation
-
Add the smartops-helm-virtual Helm repository to your Helm client.
helm repo add smartops-helm-virtual https://ustsmartops.jfrog.io/artifactory/smartops-helm-virtual --username <jfrog-username> --password <jfrog-password>
Update the repository
helm repo update
Create namespace.
kubectl create ns sealed-secrets-controller --context <kubecontext_name>
Install the chart with the release name sealed-secrets-controller.
helm upgrade --install -n sealed-secrets-controller sealed-secrets-controller-rel smartops-helm-virtual/sealed-secret-controller --version 0.0.0 --set global.namespace=sealed-secrets-controller --kube-context <kubecontext_name>
Validate and find the name of the pods using this command.
kubectl get pods -n sealed-secrets-controller --context <kubecontext_name>
-
Backup and generate sealed secret from the existing secret.
-
Go to the product directory folder.
$ cd smart-deploy/<product_folder>/sealed-secret -
Get a copy of the existing sealed secret and save to a file.
-
$ kubectl get secret <namespace>-secret -n <namespace> --context <kubecontext_name> -o yaml > <namespace>-secret.yaml
-
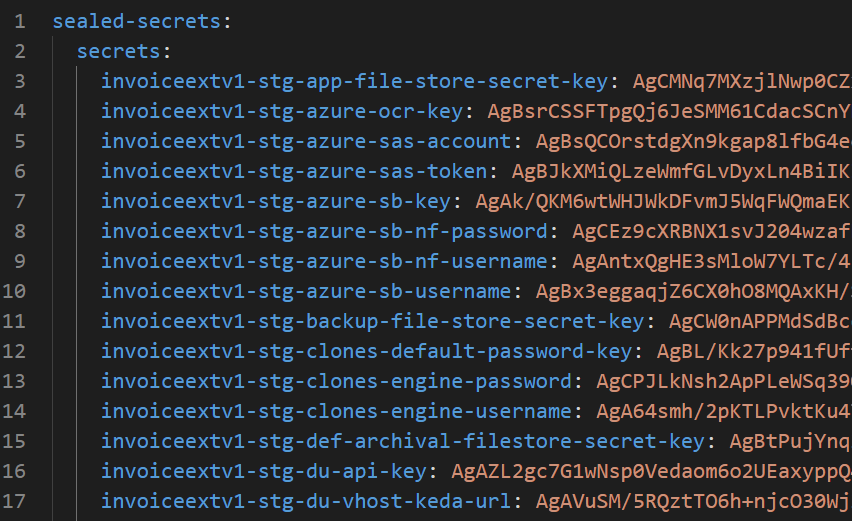
Edit the file and insert the new secret key.
Seal the secrets using kubeseal command. -
$ kubeseal --controller-namespace=sealed-secrets-controller --controller-name=sealed-secrets-controller --context <kubecontext_name> --format=yaml < <namespace>-secret.yaml > <namespace>-sealed-secret.yaml
Note: Please make sure to include extra secrets added for each Release in env_secret.yaml file before it is sealed using kubeseal command. -
Create a file “env_secrets.yaml” and Copy/Paste the generated sealed-secrets to the external configuration file in env_secrets.yaml.
Here is how it looks an example:
-
-
Take a backup for all the helm manifests
-
Go to directory folder and create backup folder.
cd smart-deploy/smart-vision && mkdir backup && cd backup
-
Fetch the manifest of all the helm releases using below script (Please substitute namespace and kube-context wherever required)
vi manifest.sh
#!/bin/bash
helm ls -n <namespace> --kube-context <kubecontext_name> | cut -d' ' -f1 > releases.txt
mkdir aiops-backup
while read line; do helm get manifest $line -n <namespace> --kube-context <kubecontext_name> > "backup/$line.yaml"; done < releases-sv.txt
-
Provide execution permission and execute manifest.
chmod +x manifest.sh
bash manifest.sh
-
Fetch manifest for logmon which is in different namespace
helm get manifest smartops-logmon-logmon-rel -n smartops-logmon --kube-context <kubecontext_name> > backup/smartops-logmon.yaml
-
-
Delete helm releases
Note: Please make you’ve backup the sealed secrets.-
Execute the script to uninstall all the releases from releases.txt file
delete_release.sh
#!/bin/bash
while read line; do helm uninstall $line -n <namespace> --kube-context=<kubecontext_name>; done < releases.txt
-
Provide execution permission and execute delete_release.sh
$ chmod +x delete_release.sh
$ bash delete_release.sh -
Uninstall all the remaining releases
$ helm uninstall smartops-logmon-logmon-rel -n smartops-logmon --kube-context <kubecontext_name>
$ helm uninstall sealed-secrets-controller-rel -n sealed-secrets-controller --kube-context <kubecontext_name>
$ helm uninstall smartops-common-secret-setup-rel -n smartops-common --kube-context <kubecontext_name>
$ helm uninstall smartops-common-gpu-setup-rel -n smartops-common --kube-context <kubecontext_name>
-
Application deployment steps
-
Go to the directory folder.
$ cd smart-deploy/<product_name> -
Upload the compress file in the Bastion server. Please find the file at email attachment.
$ tar -xzvf <product_name>.tar.gz -
Copy the “env_secrets.yaml” file and place the file to values folder
Example folder structure.$ cp ~/smart-deploy/<product_folder>/sealed-secret values/env_secrets.yaml

-
Run the smartpkg deploy command from the path where values folder and product.yaml file are present.
$ smartpkg clean,deploy --kubeContext <kubecontext_name> --jfrogUser ${JFROG_USERNAME} - Validate if all pods are running.